
Do you have trim that you want to paint?
Painting trim is particularly daunting. For me, I have always felt overwhelmed at the thought of having to paint so precisely in such a small area.
When I moved into my 70’s ranch, the trim looked great. There were no marks and the paint look fresh and new. I was so excited – one thing I didn’t have to do!
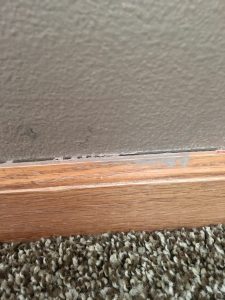
After a few days though, I noticed that the paint was peeling off anywhere that it was bumped. With moving boxes and furniture into the house, and the constant banging of little ones, this was occurring a lot. Then, I noticed that the paint on one of the doors was bubbling up. Curious, I pulled at it, and pulled a huge piece of latex paint off of the door. It just peeled right off.
At this point, I was pretty sure what the problem was. When the sellers had painted the trim, latex paint was used over the old oil based paint. If you are not familiar with the particulars of oil based paint, I’ll fill you in. You cannot paint latex over oil. It won’t adhere, and this was exactly the problem that I was having. I let it go for a while, but noticed that it got way worse after we put in new carpet. The tools that are used to tack the carpet down on the edges did a lot of damage on the paint, peeling it off of the trim all over the place.
One day, I happened upon a guy who was painting my neighbor’s house. I asked him about my situation, and he mentioned a product called Rust Scat by Coronado. It is a latex based product but it has very good adherence to different surfaces. Determined to fix my problem, I purchased a can of Rust Scat in my preferred trim color (SW Pure White) and nervously began to paint the trim.
This post may contain affiliate links. If you have any questions, please see my disclaimer page.
It was not as hard as I thought it would be!
I went very slowly, and did it freehand (meaning that I did not tape the areas that I did not want painted). I have a pretty steady hand, from painting LOTS of walls, so I felt comfortable trying it.
I learned a few things along the way, and since I am currently painting the trim in my new house, I thought I’d fill you in.
How to Paint Trim
Choose your paint.
Have you picked a color? There are a bunch of great whites. I talked to the Sherwin William’s guy the other day, and he said that the top trim paints that they sell are Alabaster and Extra White.
Make sure that you use trim paint. I used RustCat in my old house due to the oil based paint, but in my current house, I used ProClassic paint. It is an enamel, meaning it has some self-leveling properties and it is a little thicker than wall paint. It is just a better product for trim painting. But, it is expensive. It runs about $75 for a can full priced, so wait for a sale!
Wash the trim.
Use a non-sudsing cleanser and follow the directions. Some you have to wipe or rinse with clean water after you wash the trim with the cleaner, some you do not. I use Spic and Span because I like how it smells, and I don’t have to rinse it if I dilute it (who has time for rinsing?). Do this step first to ensure that you get all of the grime off your trim.
Sand the trim.
Use a medium grit sandpaper. I used 150 grit sandpaper when I did my current trim. If you’re like me, and you have no time or energy for extra work, play around with this to see how much you have to sand. I did a light sand on a section and then painted it to see if the paint would adhere. It did! I scraped my nail on it as hard as I could and it didn’t come off. Success! And minimal sanding was required! If you are not as lucky and your paint scrapes off, sand a little more and try your test again.
Wipe off the dust.
Once your sanding is complete, wipe the trim down again with a rag. I typically use my rag with Spic and Span on it, but it can just be a wet rag too. This will get all the dust off.
Now I know what you’re thinking. Why did I have to wash the woodwork first if I was just going to sand it and put all that dust on it? Well, the reason is this. If you hadn’t wiped the grime off before sanding, the sanding would have pushed all of that grime into the woodwork. When you painted the trim then, you may have ended up with places where the paint wouldn’t stick due to grease or grime preventing it from adhering.
Anyways, back to it.
Vacuum the edge of the floor where it meets the trim.
Is this step really essential? No. But you will regret it if you do not do this. I almost always skip this step, and regret it. Any little hair or speck of dust and dirt is going to stick to your paintbrush when you go to paint the very bottom of the trim piece. So just vacuum it up before you start and save yourself the headache of picking tiny pieces of crud off your wet trim and paintbrush.
A note about your edges…
If you have a steady hand, just go for it!
If you do not, tape the edges of the floor and the edges of the wall. If you are going to be painting the wall too, don’t worry about taping it. Luckily, when I painted this room, I knew that I would also be painting the room and that the white pain would act as a primer over that dark brown paint. So I did not have to be at all careful with my top edge.
If you do use tape, make sure you check under the tape to ensure that the paint is not bleeding in between the wall or floor and the trim. I have not had good luck with taping, which is why I just do without.

Start to paint.
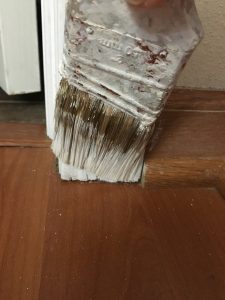
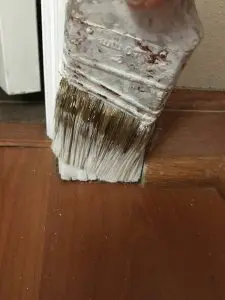
Use an angled brush (I like Wooster brushes), and dip the edge into the paint. Hold the paintbrush on an angle and start to put the paint on the trim. When the top of the piece is painted, I flip the brush upside down so that the long angled bristles are on the bottom.
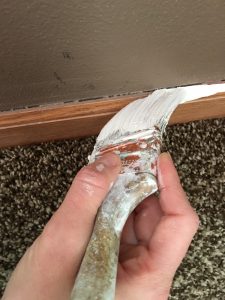

With trim, I find that a lot of times I am pushing with the brush instead of pulling with it. This ensures that I get the paint right where I want it, instead of all over the wall or floor. For example, when I paint the bottom of a door jamb, I push the brush down with lots of little pushes while the brush is pressed firmly against the trim to get the paint right to the floor. Once the one side of the door jamb is painted, I flip the brush again so the long angled bristles are on the other side and do it again.
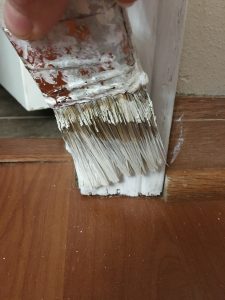
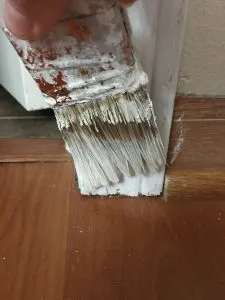
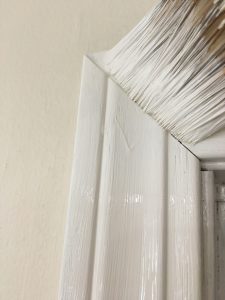
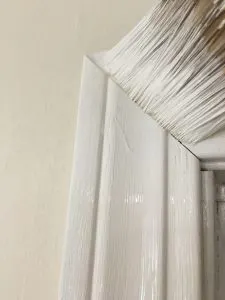
On the corners, put some paint on the trim however you can get it on, but make sure that you pay attention to the way the trim is facing when you smooth it out. Put the angle of the brush right on the angle line of the trim, and drag it in the direction of the wood. This will ensure your edges are crisp and not “muddy” when you are finished, with paint brush lines going in various directions.
If you get a little on the floor, don’t panic! If there is carpet, scrub it with a wet rag. It should come right off. If there is a hard floor, again, wipe it carefully with a rag. But do this quickly so the paint does not begin to dry.
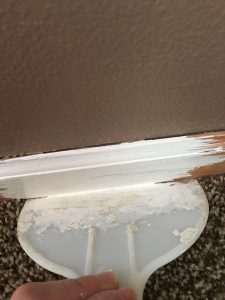
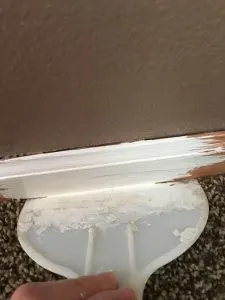
As a little tip, I found that I was able to take a wide plastic putty knife and get it right under the trim. This held my carpet fibers down so I could paint the trim above. I just pulled it out and moved it down the line of trim, painting as I went. It actually went pretty fast!
While I thought this was my own genius idea, I later realized there is actually a tool for this! You can get different sizes of this paint trimming tool, I love this 20 inch long one, because it means I can paint a long line in one go!
On your first coat, make sure you do a thin coat. This will help the paint adhere to the trim better. The reason the spray paint adheres so well is because the coats are so thin. After my first coat, I do much thicker coats because so much of the paint soaks into the wood.
After the paint has dried, give it another coat. On my wood trim, I had to do 4 coats on the door frames and two coats on the bottom trim pieces. 4 coats!!! It was tedious, but looks amazing now!
A finishing step.
Do you have places where there is a gap between the wall and the trim, or between the trim and the quarter round? Take a tube of paintable caulk and squeeze a bead right on the gap. Then, wet your finger and run it along the bead to smooth it out. Now, your seams are flawless!
I like to do this step right before my last coat. A lot of times, you’ll see many more gaps before you paint, but the paint fills in a majority of them because it is so thick. By the second to last coat, you’ll be able to see where you will actually need to use caulk to fill the gap. I’ll post a picture on this to show you how good it looks with caulk soon!
Thats it!
Painting your trim is such an easy and cheap way to update your home. It takes some work and precision, but it is well worth it.
If you are still nervous, check out a few YouTube videos on how to paint trim. Practice makes perfect! Four years ago, I would have never attempted this. Necessity required it though, so I bit the bullet. You should too!
Wondering how the room turned out? Check it out!
Shelley
Wednesday 15th of April 2020
So this has been very helpful when picking a white. I have a question. I have a grey living room that the color goes down the hallway that faces the kitchen and wondered if I should keep the same gray all the way through or go a little lighter in kitchen?
Lauren
Thursday 16th of April 2020
Hi Shelley! Either is perfectly fine! I have found that in rooms that don't have a lot of natural light, it is better to go with a slightly lighter version of the paint color. So if your kitchen is dark, maybe a lighter gray would be nice. But if it is bright, then going with the same gray would be good. There is no wrong answer here!
Judith Susia
Tuesday 3rd of March 2020
A blade from a Venetian blind is a great masking tool that really speeds up edgework around ceilings, floors, and trim. You can just slide it along with you as you progress. No taping, cleaner edges.
Lauren
Tuesday 3rd of March 2020
Great tip Judith! Thanks!
Renee
Wednesday 21st of August 2019
I have a question that maybe you can answer.. I’m about to add 7ft. to one end of my house. Contractors mostly. I’ve never done such a project but I’m trying to step out of the comfort zone.. it’s nerve racking for sure. So at the same time we are putting hardwood throughout & painting the whole interior of the house. My Problem is ,while I love the neutral gets for most of the house. On the expansion of one bedroom & one office. I’m thinking I would like to use a more cool tone of grey with a darker trim in grey or black. Would that be wrong? How would you approach this? I’m looking for a sleeker/ more modern look In both rooms. Can you help me??? Appreciatively Renee
Lauren
Wednesday 21st of August 2019
Hi Renee! Great question! I just saw a picture on Pinterest of a room with gray trim and it was GORGEOUS. So first, I'll say that I definitely think you can mix the two looks. For the main part of the house, I would probably go with a soft neutral in the gray family (such as Agreeable Gray), instead of a tan colored neutral. I think that the undertones of a gray or greige are going to flow better with the modern look you're going for in the other rooms. This flow will make the addition feel more cohesive with the rest of the house, instead of like a totally different place. For the modern rooms, I think that you have a few great options for giving it a sleeker look. First, you could also stick with white trim and do the doors black. This alone gives a room a more edgy look, and would be an easier paint job if you ever get sick of the black doors. Or, you could do all the trim, windows included in black or gray. This is also a really nice look, and definitely more modern. If you do decide to go with black or gray trim, I think a light colored cool gray or white would be best for the walls. A middle or dark gray, paired with gray or black trim, is going to make the room feel really dark. If the rooms have A TON of natural light, you may be able to get away with a slightly darker paint color, but honestly, black trim on white (or almost white) walls is super in style right now. Plus, when you paint the trim black or gray, you want that to be what stands out, instead of the wall color. So I'd go with a very light wall color and let the trim be the focal point, instead of putting a true color on the wall and having the walls and trim compete for attention. A good "white" for this may be Eider White. It has just a touch of gray in it, so it isn't a pure white. I hope that the renovations go well for you! It can be super nerve racking to have work being done in your house, and to have to make all these technical and style decisions! I'm sure that you'll do a great job though. If you have trouble visualizing what things will look like, be sure to search Pinterest for specific things like, "gray walls black trim" and check out the pictures that come up. Hopefully, that'll give you an idea of how it will look and you will feel confident in making you decision. Good luck Renee!