
How To Refinish Wood Cabinets the Easy Way
Are you thinking about ways to refinish wood cabinets? You probably know that the “correct” way to refinish wood cabinets is to follow these steps: strip, sand, stain, poly. Sounds like (and is!) a lot of work.
So what are your options if you want to refinish wood cabinets, but don’t have the time or energy to do all that work?
This is the situation that I was in. I wanted to refinish wood cabinets in my kitchen, but didn’t want to live without a kitchen for weeks while I was waiting for the process to be completed. So I started researching ways to refinish wood cabinets that didn’t include all that time and effort. There were several options. My first idea was to paint them. I knew that this would removing the doors, sanding everything, priming everything, spraying the doors with paint sprayer, painting the bases with a brush, more sanding, more sanding, spraying and painting, and then putting everything back together. I didn’t want to go through all this if I didn’t have to. Plus, it was the dead of winter, and I couldn’t spray the doors outside for at least 2 more months.
My next option was to figure out how to stain them easily.
I stumbled upon a product called Minwax PolyShades. It claimed that it could go over stained wood furniture that has a polyurethane finish.
To test this, you can take a cotton ball and soak it in acetone nail polish remover. Then, put it on your stained furniture in an inconspicuous place. If the finish gets gummy, or the cotton ball sticks to the wood, then you cannot use PolyShades. But, if nothing happens, you can refinish wood cabinets using PolyShades.
Well, I tried it out, and to my delight, nothing happened! So, I headed out to purchase the color I wanted. We wanted a super dark color, so we settled on Tudor. Minwax also makes an Espresso color but we couldn’t find it at either of the two stores we tried.
Here is how we refinished our wood cabinets using PolyShades.
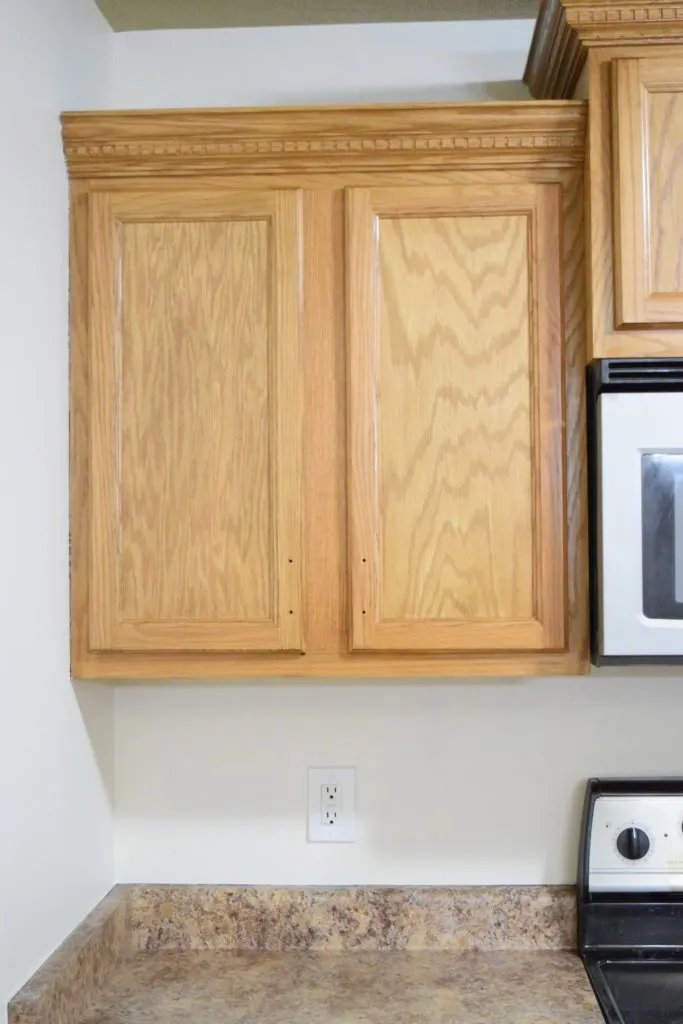
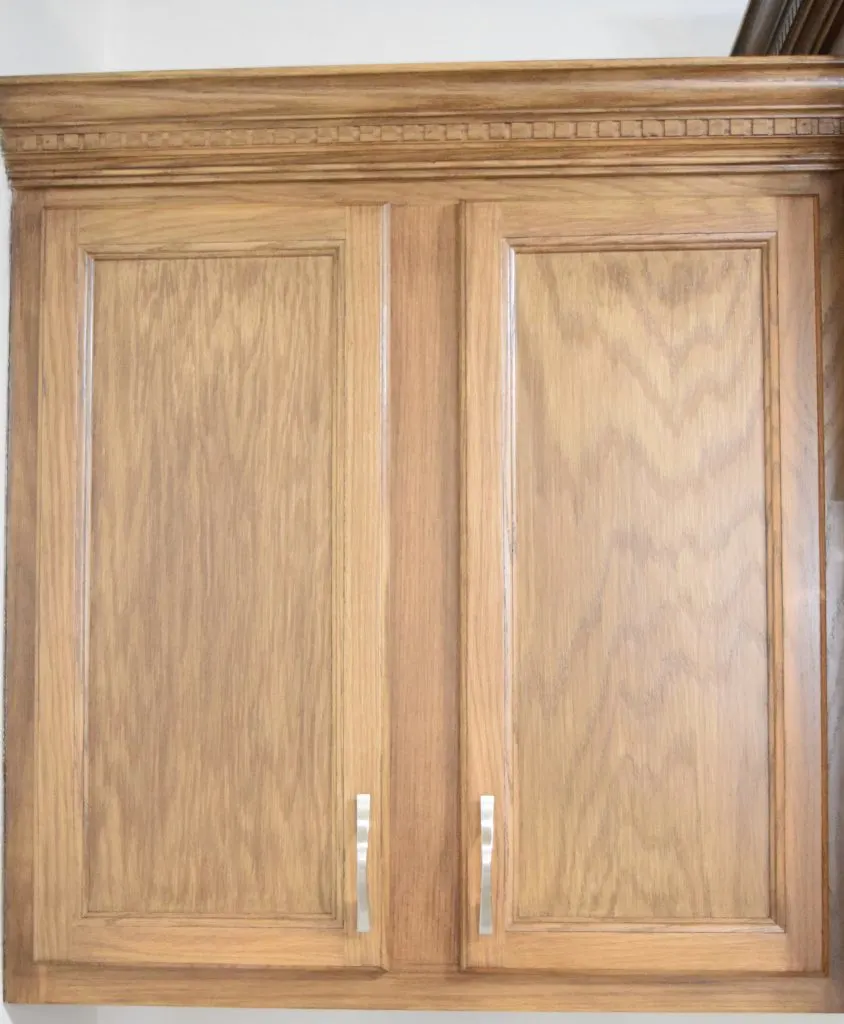
First, my before picture:


The cabinets were that really light oak wood that was popular in the 90’s or so. They were actually really pretty cabinets though, with nice decorative moulding on the top, so I knew they had potential.
This post may contain affiliate links. If you have any questions, please see my disclaimer page.
Materials List:
- Spic and Span (or other non-sudsing cleaner)
- Liquid Sander (optional – to remove heavy grease on surfaces)
- 220 grit sandpaper
- Minwax PolyShades
- Natural Bristle Brush (my favorite is this Purdy one)
- 0000 Grade Steel Wool
- Shopvac (or regular vacuum)
Directions:
Our first step was to wash the cabinets. We used Spic and Span because it is a non-sudsing cleanser that doesn’t need to be rinsed (if you dilute it with water). After scrubbing it really well, let it dry, and then started to sand it.
Thankfully, Minwax only recommends a light sand before applying the stain. Yes! So we used 220 grit sandpaper and sanded every surface. When we were doing this, we noticed that the ledges on the cabinets above the microwave were gummy from grease. Yuck. So we scrubbed those again REALLY WELL with the Spic and Span. A liquid sandpaper would have also worked, but we didn’t have one on hand.
After sanding all of the finished surfaces, we wiped it down again with a wet rag to remove all of the sanding dust. (In retrospect, we should have also vacuumed all of the crevices… live and learn I suppose.)
Time to Stain!
First, let me say, see how quick that prep work was!? This is the sort of DIY I love, because I always want instant gratification on my projects (and with 3 kids 4 and under, I don’t have an extra second to waste).
So anyways, on to staining.
I opened the stain and stirred it well with a paint stick. Then I used my Purdy natural bristle brush to apply it. Because it is a stain with a poly built in, it is a little bit thick and sticky. It is really important to keep a “wet edge,” which basically means to make sure you’re not dragging a dry brush across the surface. This will ensure that the stain goes on evenly. Also though, make sure you do not put this on too thick! You need to put on a very light coat, but make sure you keep a wet edge the whole time. It takes a bit of practice to get the right amount of stain on your brush.
I started by staining the door faces. I did the center part in long, even strokes from the top to the bottom. Then I went back and did them from the bottom to the top. The stain stays wet for a minute or two, but after that it will start to get gummy so make sure you don’t over work it. After the door face was done, I ran my brush down and across the decorative edges in a box. Then, I brushed the very outer part of the door frame.
At this point, take a look at what you’ve already done. Check for places where the stain is starting to drip. If you put it on too this, it will drip, and it may not show up right away. Remember to keep checking back! If you see a drip, run your brush across it.
Once the doors were done, I opened the doors up and did the cabinet boxes in the same way. Always brush in the same direction of the grain, and check back frequently for drips.
Then, I let it dry for 6 hours.
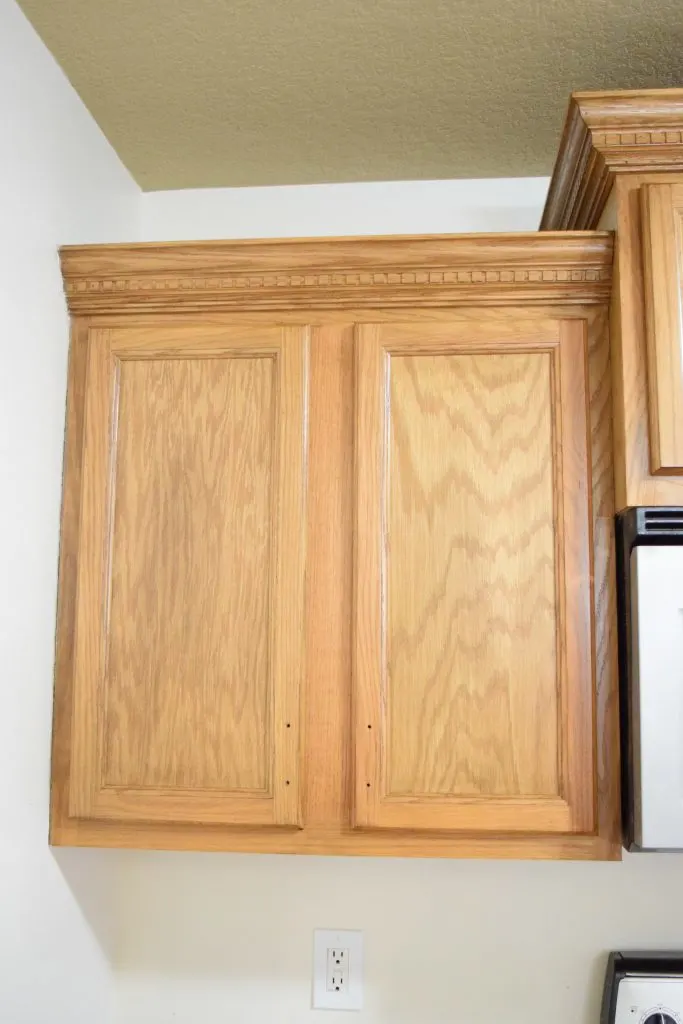
My first coat looked like this:

Pretty underwhelming right? Is it even darker? Yes, it is. But just slightly. Now when I purchased Minwax PolyShades, I was expecting one or two coats to get me to the color on the can. I was definitely wrong.
So I gave it a light sand all over with my steel wool, wiped it down again and *should have vacuumed it.
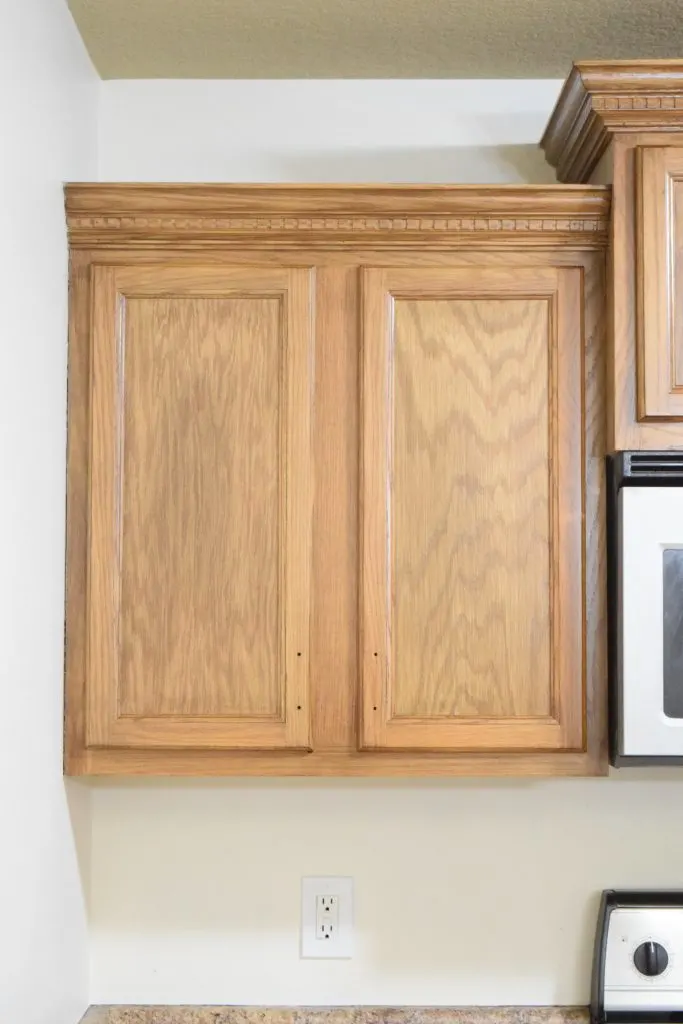
My second coat looked like this:

Alright, its getting a little darker again. But nowhere near what I was hoping for. So I let it dry again for 6+ hours and sanded with steel wool, wiped, and applied another coat.
My third coat looked like this:

Getting there now!
At this point, I was pretty sure that this stuff was not meant to be applied in multiple coats like this. It started to get thick in the crevices. I could scrape them with my nail and get some of the extra stain and poly out, but the darkness in those areas remained somewhat. We were committed though, so after 6+ hours I sanded with steel wool again, wiped it down, and gave it one more coat.
Here is how my fourth coat looked:
And I’ll let you in on a little secret. I use a pretty awesome camera filter on my photos that lightens everything up, making the images look brighter.
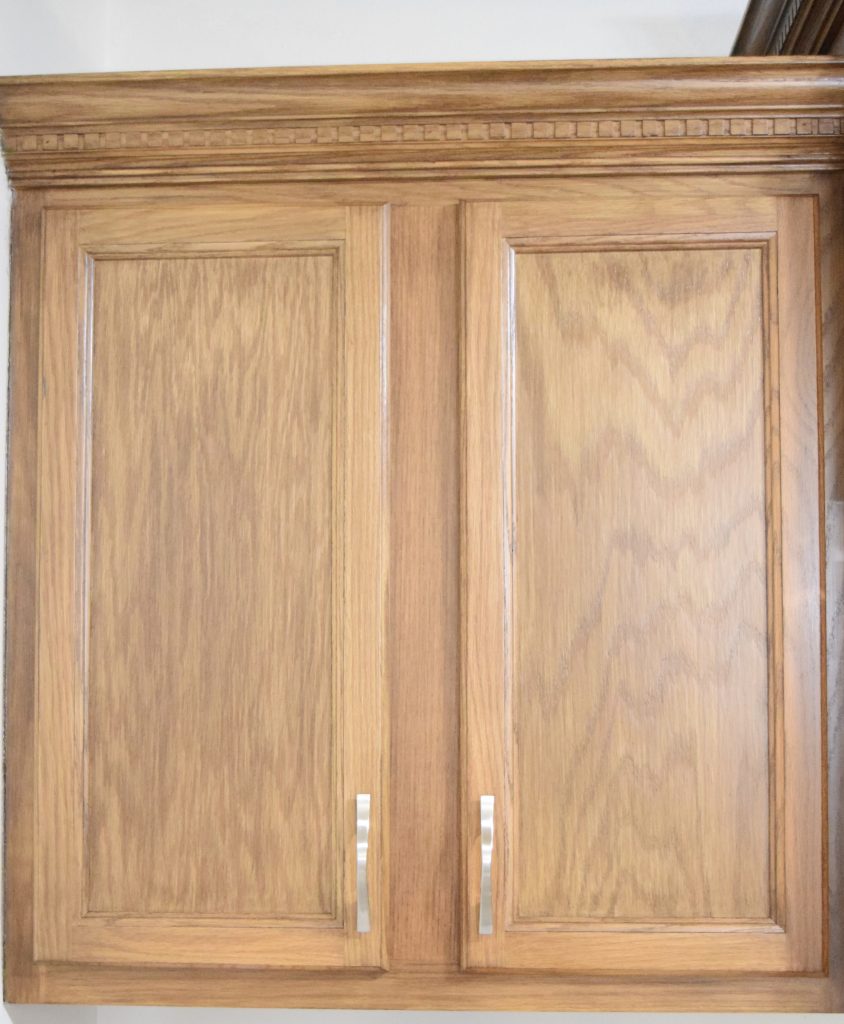
This is how dark the cabinets actually are (but see how dingy the photo looks?):
Pretty dark! Not the DARK that I was looking for, but good enough! So I stopped at four coats, because my sanity, and the Minwax itself, would not allow for any more (it was starting to goop in the little crevices – no worries though, I plan to glaze them in the future).
I didn’t even finish one whole can of the PolyShades, so the stuff does go pretty far.
So here is my side by side before and after:
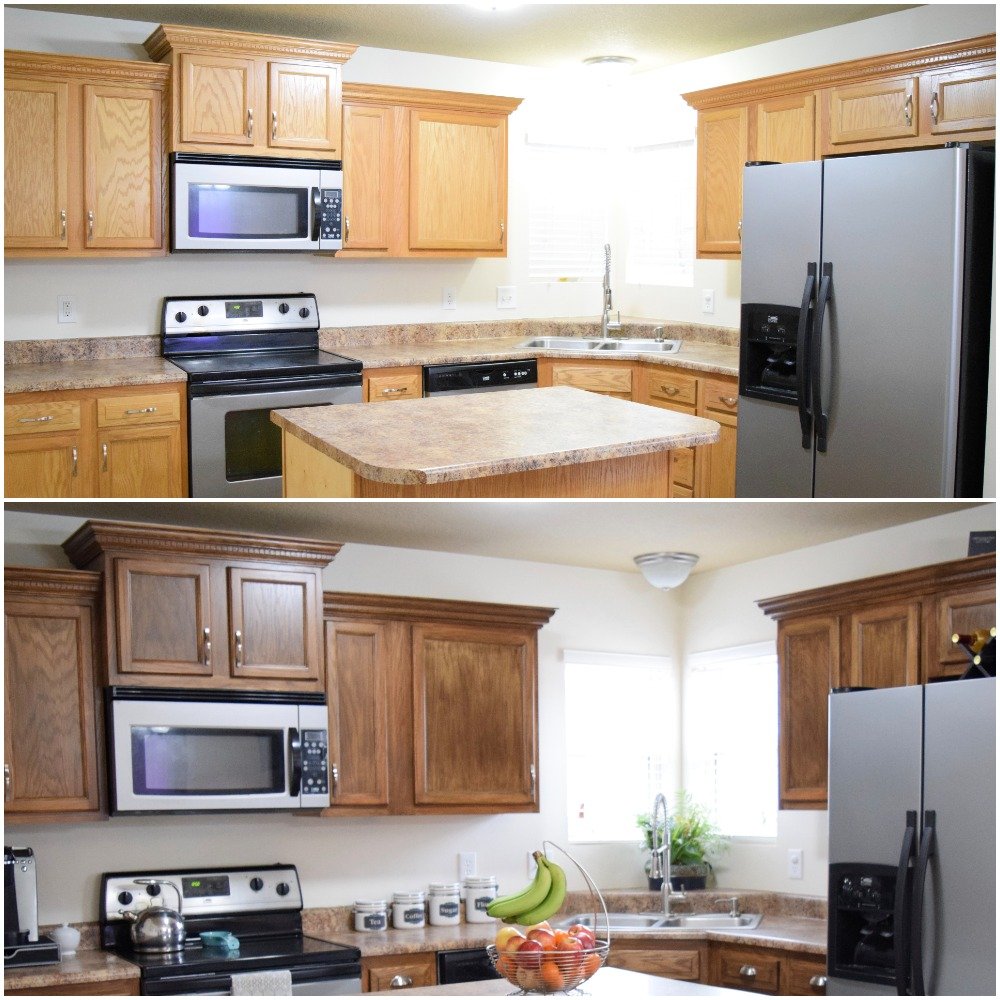
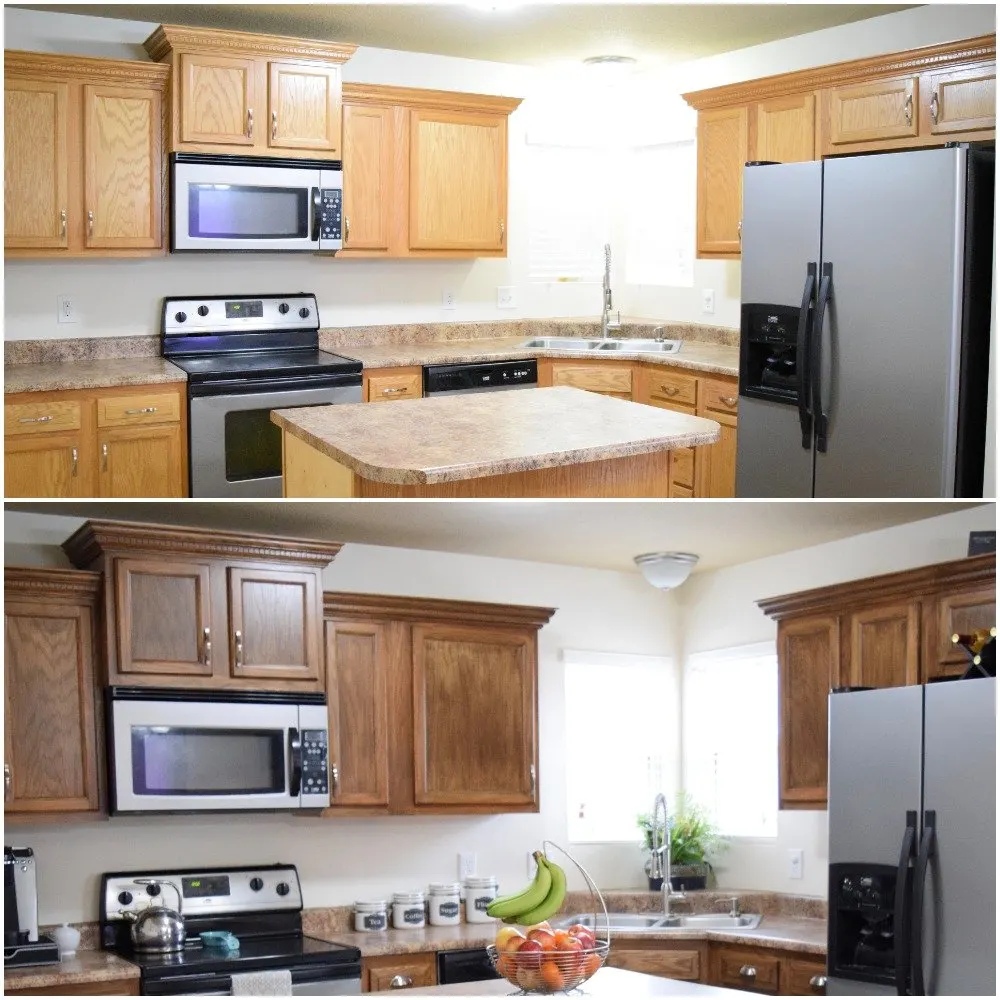
I love how it turned out, and love the darkness of the cabinets. As you can see, I also changed out the handles on the drawers for a cup cabinet pull. It gives a little farmhouse style to the kitchen.
To complete my mini kitchen renovation, I also added trim to and painted the island.


Check out how to add moulding to a kitchen island here.
The best part of this project? It cost me $40, and that includes the new drawer pulls. Total cost for the refinishing? Less than $20.
So all in all, I would call this project a success. The cabinets did not get as dark as I had originally envisioned, but I really like how they look, and I love that it only took 2 days and $40 bucks!
Leave me a comment below and let me me know what you think!
Like this post? Pin it! Or share it on Facebook!


Holly
Monday 6th of June 2022
Thank you! I want to try this. But I want to lighten the color of our "orangey" honey oak cabinets. I hope I can achieve this with the PolyShades.
Lauren
Sunday 12th of June 2022
Hi Holly! Unfortunately, you cannot lighten wood with Polyshades. The only way that I know to do that is to strip and restain them (which is a super long, arduous process). I have seen people discussing using white wax to lighten wood a bit, but I'm not sure if it works. Good luck!
Danae
Friday 18th of February 2022
Hey Lauren, Was your cabinets solid wood?......or did they have paneling on the side? Does that make sense? The cabinets I need to refinish has faux wood center on the doors. They aren't solid wood.
Lauren
Wednesday 23rd of February 2022
Hi Danae! They had paneling on the side. But I only had two places where there were sides to refinish (uppers by the sink), as the rest of the cabinet ends were against walls. They acted just like the actual wood though, since Polyshades is a product that goes on top of the surface. I wish I could say how the finish would weather over time on a lower that gets bumped and rubbed against, but I don't know. Good luck!
Devyn
Monday 8th of November 2021
Hi love this!! When I did the acetone test it didn’t get gummy or sticky but I can scratch it off in the spot I put the acetone.. does that also mean it won’t work?
Lauren
Wednesday 10th of November 2021
Hey Devyn! I don't know for sure, and I don't want to advise you wrong. If it were me, I would find a spot that isn't visible and just try it out in a small section to see if it sticks. Good luck!
Debra
Thursday 13th of May 2021
What about a tuxedo look using two complementary stains, with the darker on the lower cabinets, lighter on the top? For example, Tudor and Honey Pine?
Thanks!
Debra
Friday 2nd of July 2021
@Lauren,
Thanks for the response! I'm getting ready to sell and I'm looking at ways to update the kitchen for less. I live in a suburb of Las Vegas and we have Californians snapping up our homes for crazy prices. I don't think I need to do too much to get a "reasonable" price.
Sorry for the delayed response on my part.
Lauren
Sunday 16th of May 2021
Hi Debra! I was just looking at pictures of a house that had two different types of wood in the kitchen - a lighter wood on the cabinets and a darker wood on the island. I wouldn't say that it looked amazing, because the colors didn't provide much contrast from each other. Wood tones are coming back in style right now. That being said, tuxedo kitchens with wood though aren't the norm, but if you love wood, it could work if you get the wood tones right. Go for higher contrast, such as the ones you're suggesting. Good luck!
rhonda cohen
Tuesday 15th of September 2020
hi Lauren. i cleaned with tsp and dried and sanded with 220 wiped and applied one coat and after 6 hours it feels gummy...is it still wet and even after steel wool?
Lauren
Tuesday 15th of September 2020
Hi Rhonda - oh no! I'm so sorry to hear this! All products have specific "best practices," such as not applying them when they temperature is too hot or cold, not applying them when the humidity is high, stirring instead of shaking the cans, etc. If you followed all them correctly, I wonder if maybe the coat you applied was a bit too thick. It might not exactly be wet, but it definitely doesn't sound like it worked how it is supposed to. My best advice is to call Minwax and see if you can talk to someone about the product. I haven't ever contacted Minwax, but I have been surprised at how easy it is to get an answer about things like this when I've called other companies. If you can't get a hold of them, here is an article that I found that *may* apply: https://homeguides.sfgate.com/fix-sticky-wood-stain-87285.html. I don't know for sure if it will work, because this is regarding stain and not a stain with a topcoat like Polyshades is, but it is worth considering. Last, I'm hoping that they will be dry when you wake up tomorrow, and they just needed a bit more time. Please stop back if you think of it and let me know what worked!