
Building a kitchen pantry is a great way to maximize the storage space in your kitchen and add value to your home.
With more and more families shopping at bulk stores such as Costco, having the ability to store a lot of items in your kitchen is almost essential.
Not only is a kitchen pantry extremely useful for a homeowner, having a kitchen pantry is a great selling point in a home. In fact, ProBuilders listed a kitchen pantry as one of the top 50 things that a homebuyer wants when purchasing a home.
Even a small pantry is helpful! While walk-in pantries are becoming more desirable in large, newly built homes, older home often do not have the space required for one. So instead, building a small pantry is a great way to maximize storage, even if you don’t have a dedicated room for a pantry.
This post may contain affiliate links. If you have any questions, please see my disclaimer page.
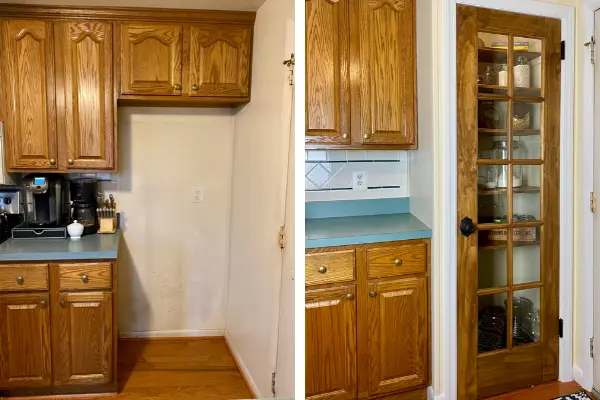
Our Kitchen Before the Pantry
When we purchased our home, we knew that the kitchen needed some work. It was fully functional as it was, but needed additional storage space to accommodate our family.
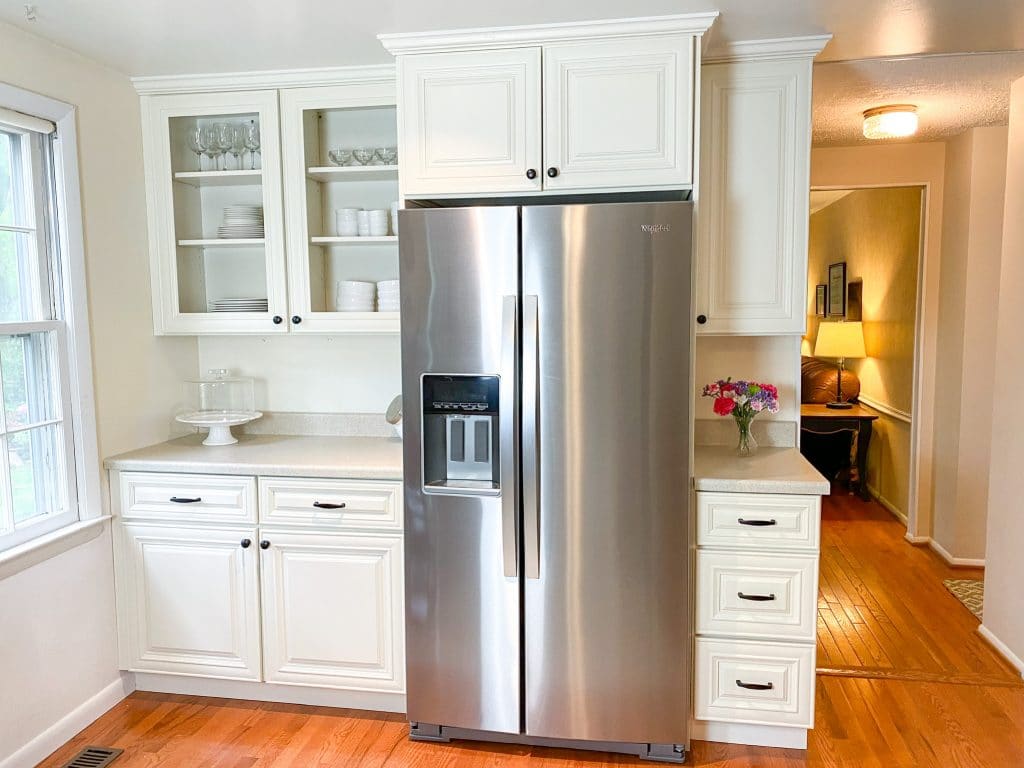
After a few months of living in the home, the old appliances started to fail and we were left with a choice. Option 1: we buy a small, 32 inch refrigerator to fit in the current spot where the fridge was. Option 2: we move the refrigerator to the other side of the kitchen and come up with sometime to fit in the space that is left.
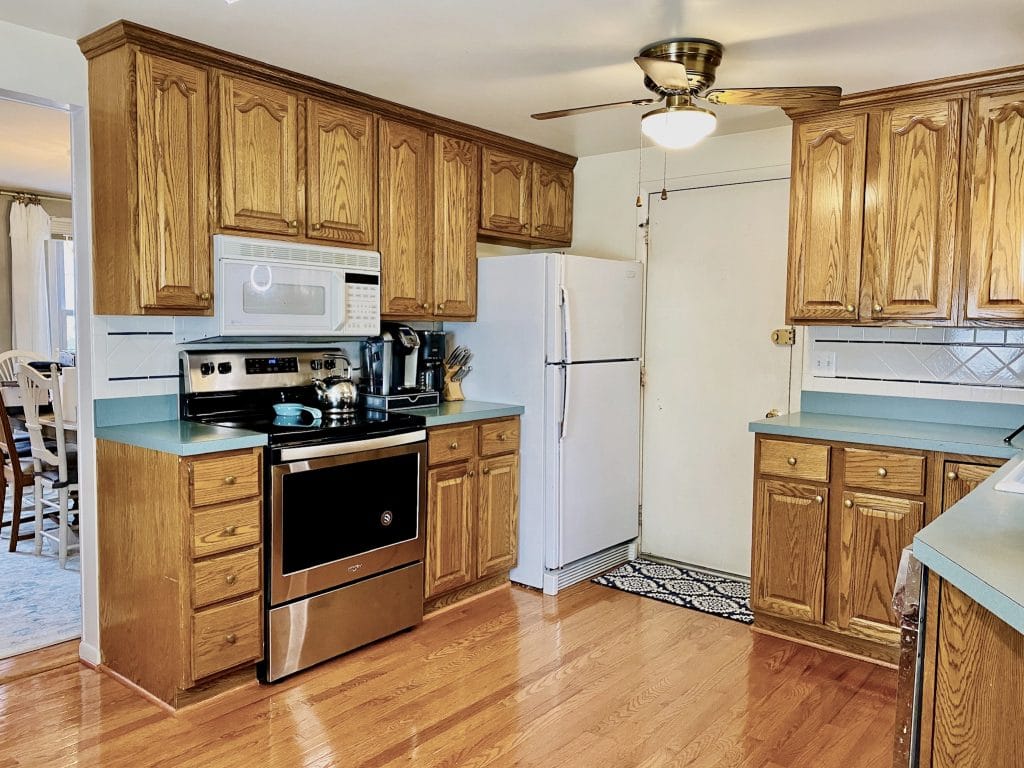

Since the refrigerator space was so small that it not only required a very small refrigerator, but it also stuck out into the doorframe next to it, we decided to move the fridge.
The space that was left was 33 inches wide. As replacing all of the kitchen cabinets wasn’t in the budget, and the current cabinets are no longer manufactured in that color and style, we decided to build a pantry in the space.
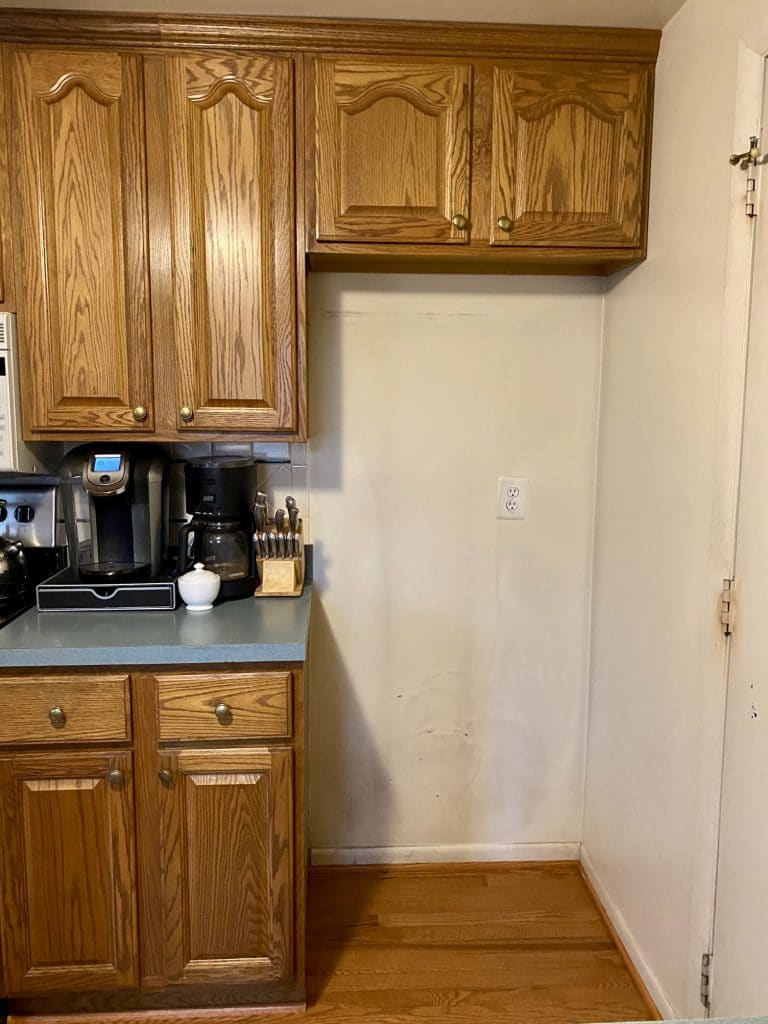

“Demolition” for the New Pantry
We started by removing the crown molding piece on the top of the cabinets. It was held on by only a few finish nails, so it was easy to carefully remove with a small crowbar.
We used a small crowbar like this one for almost every job we do. It is perfect for removing things from tight places, and getting trim off without damaging the trim, wall or floor.
Then, we unscrewed the existing upper cabinet from the wall and the cabinet beside it.
I removed the quarter round on the floor and the trim behind it, and we were done with demolition!
Building the Small Pantry
Once we removed the trim and the upper cabinet, we were able to begin work on building the pantry.
Framing the Walls for My DIY Pantry
I set to work framing the wall that would sit against the cabinets on the left side. I knew that the frame would have to fit perfectly so that I could screw it into the floor, ceiling and wall.
When the frame was completed, I measured and cut the drywall to go onto it prior to putting the frame up. This was essential, as I needed a drywalled side and wouldn’t be able to put the drywall on after the frame was up.
If I wanted to be REALLY on top of things, I could have filled the screw holes, primed, and painted the wall prior to putting the frame up. But, as always, I was too excited to see the progress of the pantry, and didn’t want to take an extra day to patch, prime and paint at this point. If you want to make things easier on yourself, do this step ahead of time.
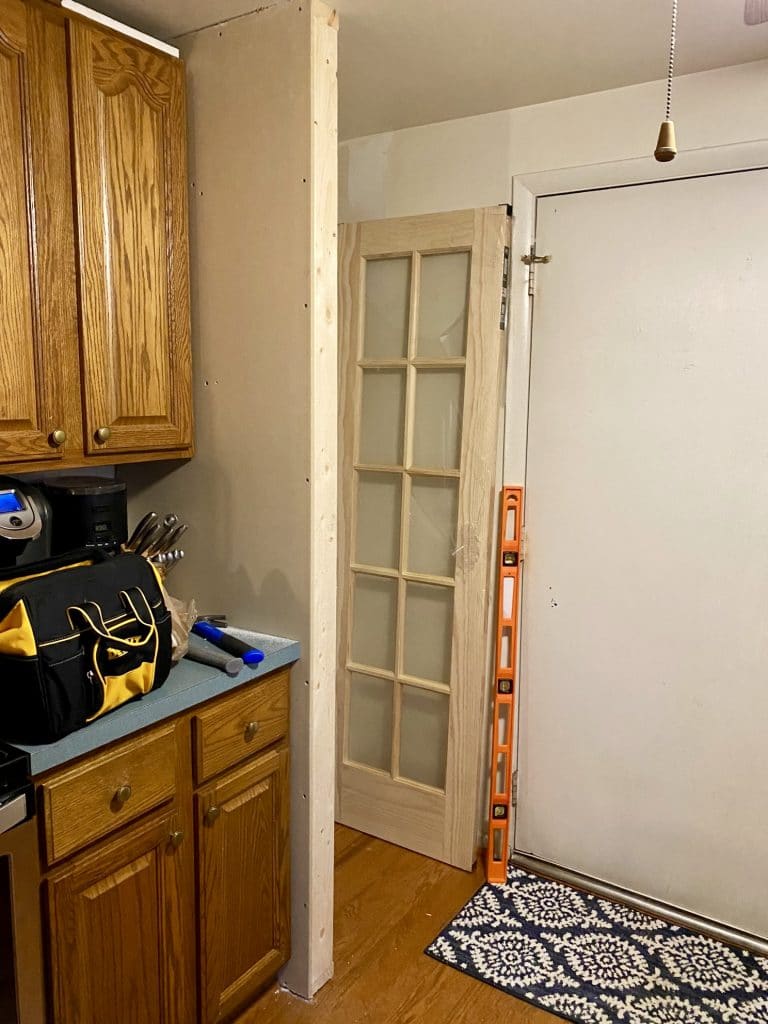
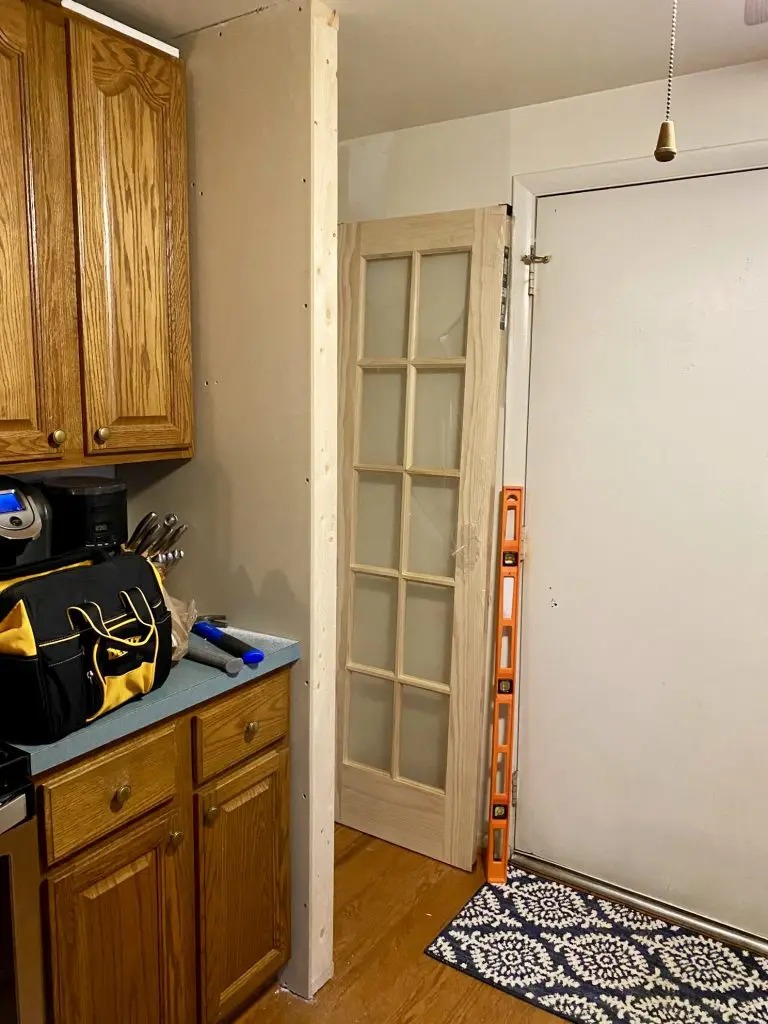
You can see the glass door that I picked up on clearance sitting against the wall in this picture.
I made sure that the wall was perfectly plumb (level up and down) with my long level, and screwed the frame into the floor, ceiling and wall, being sure to find studs where I could with my stud finder.
A long level is necessary when building a wall like this. It ensures that the wall is completely plumb over a distance. A small level (such as a 12 inch level) could make a wall that is leaning look straight.
The next step was to build the front of the frame with the door opening. I measured and triple checked to ensure that the opening that I left for the door frame was the right size.
Since my door was 24 inches wide, I needed an opening of 26 inches to account for the frame that I would build and room to shim it for plumb/level.
Drywalling the New Pantry Wall
Since the side was already drywalled prior to placing the wall, I cut and screwed drywall into the front wall and the inside wall.
Then, I used mesh tape and drywall mud to fill the seams and screw holes. After three thin coats, I sanded any high spots and was ready to prime.
I primed the drywall with drywall primer, and then painted it with some paint that I had in the garage. Since I am in the middle of a kitchen renovation, I didn’t want to purchase a can of paint until I was sure on the color I wanted. So, the wall color is Vanillin, but will change in the near future.
Hanging a Glass Pantry Slab Door
If you purchase a pre-hung door, you can completely skip this step.
There are a lot of YouTube videos on how to do this, but I found this one to be particularly helpful.
Before I put the door frame on the opening, I used a hinge butt marker and a hammer to mark where my hinge would go on both the door edge and the door frame. Using a small chisel, I chiseled out a place for the hinge to sit securely in the frame and the door without protruding beyond the edge of the wood. This ensures that the door closes completely snug.
Here is a YouTube video on how to chisel out a spot for a hinge if you are hanging a slab door.
Once that was completed, it was time to attach the frame pieces to the opening.
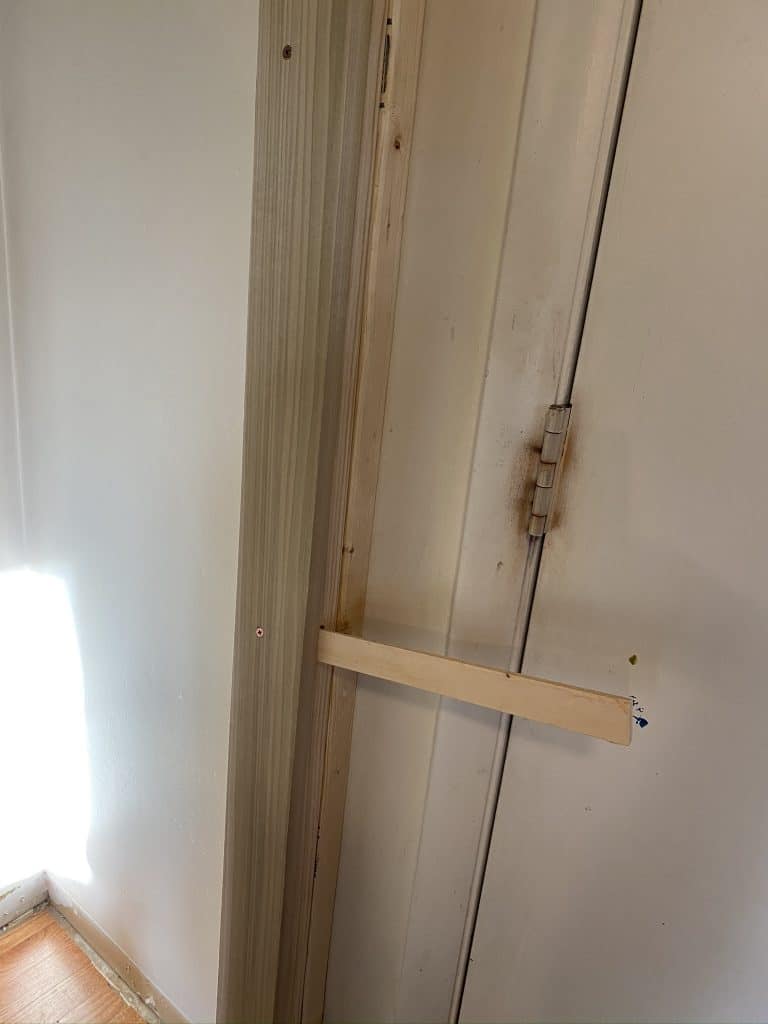

I did this by getting the frame board perfectly plumb and then shimming any spots that didn’t hit the 2×4 beside it. Once a shim was in place, I put a screw in to hold everything together tightly. Then, I snapped the excess shim off so it was flush with the frame.
After doing this to the sides and top of the door frame, we screwed the hinges onto the door in the chiseled area. Then, my husband held the door up while I screwed the other side of the hinge into the frame in the chiseled area.
I put a door stop trim piece on the inside of the frame where I wanted the door to stop, and tacked it in with trim nails.
Here is a picture of what the door stop trim looked like.
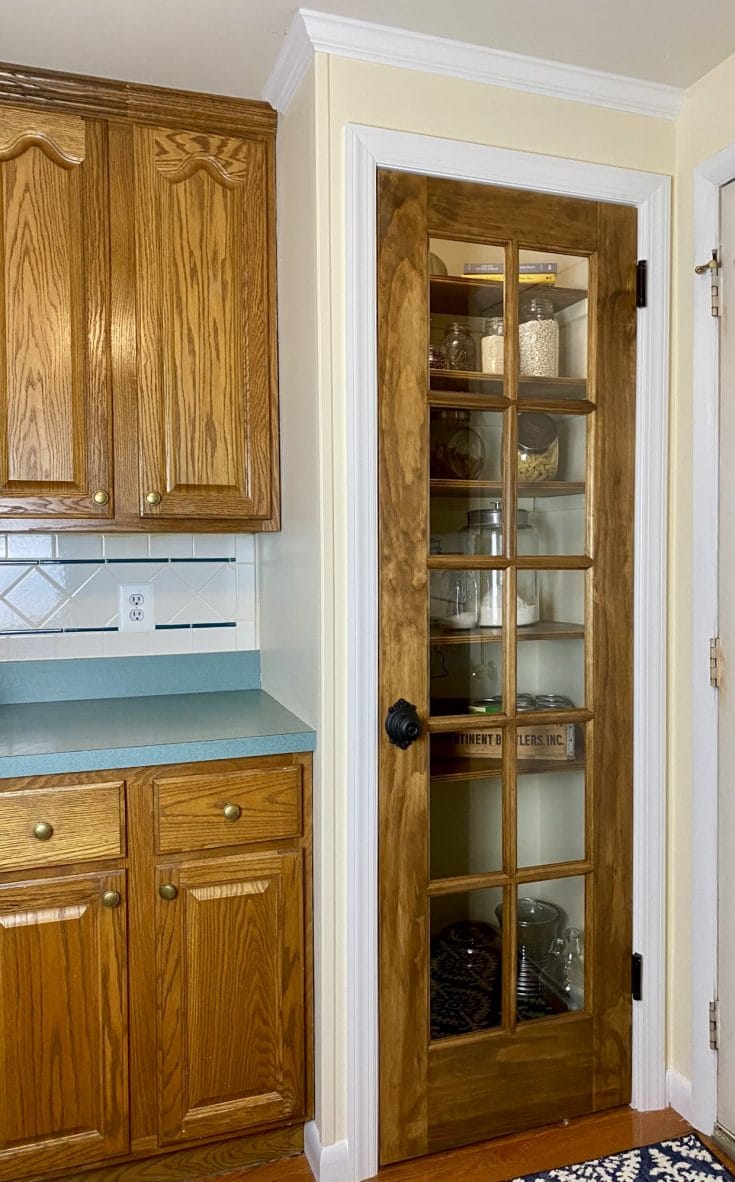
I stained the door with Varathane Early American stain. After two coats, I finished it with a coat of fast-drying polyurethane.
The last step to the door was to place a knob on the front. We used a dummy knob, or one that doesn’t latch. Since I put self-closing hinges on the door, I knew that the springs in the hinge would hold it closed, so a latch was unnecessary for our pantry.
While hanging a slab door is pretty tricky, a pre-hung door comes with all the necessary hardware and will be already on the frame. If you are installing a pre-hung door, you only need to shim for plumb and screw the pre-made frame into the opening you have created.
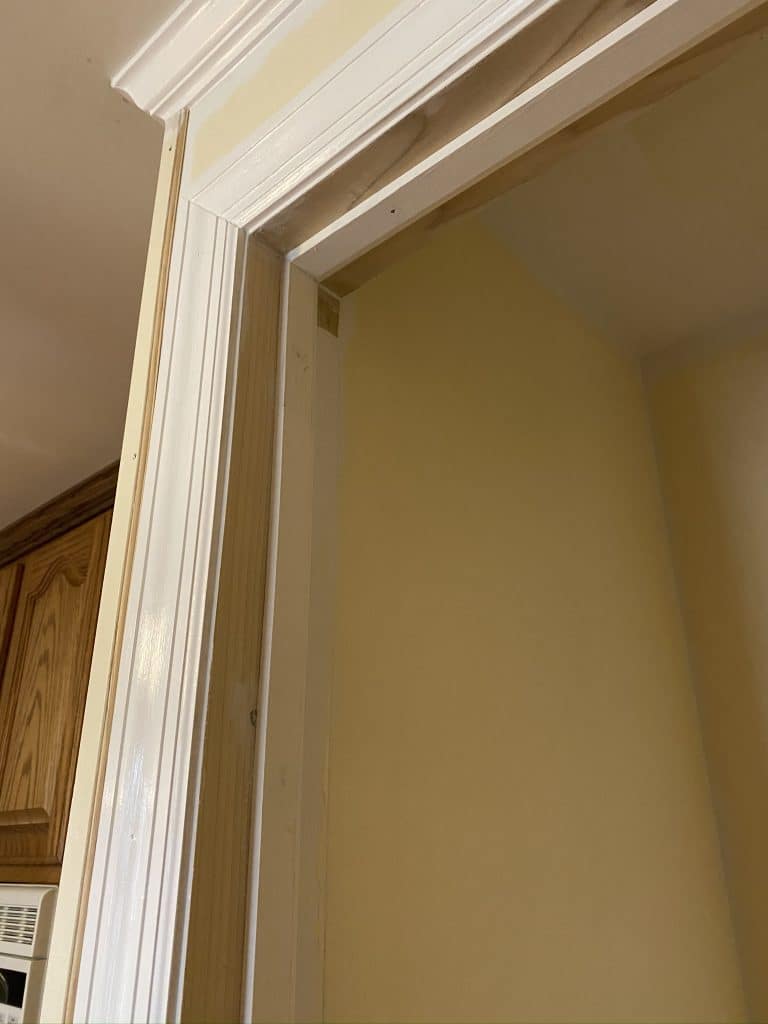
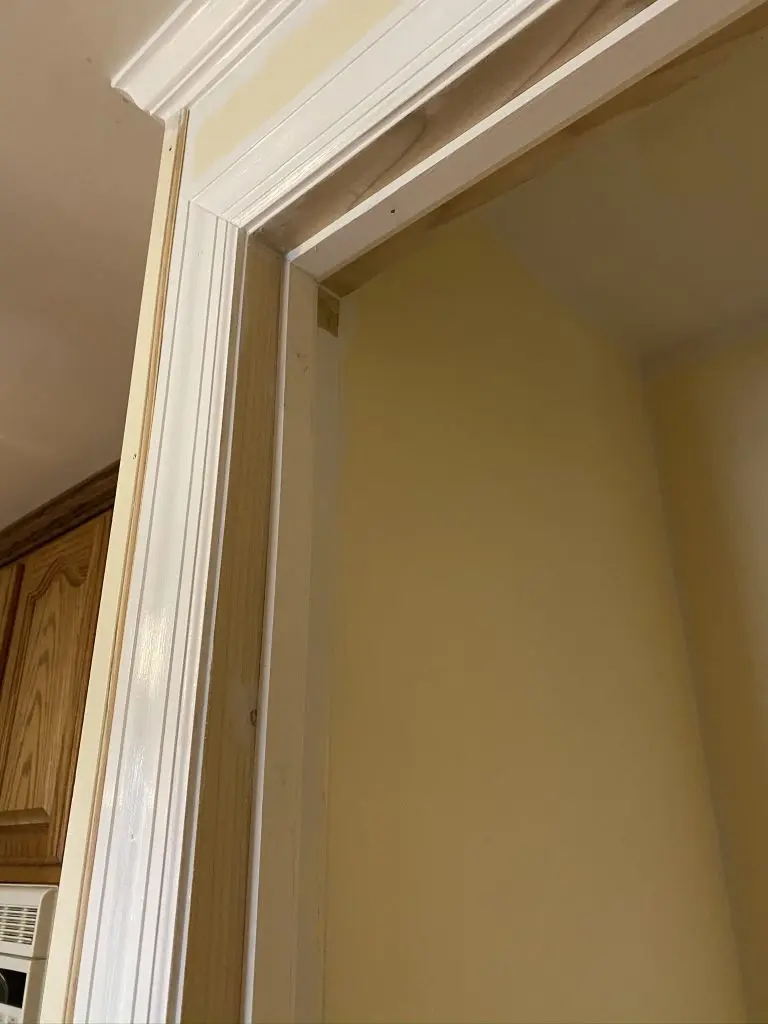
Attaching Trim and Crown Molding on the New Pantry
Once the door hanging was complete, I finished putting the trim on the door frame. I also put crown molding on the top of the pantry walls to make it look a little more custom.
Since I don’t yet own a nail gun, I use a drill to predrill my nail holes, simple nail setter and finish nails to affix the crown molding.
If you need a great tutorial on how to cut crown molding, check out this video by See Jane Drill.
Once the trim was on, I caulked all the nail holes and the places where the trim met the wall or met other trim to make sure they looked nice. Here is an example of some of the places I ran a bead of caulk.
Then I painted the all of the trim with white trim paint.
As a little hint, cover your hinges with painters’ tape, and then use an utility knife to cut off any excess. Then you can run your paint brush right over it without getting paint on the hinge!
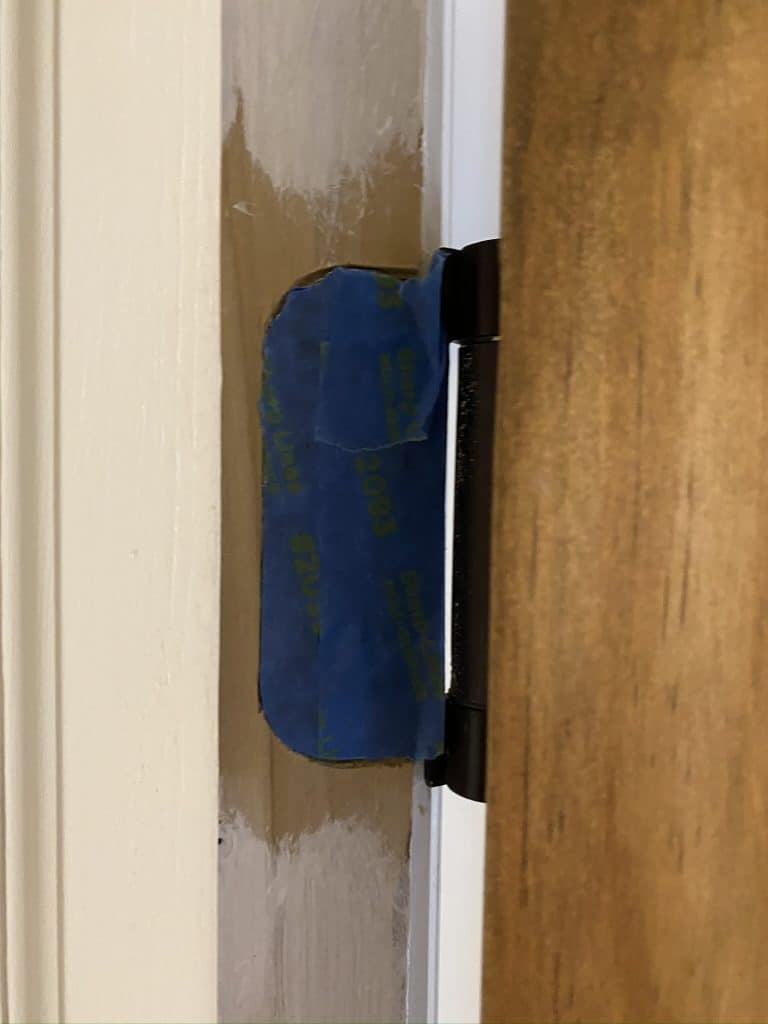

For a tutorial on how to paint trim, check this out.
How to Make Pantry Shelves
For the shelves, I used 3/4 inch sanded plywood. For a little extra style, I wanted to stain them, and knew that sanded plywood would give me a nice wood look without being super expensive.
I had Home Depot cut the plywood to the dimensions that I needed to make things super simple.
I also purchased trim pieces and cut them to the width of of the shelves.
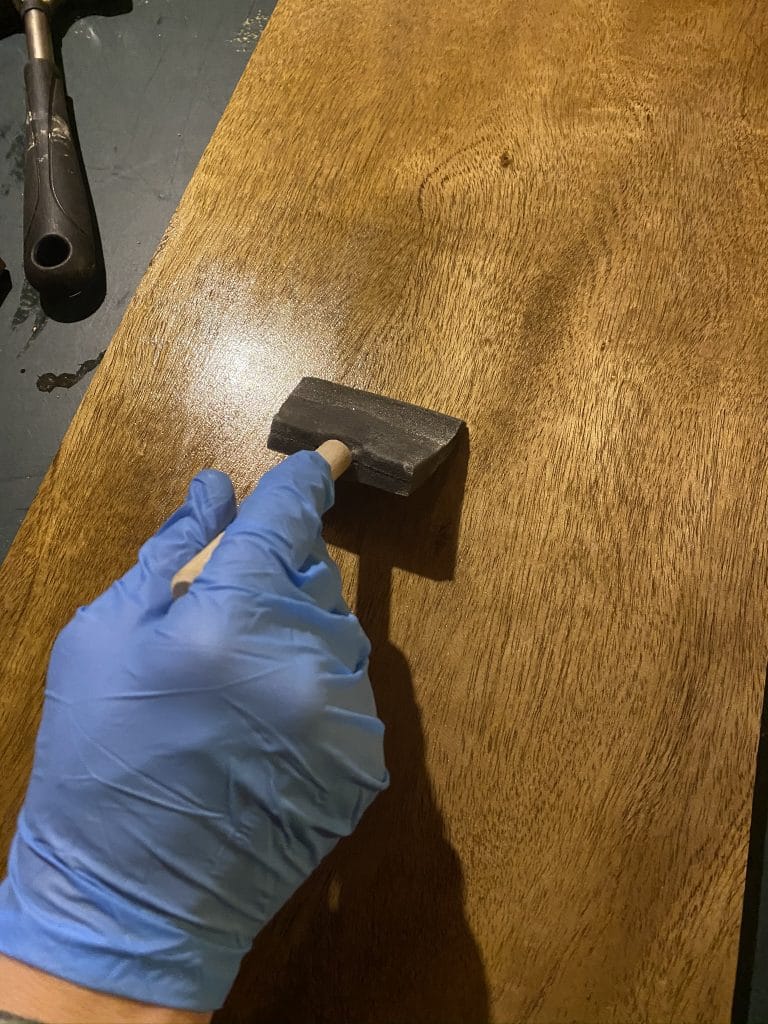
Then, I stained the plywood and the trim pieces with the same Early American stain color that I used on the door. After the two coats of stain were dry, I applied two coats of polyurethane to protect the shelves, sanding lightly between coats.

When everything was dry, I attached the trim to the front of the shelves with finish nails.
Attaching the Pantry Shelves to the New Pantry
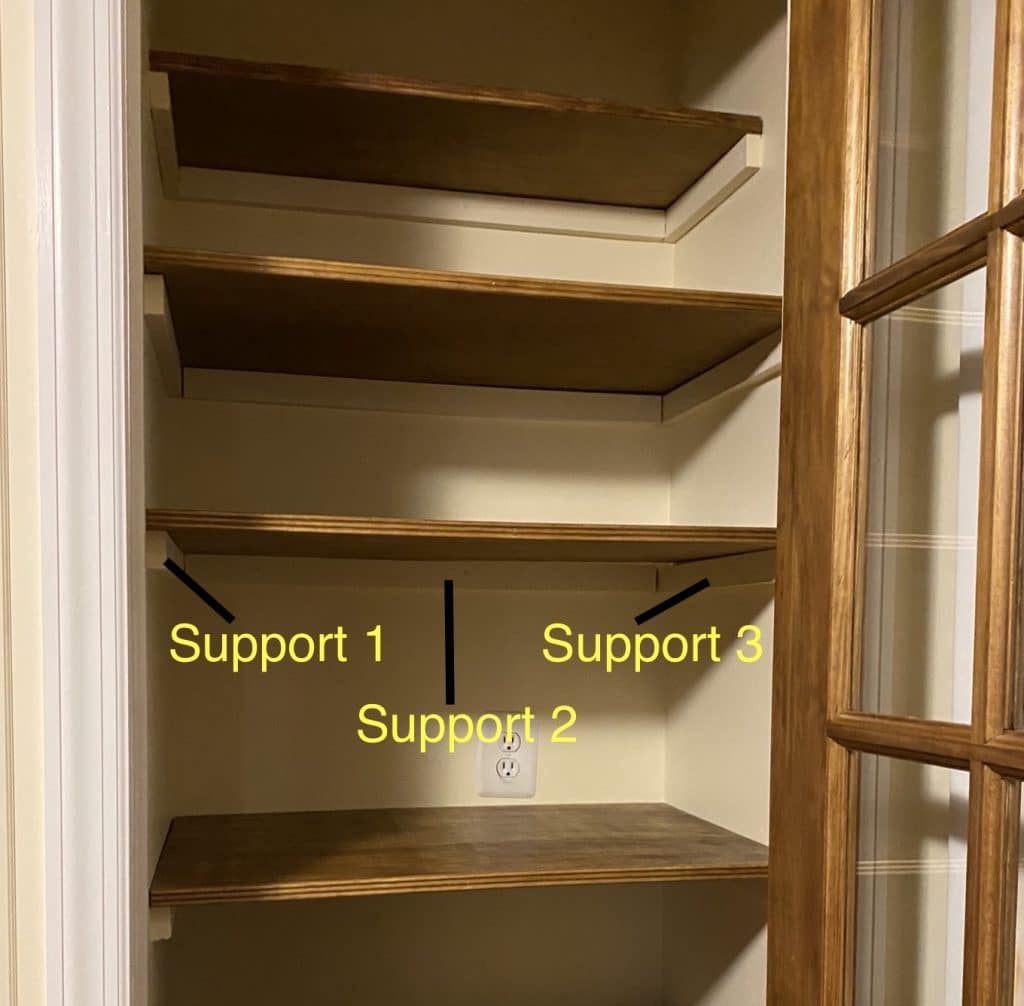
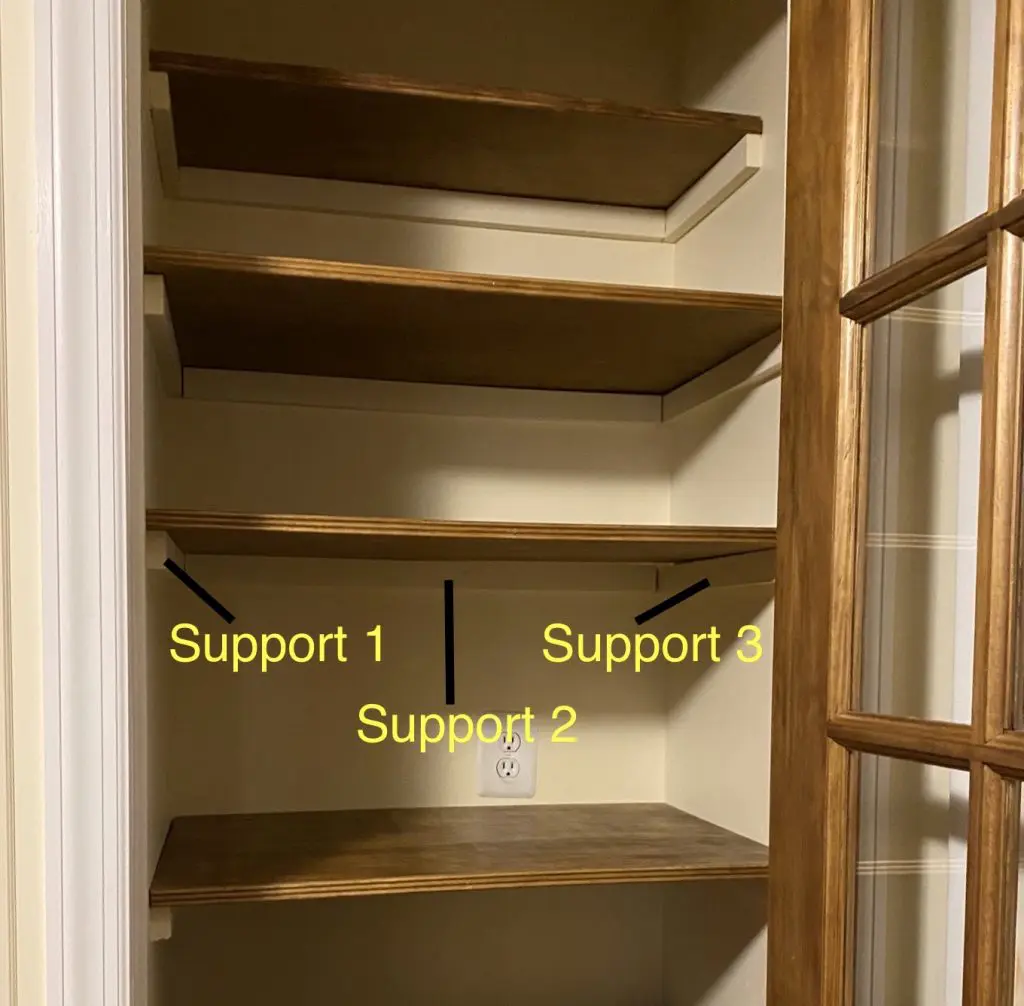
I cut the wood 1x3s to the length needed to support the wood shelves. Each wood shelf had three support pieces – one on each side and one on the back.
If your shelf is longer and you need a little extra support to keep it from sagging, you can always attach a thicker trim piece or an additional support piece across the front of the shelf.
For each shelf, I determined how high I wanted the shelf to be. Using a level, I attached the shelf support to the studs one of the walls, making sure it was perfectly level.
Then, I placed the wood shelf on top and put the level on top. While I held it the shelf level, my husband attached the shelf support on the other side of the wall. This made sure that the shelf would sit level. As a note, be sure the shelf is level both side to side and front to back.
Once both side supports are in place, you can attach the back support piece to studs while the shelf sits flush on top of it.
I painted the support pieces to match the wall. Then, I placed the shelves on top.
How Far Apart Should Pantry Shelves Be?
This was a question that I spent some time figuring out. I wanted to make sure that all my pantry items fit easily, and that I didn’t waste a lot of space.
As it turns out, many pantry items are sized similarly. Tall bottles (such as vinegar), cereal boxes and oatmeal containers require a 15 inch shelf. Smaller bottles and boxes require a 12 inch shelf. Spaghetti bottles and cans can fit on a 8 or 10 inch shelf (with some added room on top to be able to get ones in the back out).
So here is what I ended up with.
- One 15 inch high shelf.
- One 12 inch high shelf.
- Two 9 inch shelves.
- One 15 inch top skinny shelf for coolers, etc. (The top shelf had to be a smaller depth than the other shelves because of the pantry frame. If it had been the same width, I would have had a very small space to fit items up on top of it with.)
Overall, DIY Building a Small Kitchen Pantry…
isn’t hard to do. But it is a lot of little steps.
While each step can be broken down into its own tutorial, I wanted to give you a general overview of the process, since your pantry requirements will be different than mine were.
Total Time to Make a Small Pantry
In total, making pantry took me 2 days to frame and drywall, a day to hang the slab door (2 person job), a day to hang trim, molding and paint, a day to stain and poly the wood shelves and pantry door, and a day to attach the shelves.
This was all done in addition to all the normal daily activities that come with three children (commutes to school, meal prep, homework help, nap schedules, etc.).
If you have whole days to devote to JUST making your pantry, you will likely finish it much quicker than I did!
How Much Does It Cost to Build a Kitchen Pantry?
Building a pantry can be pretty expensive if you hire a contractor to do the job. A Google search with this question found answers ranging from $850 to $5000, depending on the size and finish of the pantry.
If you build the pantry yourself, you save a lot of money on labor.
Here is what it cost me to build my kitchen pantry:
- Wood 2x4s – $30
- All Purpose Screws – $10
- Finish Nails $5
- Glass French Door – $75
- Self-Closing Hinges – $30
- Doorknob – $20
- Wood Stain – $5
- Fast-Drying Polyurethane – $10
- Trim Pieces – $100
- Primer and Paint – $35
- Shelf Wood – $40
- Shelf Support 1x4s – $10
Total Cost to DIY Build A Pantry – $370
As you can see, building the pantry myself saved a ton of money. Other than hanging the slab door, it is a fairly easy DIY job that can be completed with some detailed step-by-step tutorials found on YouTube.
As with any home improvement project, be sure of know what you are doing and how to do it before starting!
Kitchen Pantry Before and After Picture
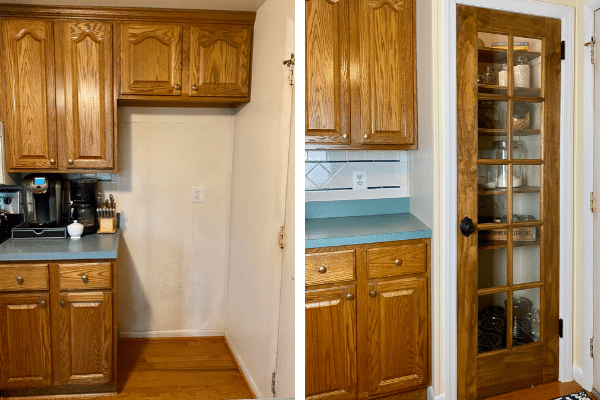
I hope that this overview helps you understand the process and order of building a pantry, and inspires you! Good luck – drop me a comment and let me know what you think!
Oh, and stay tuned for the rest of my kitchen remodel!
I’ve added gorgeous new cabinets to accent my wood cabinets.

I’m also going to be painting, adding quartz, and maybe even restaining the current cabinets!

How to Build a Pantry
Learn how to build a pantry in your kitchen for extra storage.
Materials
- 2x4s
- drywall
- wood or all purpose screws
- drywall mud
- drywall primer
- mesh drywall tape
- paint
- finish nails
- crown molding
- 1x4s (for door frame)
- pantry door
- self closing hinges
- door stop trim
- wood stain
- fast-drying polyurethane
- doorknob
- quarter round
- molding
- caulk
- sanded plywood (3/4 inch thick)
- shelf trim
- 1x2s (wood shelf supports)
Tools
- small crowbar
- long level
- hinge butt market
- chisel
- drill
- saw
- hammer
- utility knife
- drywall spatula
- sanding block
- stud finder
- nail setter
Instructions
- Using a drill and a small crowbar, carefully remove existing cabinetry, shoe molding, and trim from the area where the pantry will go.
- Build a frame for the pantry using 2x4s and wood screws. Attach the frame to existing studs in the wall, floor and ceiling.
- Hang the door. See Notes for additional details.
- If necessary, finish the door to your preference (stain or paint). For a stained door, add a top coat of polyurethane.
- Add drywall to the frame on the inside and outside of pantry. Affix it with all-purpose screws.
- Cover drywall seams with mesh tape.
- Patch and mud the drywall. This includes all seams and screw holes.
- Once dry, sand any excess drywall mud until the wall is smooth.
- Prime the drywall with drywall primer.
- With finish nails, attach trim pieces to the door way and floor.
- With a mitre or hand saw, cut support strips to length.
- Attach support strips to studs using screws (for pantry shelves).
- Ensure the strips are level by placing a level on top of the strips, or on top of the shelf prior to screwing the second side of support in.
- Paint the walls and trim, inside and out.
- Cut the shelves to fit the pantry space (if you purchase sanded plywood from Home Depot or Lowes, they will cut them to length and width for you).
- Finish the shelves as desired (paint or stain). For a more decorative look, attach trim to the edge of the shelves.
- Place the shelves on the shelf supports.
- Paint the walls and trim to your liking.
Notes
Hanging a door - Hanging a prehung door is much easier than hanging a slab door. A prehung door comes with the hinges attached, the door trim in place, and a hole for the doorknob. You place it in in the hole you created in the frame, shim it for plumbness and level, and screw it in. A slab door comes with just the door. You have to create the frame for it, shim the frame for plumbness and level, etch out a spot for the hinges on the door and the frame, place the door stop trim, and drill holes for the doorknob. This can be a challenging task for a novice DIYer, as there are many steps and extreme precision is required for the door to hang correctly.
Jennifer Chandler
Tuesday 25th of October 2022
Hello!
I just came across your page and wanted to thank you for sharing how you reinforced the shelving. How have they held up? Any issues with sagging now that’s you’ve used them for a few months! I’m hoping to build shelves with the same reinforcement you used. Thanks!
Lauren
Tuesday 25th of October 2022
Hi Jennifer! I'm glad it was helpful for you! The shelves have worked perfectly. No sagging at all. The key is getting a very thick sanded plywood. The longer you want the shelf to be, the thicker sanded plywood you'll need. Good luck on your project!!
Linda
Tuesday 3rd of May 2022
This was really useful, thank you! We have a similar space and I'm trying to decide what to do. Three questions:
1) What are the final interior dimensions of the pantry, particularly interior width and depth?
2) Is it correct that although the wall you built on the left is the standard 4.5" thick (i.e., a 2x4 that's actually 3.5" wide, plus two 0.5" drywall sheets), the wall/door frame you built on the right against the existing wall is less thick, like 2.5" thick? Just doing the math, 33" wide space minus 4.5" left wall = 28.5" space, minus 26" opening allowed for 24" door = 2.5"?
3) Did you consider any other type of door? I'm looking at bi-fold sliding barn doors that could mount externally onto the protruding "end" of the wall you built on the left, then slide shut to cover the whole opening, without taking up any closet width either when opened or shut.
Lauren
Thursday 12th of May 2022
Hi Linda! I'm so excited that you may try out this project!!
The interior of the pantry is roughly 28 inches wide by 24 inches deep. The wall on the left is wider than the wall on the right. I would guess that your measurements are correct, though I can't exactly measure it now. I do know that I didn't have quite enough space for the door when I finished. The frame was okay, but when I put the trim pieces on the sides of the door frame, the door was just a bit too wide. So I had to use a smaller width piece of trim on the one side to make up for it. I used a piece of thin popular, probably a 1/4 inch thick instead of a 1 inch board (3/4 inch thick).
Lastly, I didn't really consider another type of door because I knew I wanted glass doors. But, I think the type of door you're thinking about would work. I haven't seen bifold sliding barn doors before - love it!
Good luck Linda!!
Marie
Monday 17th of January 2022
Wow your kitchen looks exactly like mine with the small refrigerator. Thank you so much for the inspiration, detailed instructions and pictures!
Lauren
Monday 17th of January 2022
You're welcome Marie!