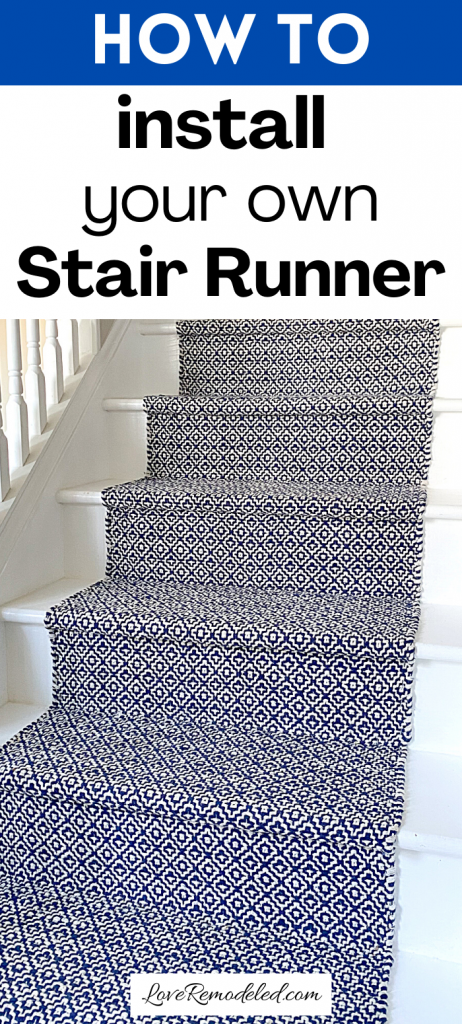
Installing a stair runner is a quick and easy way to transform the look of your staircase.
This tutorial will walk you through how to install a carpeted runner on your staircase.
I’ll answer all the frequently asked questions, and then tell you exactly what I did to install a runner rug on my stairs in under 2 hours.
This post may contain affiliate links. If you have any questions, please see my disclaimer page.
Are stair runners a good idea?
Stair runners have a number of benefits.
First, they can really change the look of your stairs. They are a great way to give the stairs your own style.
Second, stair runners can make your stairs easier for children and pets to navigate. The slick surface of stairs can be slippery, especially when wet. Having a carpeted place to walk on makes it easier to go up and down the stairs without slipping. In this way, carpeted stairs are safer than hardwood.
Third, if you DIY this project, stair runners can be changed out easily! Just remove the staples with a staple puller (or try you hand at yanking the carpet really hard and see if that works!).
So, for these three reason, stair runners are a great idea!
How are stair runners installed?
You can secure a stair carpet runner to the stairs by laying a carpet pad and then affixing the rug to the stairs using staples.
In addition to stapling the carpet to the stairs, some people also like the look of adding stair rods.

Can I install my own stair runner?
Installing your own stair runner is actually a really easy DIY.
It takes basic measurement skills, and the ability to use an electric or pneumatic stapler (if this sounds a bit scary, don’t worry… if you can use a regular stapler – you’re good to go!).
It only takes an hour or two to install a stair runner, so its a fast DIY too!
Do you need padding under stair runners?
Yes, you do need to put padding under your stair runner, unless you choose a stair runner that has a non-slip backing on it.
A non-slip pad keeps your runner in place and can even add a bit of cushioning to the stairs.
I honestly thought maybe this was an unnecessary step when I was putting my stair runner in, so I left it out for a stair or to when I first started.
After walking on the stairs to try it, I realized that a pad under your stairs is ABSOLUTELY essential. Even though I had stapled that rug really tightly, the runner still “grew” and stretched under my feet when I walked on it. It was actually really hazardous. So, I removed the staples and redid those stairs with a pad under the runner.
What is the best material for stair runners?
When you’re choosing a material for your stair runner, it is important to recognize that this is a strip of rug that is going to get a lot of wear and tear. This means that you want a material that is highly durable and that cleans easily.
One of the top fabrics for a stair runner is wool. A wool rug cleans well, provides a fairly plush surface and maintains its appearance for many years.
Another popular option is an indoor/outdoor rug. These rugs are typically very durable and wash up easily. They won’t be quite as plush or soft as some of the other options, but if serviceability is paramount, these are a great choice.
A third great material for your stair runner is cotton. A cotton rug is typically fairly thin, making it a great option for a stair runner. They can be easily pulled around bullnoses and come in a large variety of prints and colors. Additionally, they can be pretty inexpensive. They aren’t quite as washable as a wool run, but with proper care, they will look great for a long time.
Can any runner be used on stairs?
Whatever material you choose for your stair runner, make sure you choose a rug that is thin. A thick rug sounds nice, but it 1) hard to staple through, and 2) is hard to work with if you need to fold extra length at the top, bottom or middle of the stairs.
You need to make sure that your runner is not so thick that staples won’t go through it. Additionally, if a rug is too thick, you will see the depressions where the staples are tacking the rug down.
I recommend getting a low pile or very thin rug to make sure it will work as a stair runner.
Can you use normal carpet as a stair runner?
Before I answer that question, let me note the difference between a carpet and a rug. A carpet is the type of floor covering that goes the whole way from wall to wall. It is the only floor covering in a room.
A rug is smaller than the room, and can be moved from space to space.
You can’t use normal carpet as a stair runner unless you get it bound at the seams. If a carpet isn’t bound at the seams, the carpet fiber will continually shed, and the carpet will eventually look terrible on the sides.
You CAN use a normal rug as a stair runner though, if you can find one in a width that works for your stairs.
How much does it cost to install a stair runner?
The cost to install a stair runner can vary depending on two main things.
The first consideration with the cost is whether you are planning to hire someone to do it, or whether you are going to do it yourself.
According to Floor Decor Design Center, having a professional install a stair runner on your steps will cost $300-$500 for the labor. The cost of the rug and materials is in addition to this.
If you install the stair runner yourself, the price goes way down to only include any tools that you may need to buy. I’ll talk more about the tools later, but if you need to buy EVERYTHING, it will cost you about $60.
The second cost consideration is what type of runner rug you want to put down.
You can use a wide variety of runners, and with that comes a huge price swing.
On the high end, you can get specially designed, gorgeous rug runners from a rug company. In my opinion, Annie Seike has the most gorgeous stair runners. For an 8 foot runner, they can cost anywhere from $175 to $450. The runner pad that goes under the rug costs between $14 and $72. Most stairs are longer than 8 feet, so you probably should double those prices.
In total, installing a high quality rug and pad on your stairs costs between $380 and $1050.
On the low end, you can order regular runner rugs and put them down on the stairs. The cost depends on the quality and type rug you choose and the pad you put down under.
To give you a frame of reference though, my runner and pad altogether cost me about $250.
To sum all that up, installing a stair runner can cost anywhere from $250 to $1550.
Are stair runners cheaper than carpet?
According to Fixr, installing carpet on stairs cost about $750. This cost includes the price of the carpet.
So, installing a stair runner yourself can be much cheaper than having carpet installed, but hiring a professional to install it can end up being more expensive.
Do stair runners ruin wood?
Stair runners can damage wood stairs, but they shouldn’t completely ruin them. When you install a stair runner, you typically use staples, and these staple will leave little holes in the wood.
The holes are repairable though. With a little wood filler, you can patch these teeny holes and make them almost unnoticeable.
If you go the route of using stair rods, you will have much bigger screw holes that need to be filled. These larger holes will be noticeable, even when filled. So this is something to take into consideration before installing stair rods.
How long does a stair runner need to be?
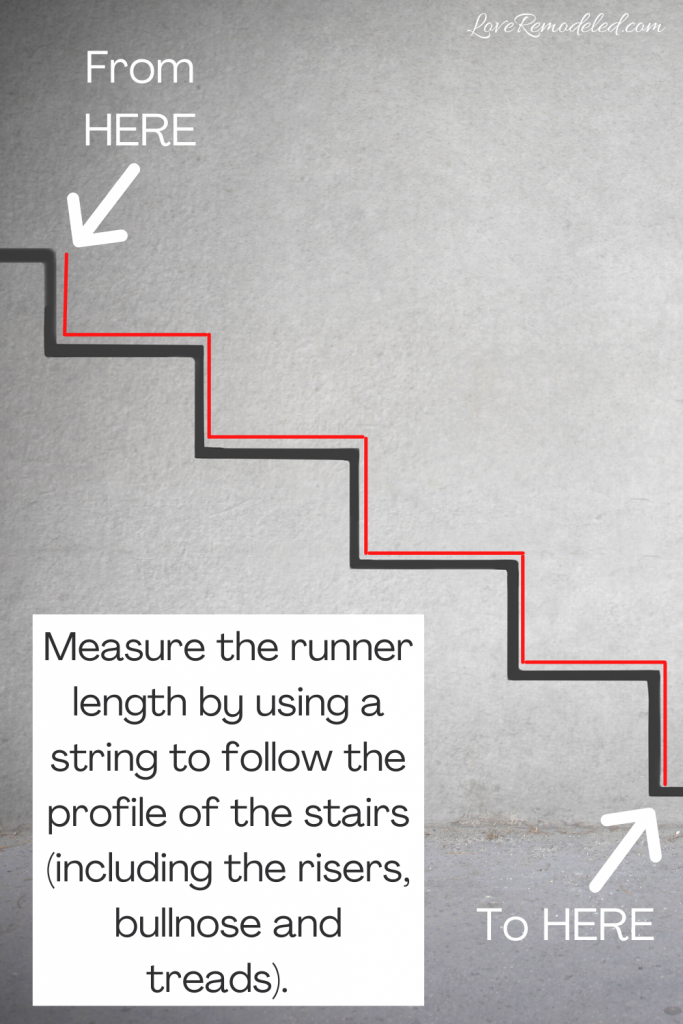
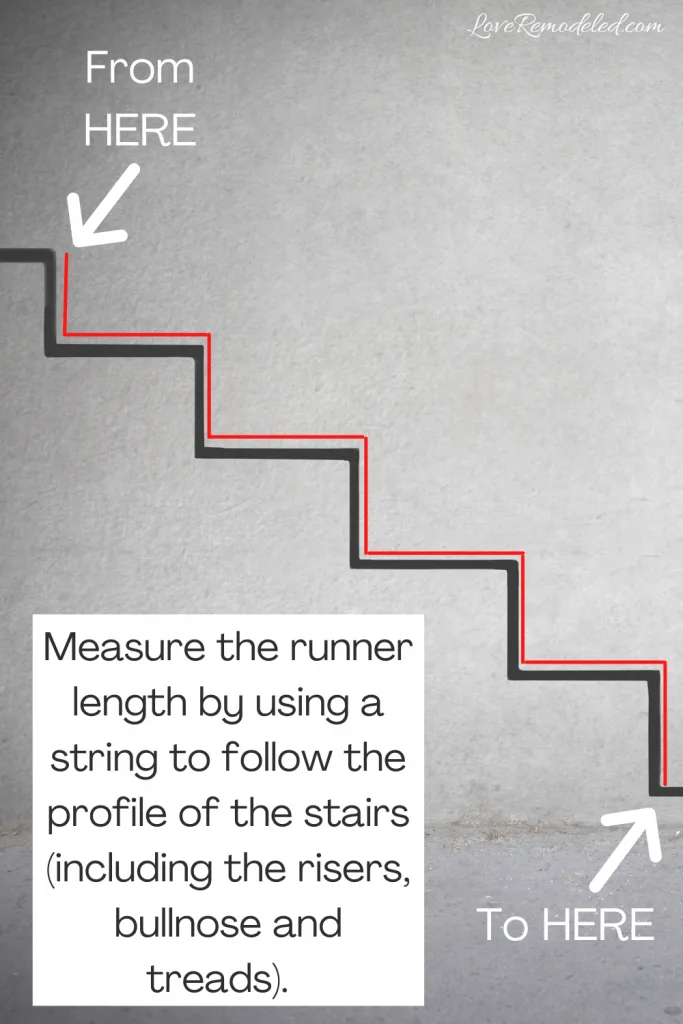
A stair runner needs to be the entire length of the staircase, which includes the riser, tread length and bullnose.

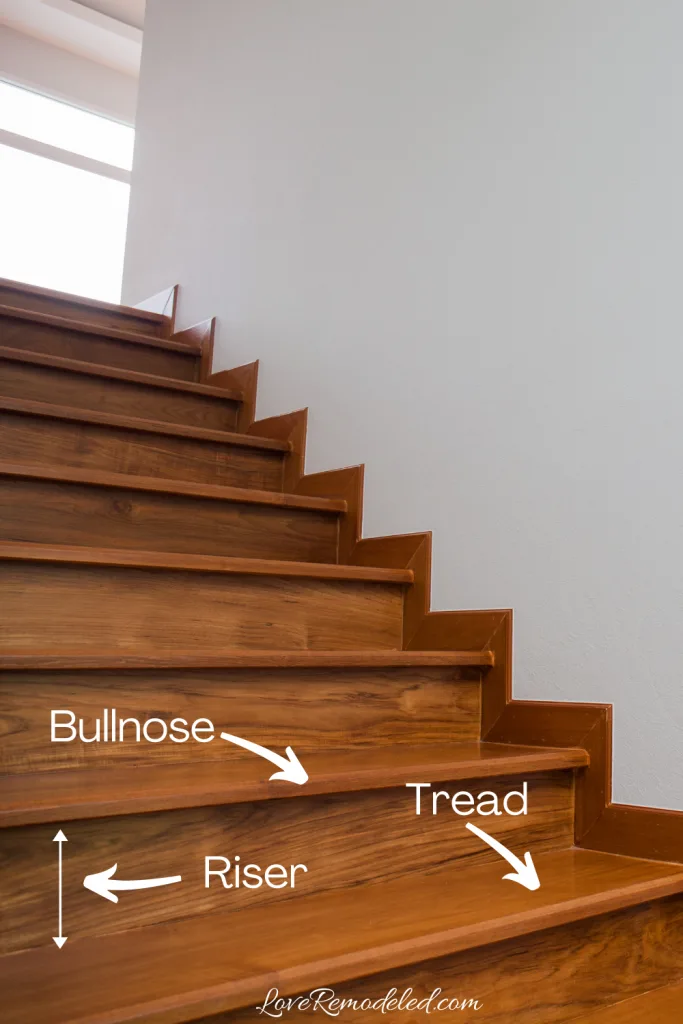
A good way to measure this is to use a long string. Start the string at the top of the highest riser. Run it down each riser, across each tread and around each bullnose. Do this the whole way to the bottom of the last riser. Mark the string at the bottom of the last riser, or cut it in that spot. Then, measure the length of the string using a measuring tape.
This total length will let you know how long the stair runner should. I would recommend adding 6-12 inches to your measurement though to ensure that you have enough length.
What if I can’t find a runner rug in the length I need?
Now that you know the length of rug you need, the next challenge is finding a rug in that exact length.
Chances are, you won’t.
Some Home Depots and Lowes have rolls of runner rugs that can be cut to the exact length that you need, but the rugs were actually a little pricey when I looked.
Instead, I found it much easier to find a runner I loved, and order two different lengths of it to total the length that I needed.
If you choose this option, be sure to get one that has a repeating pattern or no pattern so you can join it with little difficulty. Otherwise, it will be very apparent that it is two different rugs, instead of one long runner rug.
How much of my stairs should be covered by a runner?
The other consideration when ordering a stair runner is how wide it should be.
This is completely a matter of preference, but I found that I liked the runner to cover most of my stairs, leaving only about 3 inches of stair on either side of the runner.
If you order a runner that is too narrow, it can make the stairs look longer and skinnier than they are.
If you order a runner that is too wide, it can end up looking like a carpet on the stairs, or like you meant it to cover the whole stair but just didn’t quite measure right.
Either is not a great outcome.
So make sure you order a runner rug that leaves an appropriate amount of uncovered stairs on either side. To me, that looked to be about 3 inches.
Where can I buy a stair runner rug?
I discovered that finding a stair runner rug is actually a little harder than you would think.
My favorite shop for ordering a runner rug is Annie Selke. They have the absolute best patterns. The rugs they sell are in style, high quality, and have gorgeous shades.
If you want a more budget friendly option, check out Amazon rugs, or Wayfair/Birch Lane rugs. They don’t exactly have rugs that are made to be stair runners or that can be cut to the exact length you want, but they have runners that you can piece together to get the length that you want.
How to Install a Stair Runner
Now that we’ve discussed all the ins, outs and frequently asked questions about stair runners, lets get down to the instructions of how to actually install a stair runner.
Tools and Materials Required to Install a Stair Runner:
- Electric Staple Gun
- Staples
- Measuring Tape
- Sharpie
- Scissors
- Runner Rug
- Rug Pad
Installing a Stair Runner Step 1 – Measuring
Begin by measuring how long your stairs are.
You can use the string method that I described above, or you can use a measuring tape to measure the length of the treads and risers and then multiply that number by the total number of treads and risers.
You can then use this number to order the correct length of runner. The runner you purchase should be at least as long as the total length.
Be sure to also make sure you get the right width rug (as discussed above).
And last, a little tip on ordering a rug pad. I found it less expensive to order a 8×10 rug pad and cut it to the size I needed than to order a runner rug pad. Since you only need the pad to go on the treads, and not on the risers, you don’t need nearly as much of a rug pad as the actual runner.
Installing a Stair Runner Step 2 – Preparing the Stairs
Once you have all your materials, measure your rug to make sure that it is actually the right width. I had brought home several runner rugs to try, and found that very few were the width that they were supposed to be.
To prepare the stairs, measure the total width of each stair and subtract the total width of the rug. For example, if the total width of the stairs is 30 inches, and your rug width is 24 inches, you have 6 inches left over.
That means, to get the rug perfectly centered, you will need 3 inches of bare wood on either side each step.
Take your tape measure and mark a line on the stairs three inches in (or how ever many inches in you need it to be) on either side of the stairs (including on the risers and treads).

This line or set of dashes (like I did) will be your guide for where to staple the rug onto the stairs at. If you don’t do a guide like this, it can be easy to get off center!
Installing a Stair Runner Step 3 – Cutting the Rug Pad
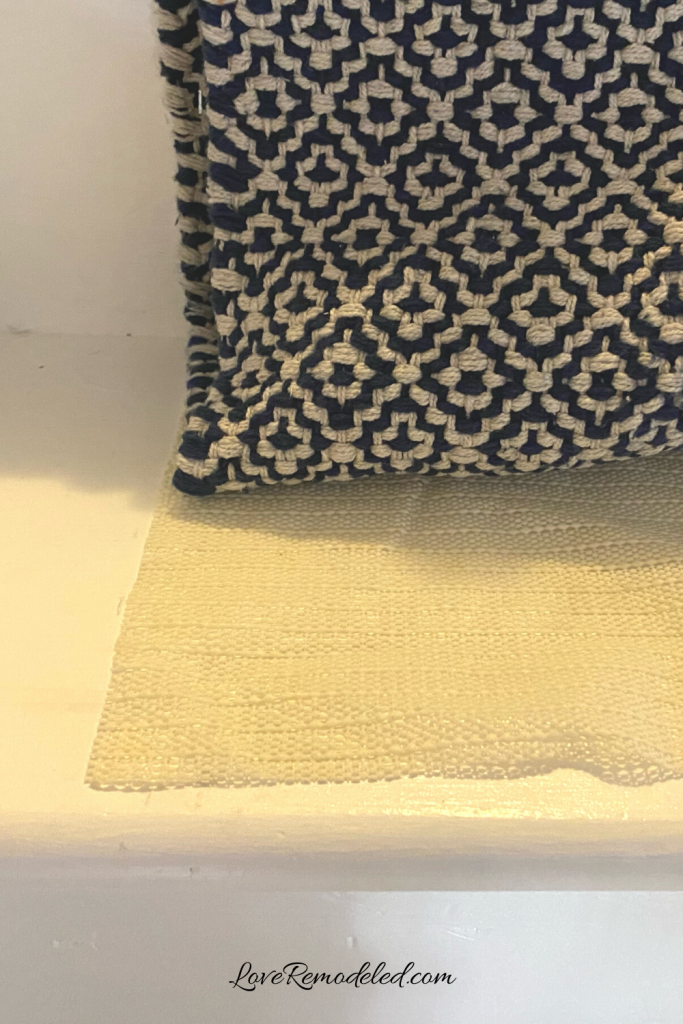
If you’re using a rug pad, and you should unless your runner has a non-skid backing on it, cut out a rectangle for each tread.
You want the rug pad to be just slightly smaller than the width of the rug, and to cover the whole tread without going over the bullnose.

Installing a Stair Runner Step 4 – Color the Staples
I gave this little tip its own step number because I forgot to do it – creating more work for me in the end.
When I was researching how to install a stair runner, another blogger mentioned that they colored the staples with a sharpie prior to putting the staples into the stapler (I’d give her credit, but I can’t remember who it was!).
This little genius tip would save a lot of time!
With a sharpie, color your staples a color that coordinates with the rug. This will reduce the shine on them and will help to hide them once your runner is affixed to the stairs.
Installing a Stair Runner Step 5 – Attaching the Runner to the Stairs
Finally all your prep work is done! You have the right length and width runner rug, you have your guide lines drawn on your stairs, and you have all your rug pad pieces cut out. It is time to actually staple that rug on to the stairs!
You can decide whether you want to start at the top or bottom of your stairs. I started at the bottom, but I don’t think it matters too much.
My rug had a binding at the end that changed the pattern, and I didn’t love how that looked. So, I took out the seam (by carefully cutting only the thread that bound the end together) and tucked it under before stapling my rug at the bottom.
Once the whole bottom was stapled to the bottom of the riser right by the floor, I smoothed the fabric out and stapled it to the top of the riser, right under the bullnose.

For my rug, it was really important to make sure the pattern was perfectly spaced. If you pull one side of the rug tighter than the other, it was very apparent because the pattern would start to be on a diagonal.
I used the tip of the bullnose as a guide, making sure the center dot of the rug was right on the end of the bullnose.
So, pay close attention to the pattern if you get a patterned rug, and attempt the get each staple in the same place of the pattern.
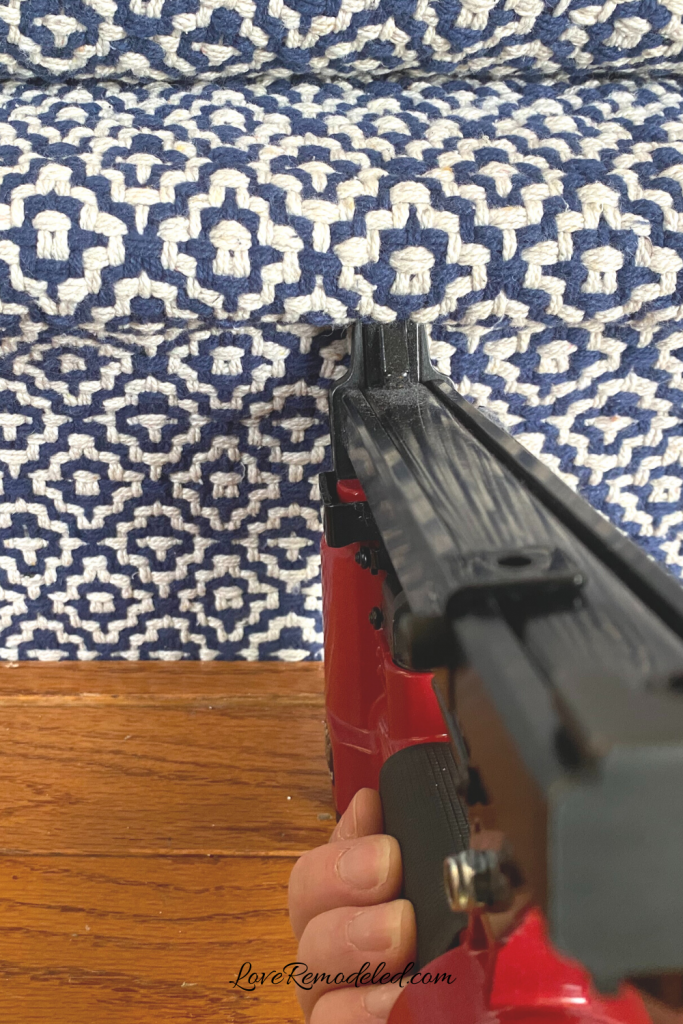
Now that the bottom or top rise is done, put a rug pad down on the tread. Place the rug over it, and staple the rug to the stair tread. Be sure to follow your side guide lines, making sure they are just covered by the rug to ensure the rug stays centered.
Remember also to continue pulling the rug tight (but not so tight that you distort the pattern).
Staple along each side of the rug (three to four staples per side should do it) and along the back of the tread. Get as close to the riser as possible with your staple gun.
Also staple under the bullnose to make sure the rug is attached there as well.


Continue stapling the rug to each riser and tread, ensuring that the rug stays centered and that any pattern stays consistent, until you reach the top step.
If your rug measurement is perfect and you were able to get a rug that is cut to length, you’re done!
If not (which is the more likely option…)
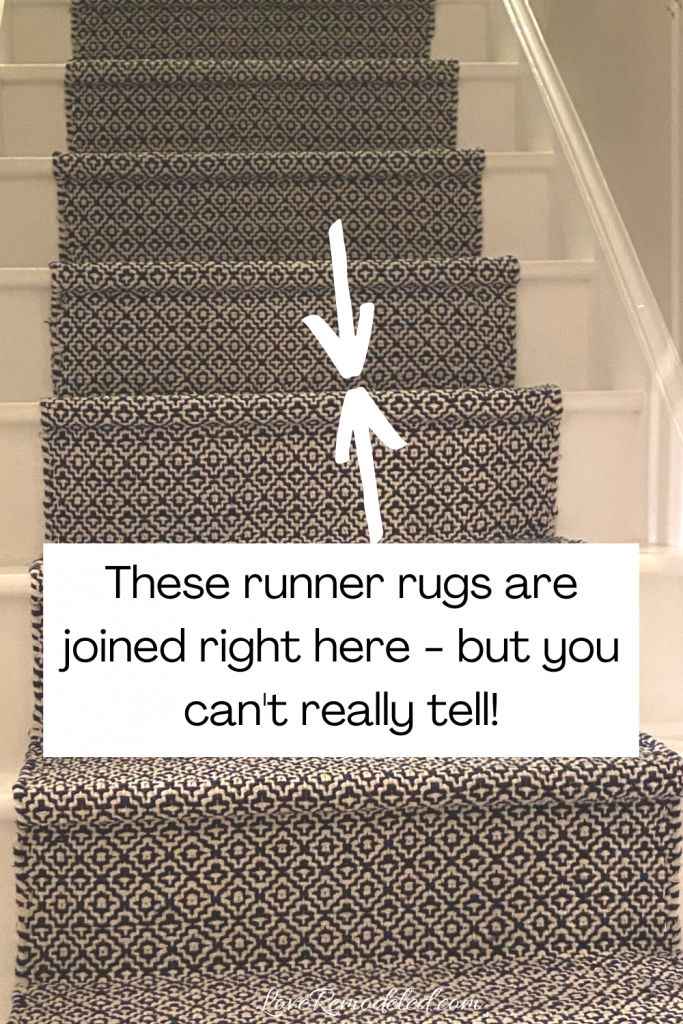
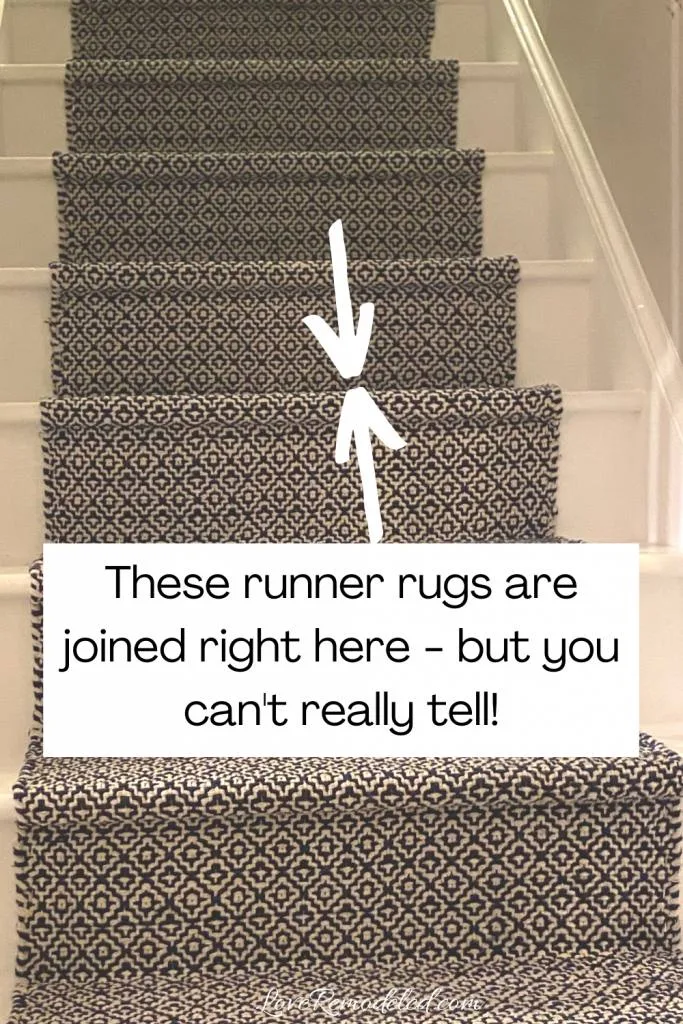
Installing a Stair Runner Optional Step 6 – Joining Two Runner Rugs
Since I used two rugs to get the length I needed, I had to join my rugs in the center. You can’t always cut a rug to length, especially one that is made of cotton fibers.
So, instead I had to fold it in various places. For example, I folded a bit of extra rug under the initial riser at the bottom. This helped reduce the length by a few inches. I also had to fold the rugs in the center where I joined them to make sure the pattern stayed consistent.
As a note, you never want to have multiple layers of rug on a tread. This will make the tread squishier and potentially uneven, possibly making it hazardous. Instead, make sure that any doubled up rug is on a riser.
Here is where I joined my rugs. As you can see, I had to let the binding out where I joined them as well, otherwise it would have been bulging instead of flat.
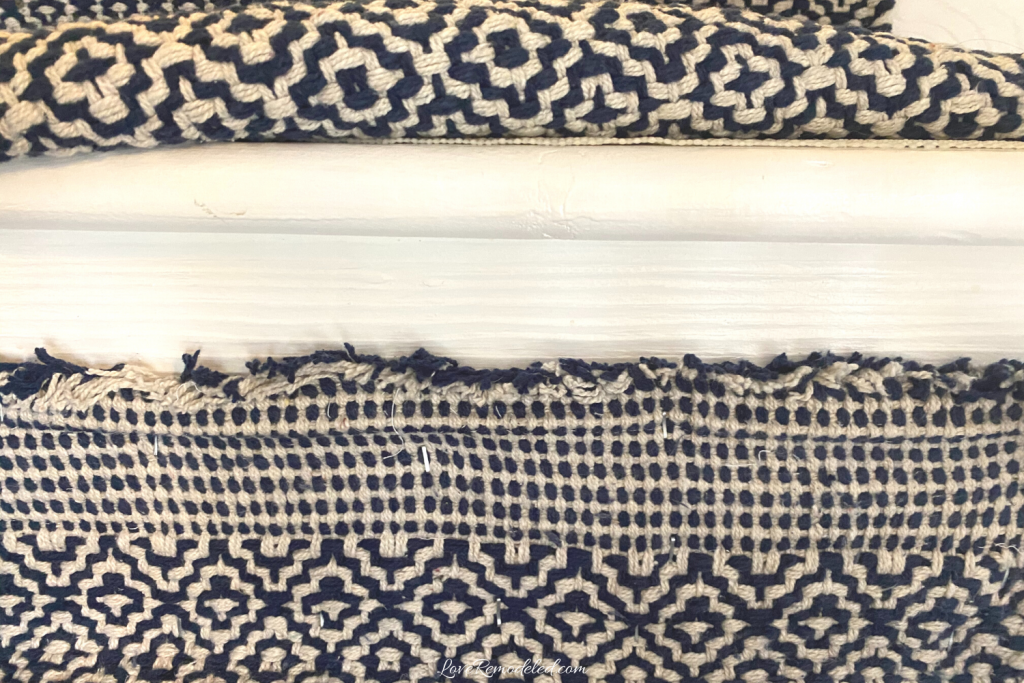
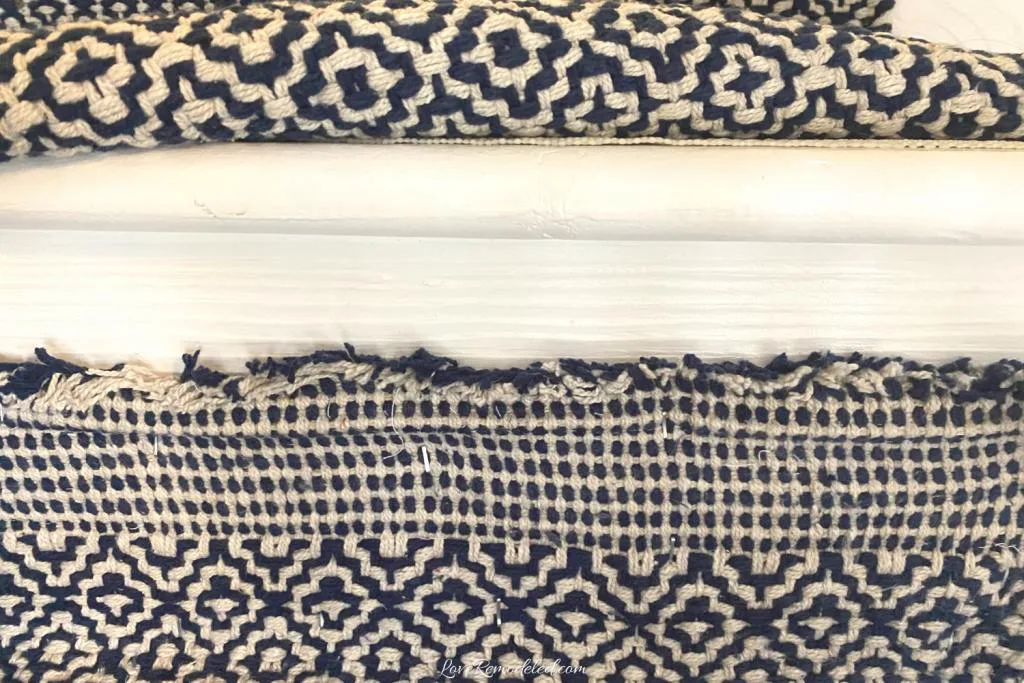
I then made sure to fold the top runner rug so it just reached the bottom of that riser. This helped to hide the seam in the natural seam of the stairs.
It is probably even better to join it right under the bullnose, but my rugs wouldn’t join there without getting to bulging too much.
You may have to play with this a bit to get it just perfect. In fact, it is really helpful to lay out the rugs before you start stapling to see where you will need to join them. This will let you know if you need to fold the rug on the bottom riser or not.
That’s how to install a stair runner!
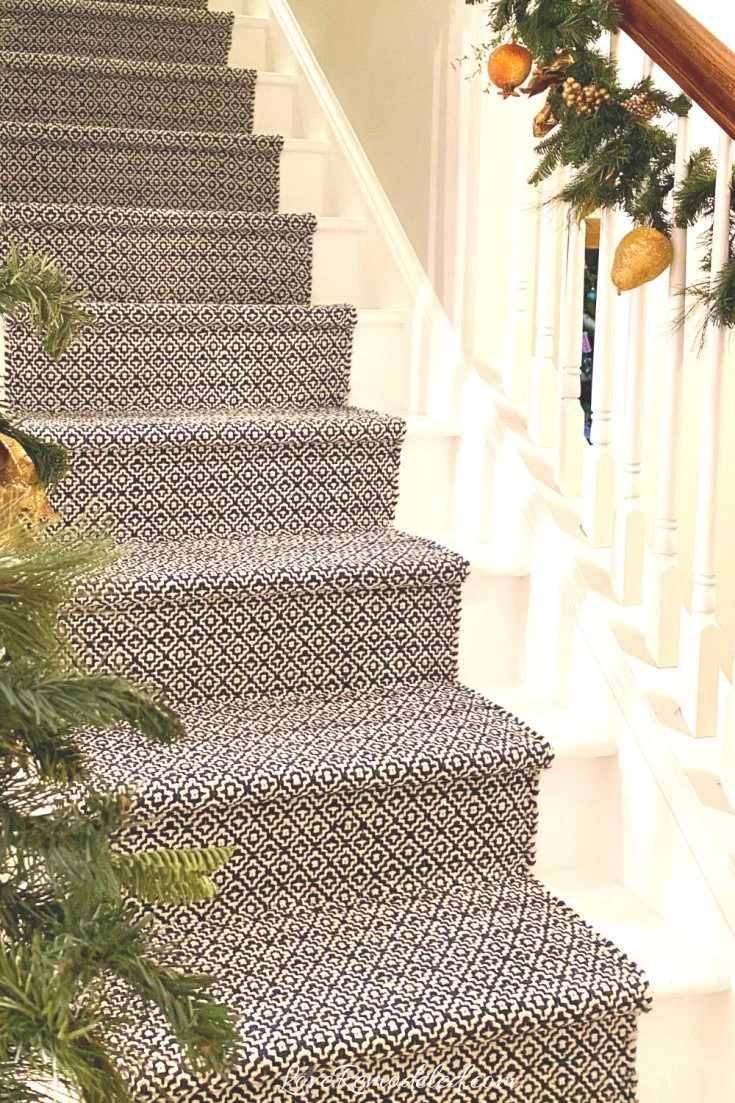
Here is how my stairs turned out:
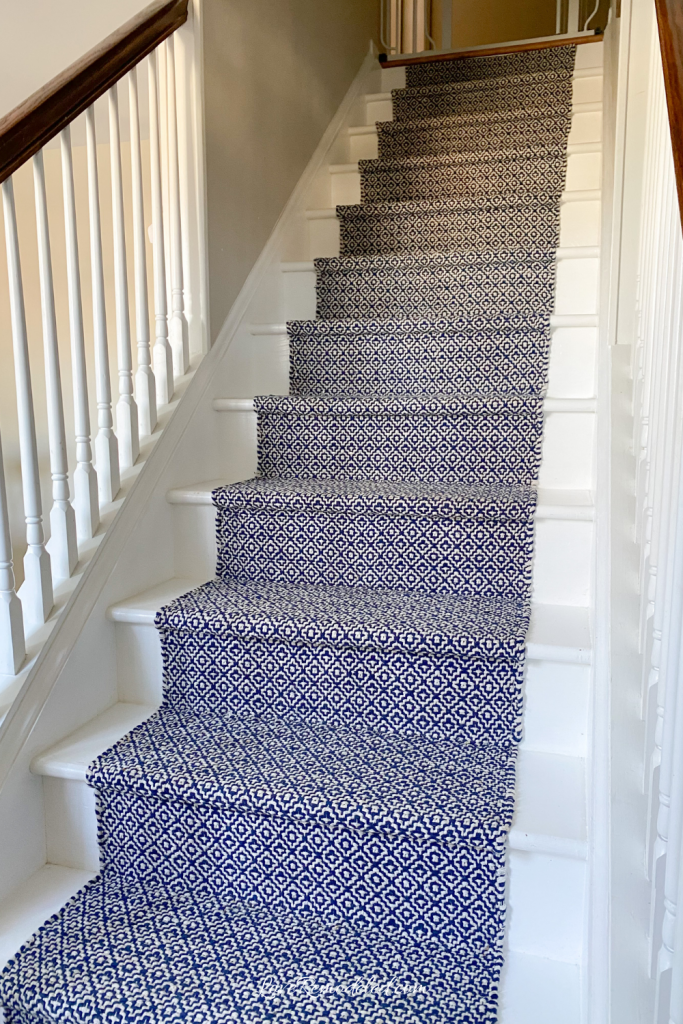

Adding a stair runner really transformed the look of the stairs, made the steps easier to walk on, and gave the space my own style.
Final Thoughts on Installing a Stair Runner
Installing a stair runner is a really easy DIY, but that doesn’t mean it isn’t tricky at points. This tutorial should have answered all your questions, but if you have any others, feel free to drop me a comment below!
Remember to check out the gorgeous rugs from Annie Selke! You’re going to love them!

Installing a Stair Runner - Easy DIY Tutorial
Learn how to install a stair runner on your own in this easy-to-follow, DIY tutorial.
Materials
- runner rug
- rug pad
- staples
Tools
- electronic or pneumatic staple gun
- measuring tape
- scissors
Instructions
- Measure the total length of your stairs. Be sure to include the riser, tread and bullnose lengths. Order a rug or set of rugs that is at least as long as the total length. For more information on measuring for the correct length and width runner, see the associated blog post.
- Mark a line on each riser and tread of the stairs to show where the rug should go. This will keep your rug centered.
- Cut the rug pad in equal size rectangles to cover each stair tread. Be sure that the rug pad is smaller than the rug width, and that it doesn't go over the bullnose (this will add bulk to that area, making it look less neat).
- Using a sharpie, color the staples in color that matches the rug. Then put the staples in the staple gun.
- Making sure your rug is straight, begin stapling the rug to the top or bottom step. It should begin at the top of the top riser (right under the bullnose) and end at the bottom of the bottom riser (right where the floor begins). You can start at the top or bottom, depending on your preference.
- Place a rectangle rug pad down on the stair tread and staple the rug to the tread. Be sure to just cover each guide line on the side (to ensure the rug stays centered) and to pull the rug tight, but not so tight that the pattern becomes distorted. Staple along each side, at the back of the tread, at the bottom and top of each riser, and under the bullnose.
- Repeat for remaining steps.
- If necessary to join two runner rugs, fold the rugs under on a riser and make sure the pattern lines up.