
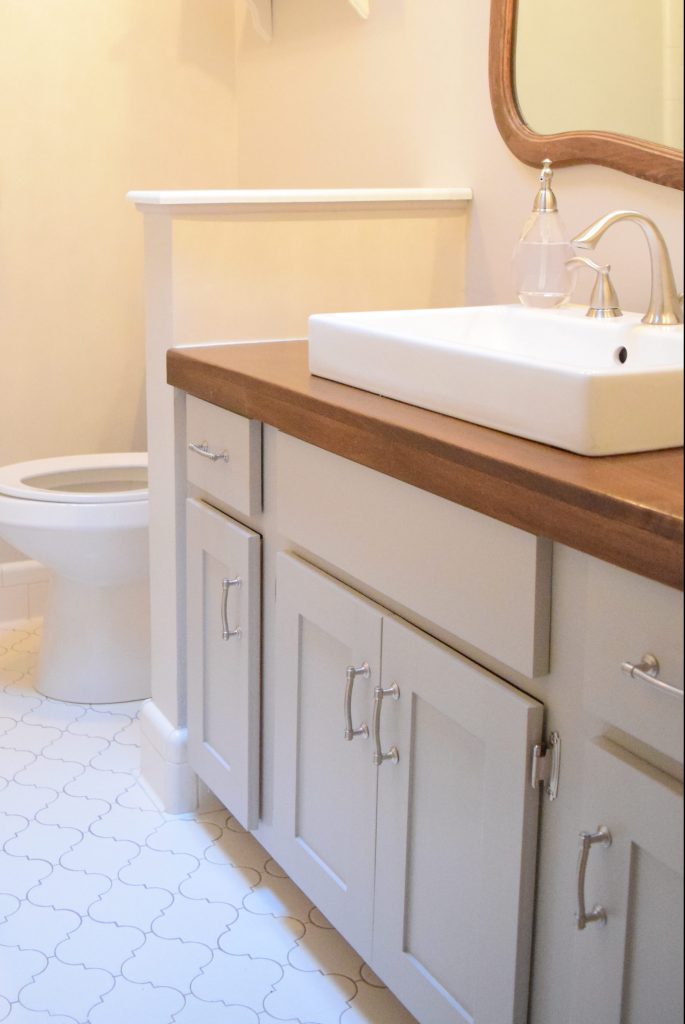
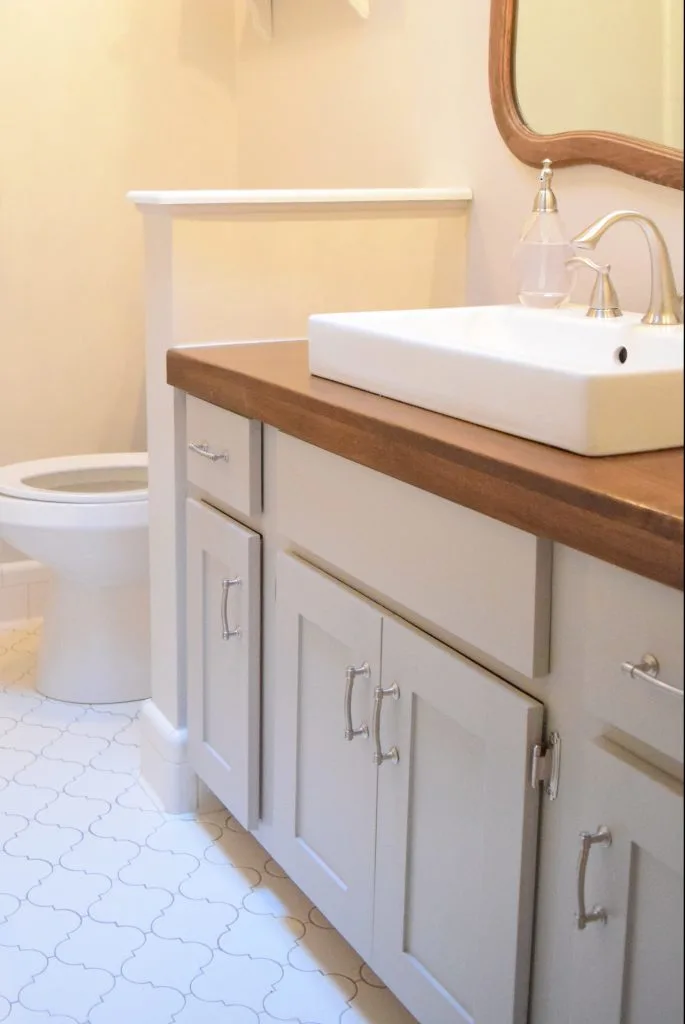
Making a farmhouse bathroom vanity top is a great way to update an old bathroom for cheap!

The vanity in my fabulously 70’s bathroom was in need of some serious updating. After I updated the vanity base with refaced drawers and doors, I began working on the top.
As a fan of Fixer Upper, I knew that a farmhouse bathroom vanity top was something that I wanted, but I wasn’t sure how to get it.
Again, I was faced with no clear way to economically (cheaply!) get a new top.
I looked into granite and quartz, but since the vanity was not a standard size, I would have to either buy a standard size base and cut a half inch off of each side (this is NOT is my repertoire of knowledge and skills… yet…), or order a custom vanity top to the tune of around $500.
This post may contain affiliate links. If you have any questions, please see my disclaimer page.
So I decided to make my own farmhouse bathroom vanity top.
I read several different blogs and websites on how to make a wood countertop, and then set out to my local big box home improvement store to get my supplies.
Here’s a list of what I used to make my farmhouse bathroom vanity top:
- (2) 1 inch x 12 inch x 4 feet poplar board
- 1 inch x 2 inch x 8 feet poplar board
- wood glue
- clamps
- mouse sander
- sand paper (80 grit, 120 grit, 220 grit)
- Minwax Pre Stain Wood Conditioner
- Minwax Wood Finish in Special Walnut
- Waterlox VOC Compliant Finish
- foam paint brushes
- old socks
- reciprocating saw
- farmhouse sink
- caulk
1. Cutting and Gluing
To start, I cut the boards to the desired length (36 inches) and then glued and clamped them together.
As an aside, my 3 year old helper dumped a HUGE amount of glue on the top of one of the boards while I was clamping in a different area, so I quickly wiped off as much as possible.
I was worried that this would mess up the stain later, but thankfully it did not! (And you thought you were the only one who had catastrophes when trying to be handy).
I left the boards clamped together overnight to make sure the bond was really strong.

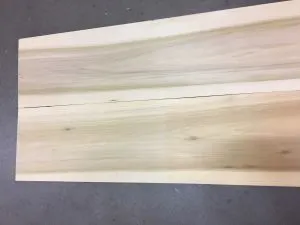
Then I glued and clamped the 1 inch x 2 inch piece to the front of the boards to make the vanity top look like it was three inches thick instead of one (tricky, I know).

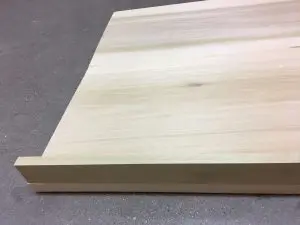
2. Sanding
After the glue had set (24 hours), I sanded the boards with my mouse sander using three different grits of sandpaper.
I started with 80 grit, then resanded with 120 grit and finished with 220 grit.
Since this was going to be a vanity top, I wanted to make sure I did it right.
I also made sure to sand off all of the remaining glue and then sanded the edge of the board so it would have a curved edge instead of a square one.
3. Staining
When the sanding was complete, I applied the Minwax Pre Stain with an old sock (conveniently, my bin of mismatched socks was right next to where I was working).
This helps to condition the wood so that the stain goes on uniformly.
After waiting 15 minutes, I wiped off any excess (there really wasn’t any though).
Then I got another old sock and began to apply the Minwax stain.
When I finished with the first application, I waited another 15 minutes and wiped off the excess (again, there wasn’t any).
I applied three coats like this until I felt that the wood was the color I wanted. I left the stain dry overnight to make sure it was completely dry.
4. More Cutting
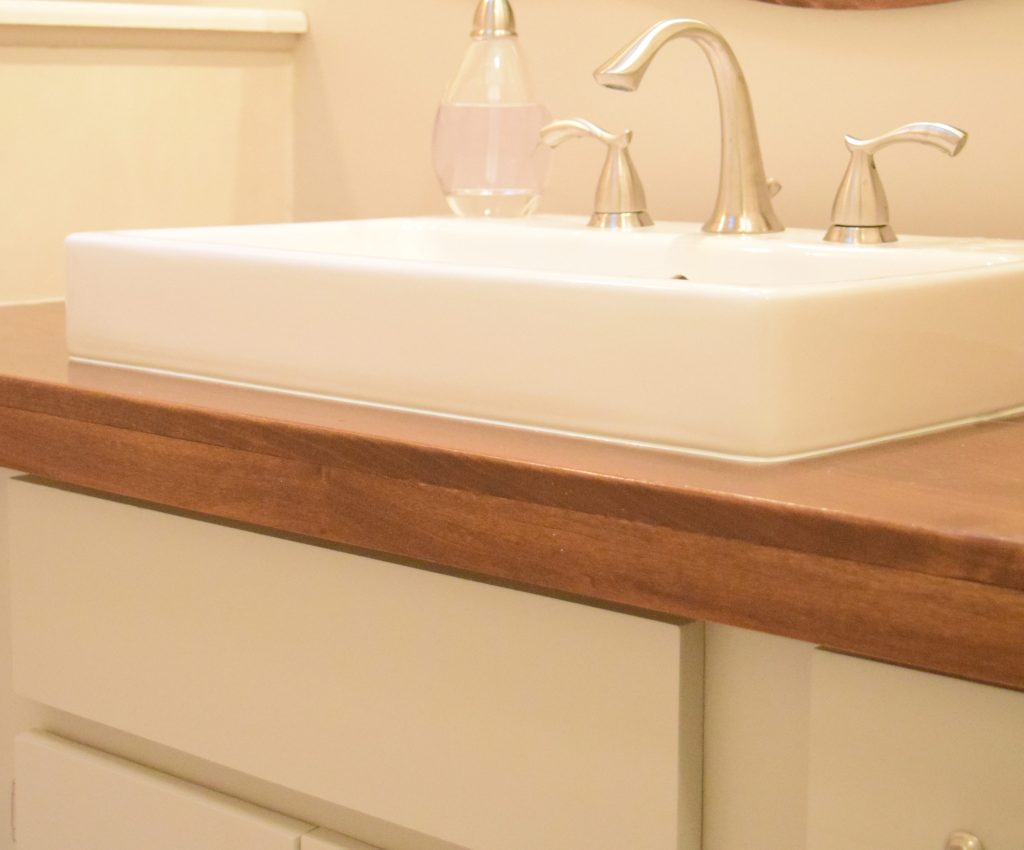
The next day, my husband used a reciprocating saw to cut the hole for the farmhouse sink we had purchased.
We used the template that came with the sink to make sure we did not make the hole too big or too small, but it was still a little challenging.
To our relief, the hole was perfect!
5. Waterproofing

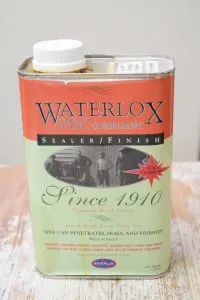
Now, I was ready to put the Waterlox on.
This was the most crucial step of all! I knew that the top had to be completely water tight since it would regularly be drenched by my two little helpers.
So I did a lot of research to determine which product to use as a finish, and decided on Waterlox because the company actually developed the product to seal boats (if this stuff can seal a boat, it can seal my vanity top!).
I also chose the VOC Compliant version of the product since I knew that I would be sealing the countertop in my basement and did not want my kids to inhale harmful fumes.
Since Waterlox is an oil based product and I knew I would be throwing them away after each coat, I used foam paint brushes to apply it.
I applied the Waterlox over whole top and sides, and made sure to get a good coating inside the sink hole (and even on the underside of the edges of the hole, just in case!).
I let it dry for 24 hours per the instructions.
When I checked on it the next day, I found that the Waterlox had raised the grain of the wood. I gave it a light sand with …. grit sandpaper by hand, and then wiped it with a slightly damp rag.
Then, I dried it and applied another coat of Waterlox.
I did this each night for 4 days, for a total of 4 coats of Waterlox.
I wanted to make sure that nothing was getting through to the wood causing it to mold or rot, and after 4 coats I felt confident that we were ready to go!
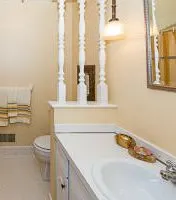
The Finishing Touches On My Farmhouse Bathroom Vanity Top
My resident strong guy (AKA husband) brought the vanity top to the bathroom for me, and we set it in place. Perfect!
Well almost… the walls were not completely straight, leaving a gap on one side between the wall and the vanity.
Learn from my mistake – measure both the front and the back of your wall space if you’re fitting a top to go between two walls and cut accordingly.
Just because its 36 inches in the front does not mean it is exactly 36 inches in the back! Anyways, it was nothing a little caulk couldn’t fix.
So, I caulked between the wall and the new top with clear caulk and put a bead of caulk on the bottom of the sink.
Then, we fit the sink into the whole and allowed the caulk to adhere the sink bottom to the vanity top.
My resident plumber (okay, it was my husband again) hooked the drain and the faucet up and we were done!
One Year Update
Now you may be wondering how the finish held up. Well, after one year of use (and by use I mean abuse – this is my KIDS bathroom), I’m happy to report we still love it!
The finish is as strong today as it was when we first did it. It has held up to cleaning products, toothpaste, and matchbox cars (why are there matchbox cars racing on the bathroom vanity?!).

And The Best News
The cost of this farmhouse bathroom vanity top came to just under $200, and that includes the $100 farmhouse sink. Now, time to decorate my farmhouse bathroom and start on the tile!
Like this pin? Share it with your friends, or pin it to save it for later!


Tammy
Friday 9th of December 2022
What color minwax stain did you use on the bathroom vanity top?
Lauren
Wednesday 14th of December 2022
Hi Tammy! This was several years ago now, but I'm pretty sure it was Special Walnut! :)
Cori
Sunday 16th of January 2022
This is beautiful! Have you found that this can withstand any heat, like a curling iron propped on on its stand?
Lauren
Monday 17th of January 2022
Hi Cori! Thank you! I didn't find any problem with this. I would imagine that if the actual heated part was on the wood, it would cause a mark, but on a stand I never had an issue.
Lorraine
Sunday 2nd of May 2021
Where do I see the After picture?
Lauren
Monday 3rd of May 2021
Hi Lorraine! Thanks so much for your comment - I had no idea that the after pictures were somehow dropped from this post! I added the after pictures! Thanks again!
Marianna
Friday 14th of August 2020
I cannot find this exact Waterloo sealer there are so many others but I want the one you used. I tried amazon it’s not shown there. Please advisr
Lauren
Friday 14th of August 2020
Hi Marianna! See if there is a WoodCraft store by you. They will have it. Good luck!