
A Review of Giani Marble Countertops
Are you ready to update your kitchen? I’ve partnered with Giani to share my experience and opinions on their Marble Countertop Paint Kit.
Giani Marble Countertop Kits are an easy, inexpensive way to update your kitchen without replacing your current countertops. Learn everything you need to know about them here!
Why I Chose To Paint My Countertops
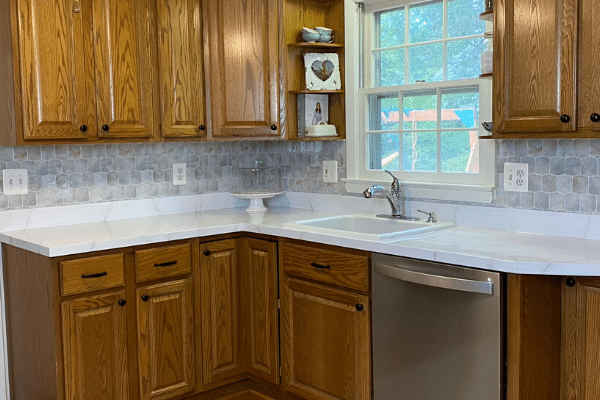
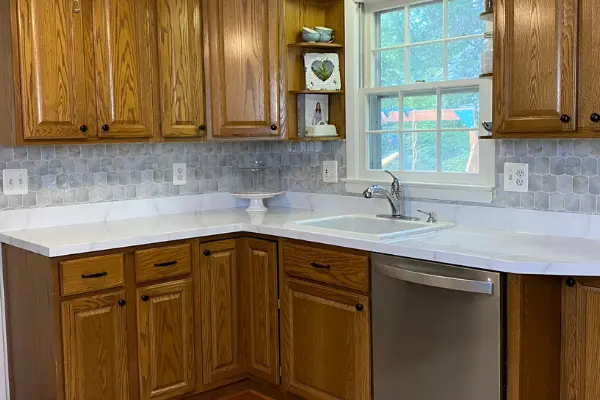
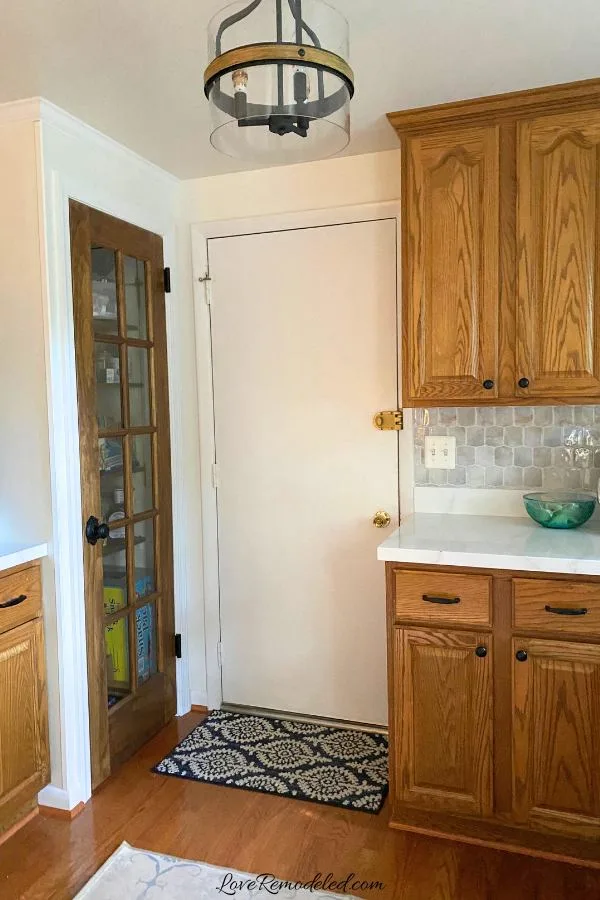
Recently, I’ve been working on updating the kitchen in my current home. Here is what my kitchen looked like before I started updating it.
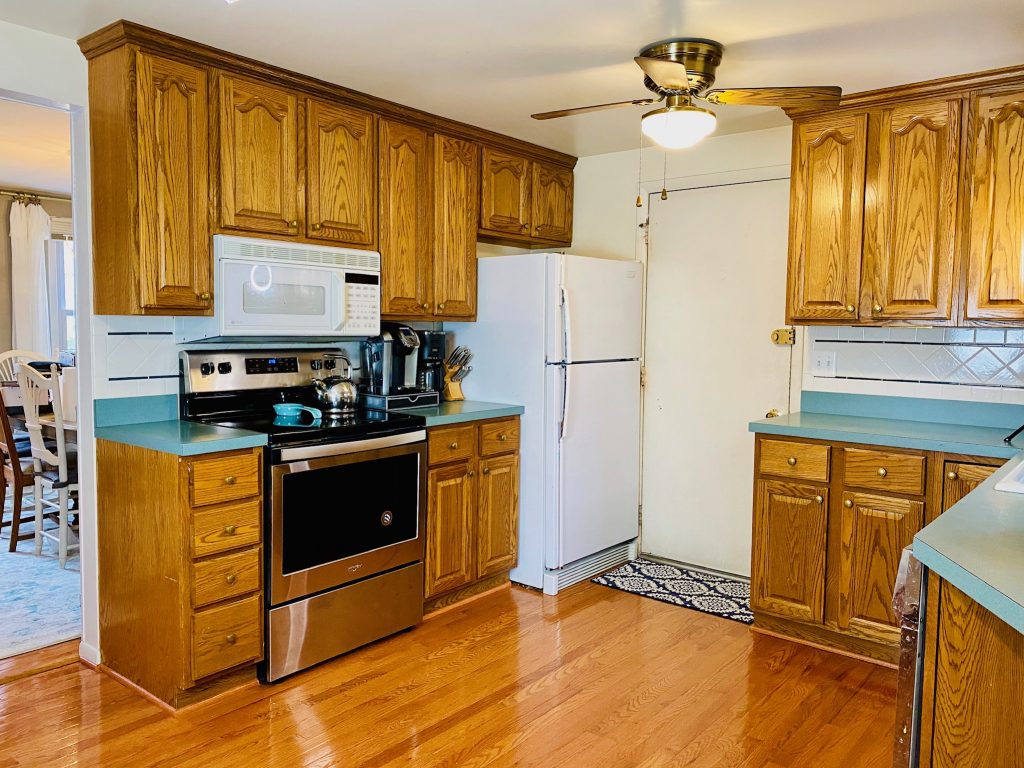

It had wood cabinets with gold knobs, turquoise colored countertops and a white and dark green backsplash. The kitchen was in great condition, but was out of date.
I wanted to add some additional kitchen storage and couldn’t find matching wood cabinets. So I added some gorgeous white RTA cabinets on an adjacent wall as an accent to the wood cabinets.
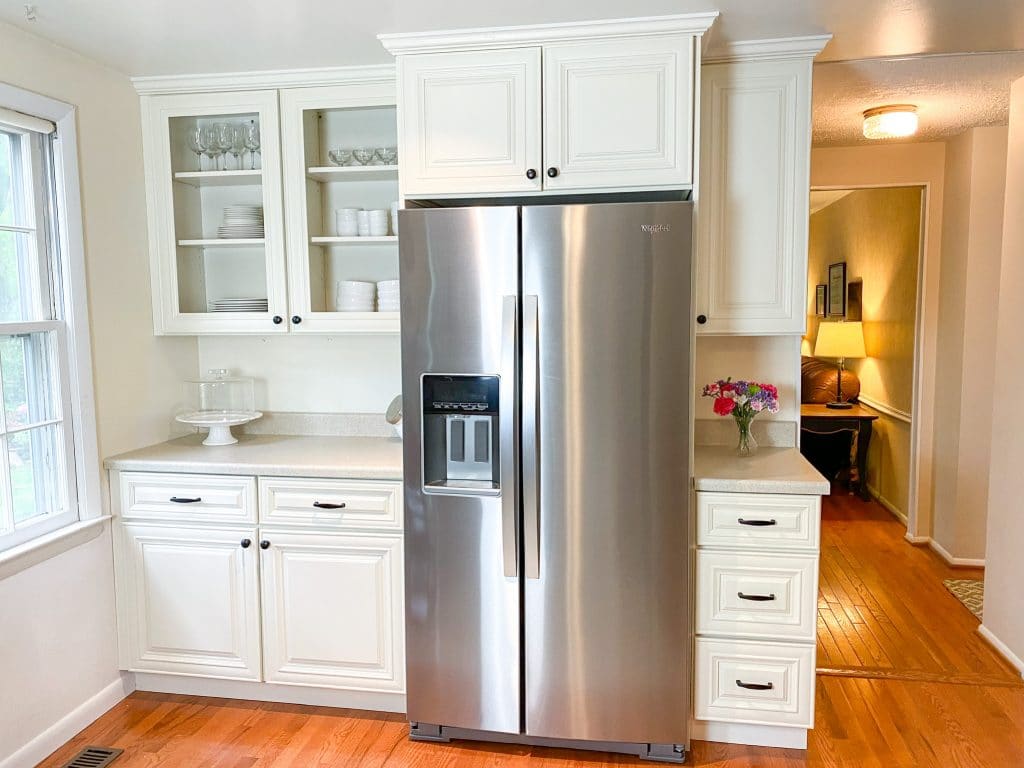

To give the space a cohesive look, I needed to have the same countertops and backsplash on both the wood and white cabinets.
So I started looking into options for a countertop. I really wanted quartz or marble, but putting in real quartz or marble costs thousands of dollars. Seeing how much they would cost, I began looking into options for refinishing or resurfacing countertops.
During my research, I stumbled upon Giani Marble Countertops. The website claimed that I could paint my countertops to look like Carrara Marble. The kit cost under $200, so it was much less expensive than putting in real marble.
It seemed like the perfect solution for updating my kitchen countertops without spending a ton of money.
This post may contain affiliate links. If you have any questions, please see my disclaimer page.
Giani Marble Countertop Paint Kit
When my paint kit arrived, I found that it had just about everything I needed to complete the project.
Inside the box I found paint, epoxy resin and activator cans, a spray bottle, paintbrushes, rollers, a sponge, sandpaper, plastic drop clothes, stir sticks and detailed instructions. The only other thing that I needed was blue painters’ tape.

The Process of Painting Countertops
After watching how-to video that Giani made, and reading the written instructions several times, I was ready to paint my countertops.
Prep Work
I started prepping my countertops by scrubbing them with a Brillo pad and then wiping them down twice with a wet rag. I also removed the caulk from around the sink.
With painter’s tape, I covered the edge of the sink, the sides of the stove and the sides of the fridge cabinet. I left everything else untaped, knowing that I would cover any stray paint marks when I repainted the kitchen.
As a note, I didn’t remove the caulk from the backsplash area, because I was planning to cover over it with peel and stick backsplash tiles. I also didn’t tape the walls, since I knew that I would cover them with a new backsplash. Your prep work may take a bit longer if you need to do these steps.
That was it! Since I’m typically impatient to start seeing results, I love that painting my countertops took really minimal prep work.
I was nervous to begin painting, because I knew that I was committed once I started. But since I had green countertops, I figured I didn’t have much to lose and forged ahead.
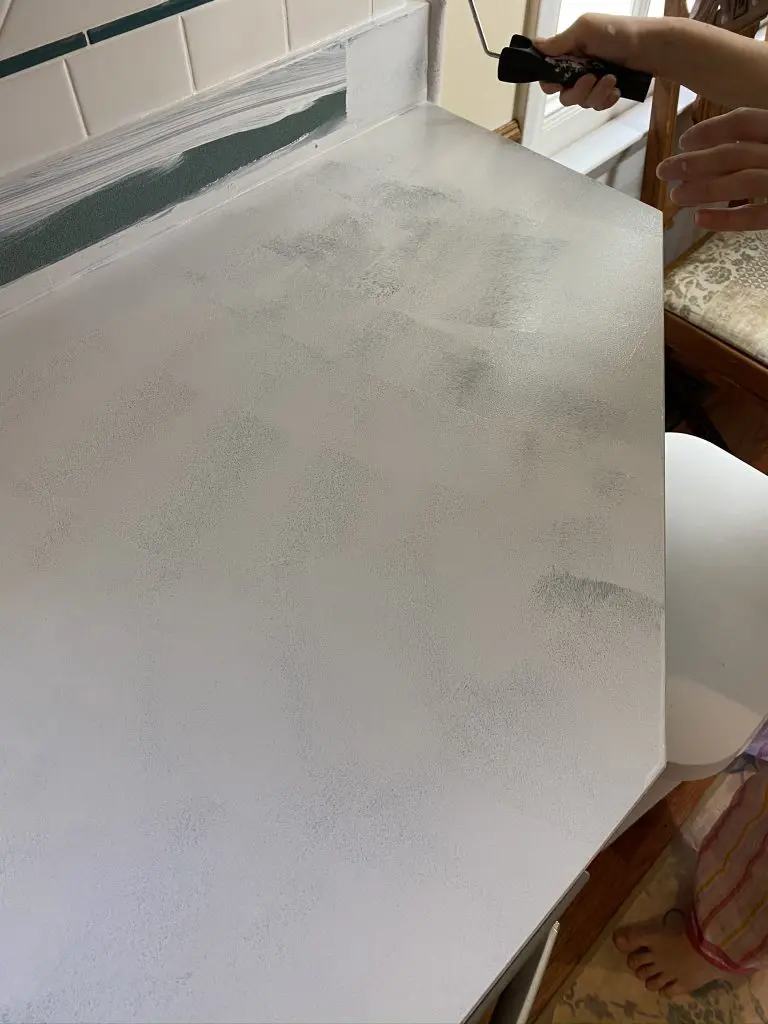
Step 1: Priming the Countertop
I followed Giani’s priming instructions and painted the backsplash area first, and then rolled the top of the countertop.
The paint acted just like paint should. It covered well, was thick but not goopy, and seemed to stick well.
My first coat looked like this:

After waiting the recommended 4 hours, I did a second coat.
When I was done with the second coat, it was clear that I would need a third coat. The coverage was good, and the second coat had covered the light countertops that sat on the white cabinets, but those green countertops were still peeking through.
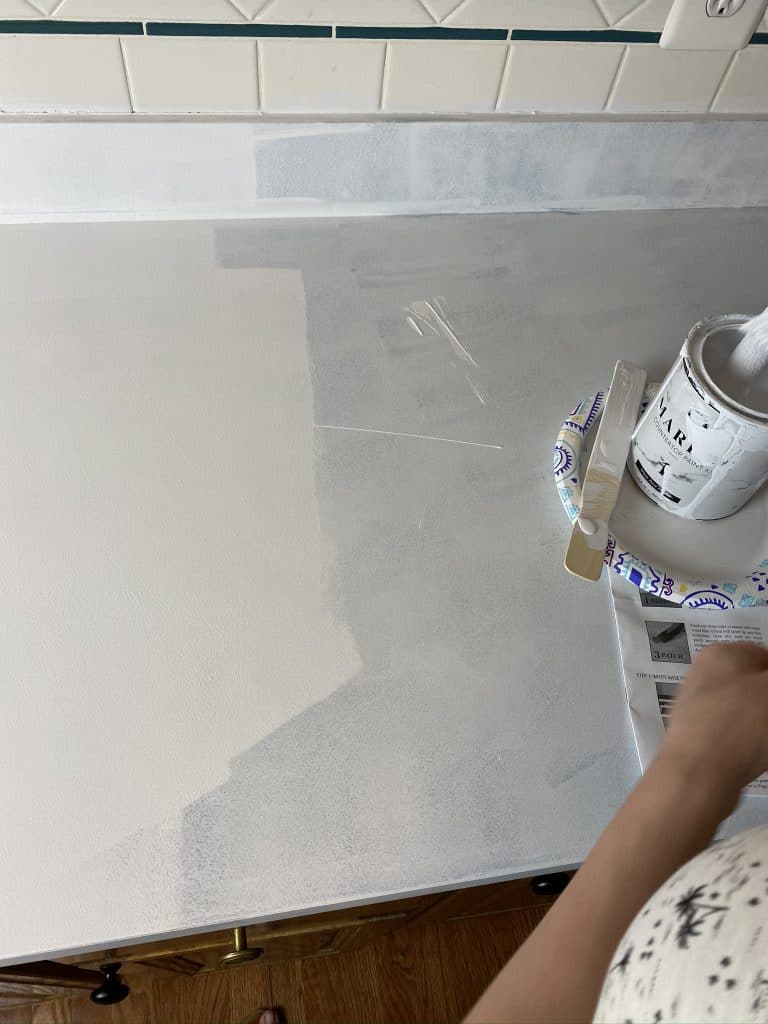
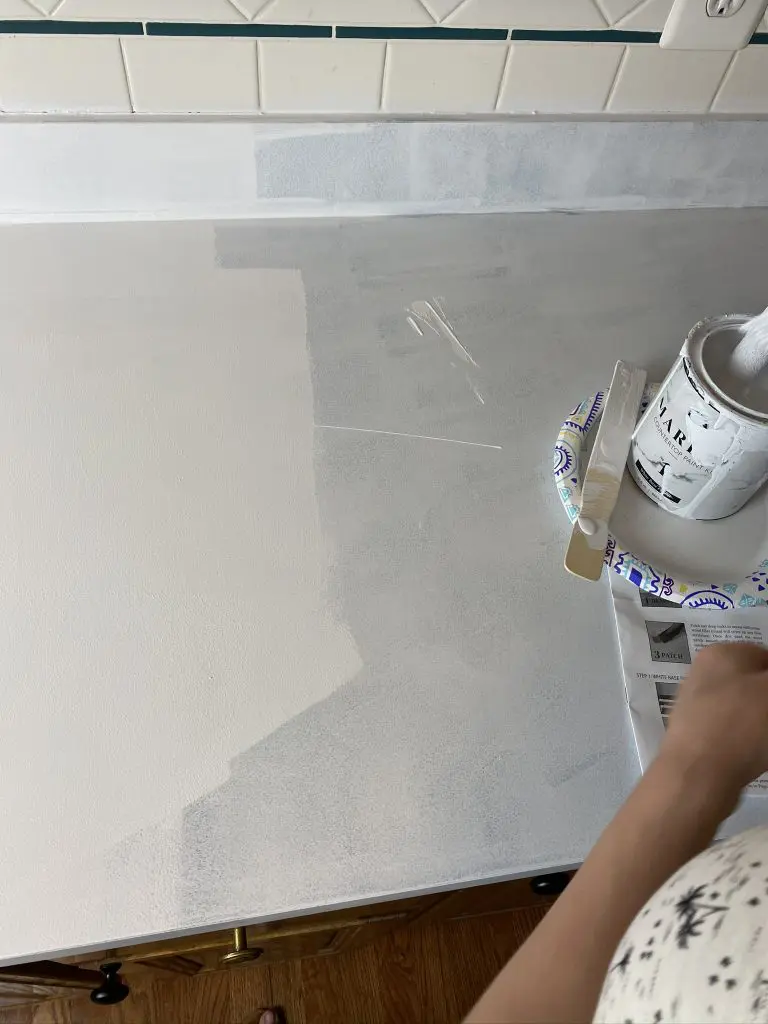
According to the directions, I could touch up the area with a foam brush an hour after the second coat. Since I needed more than a touch up in certain areas, I went ahead and gave everything a third coat with the foam roller.
Step 2: Adding Veins
I was pretty nervous to do the veining because I am not artistic in the least. Thankfully, the instructions said that I could erase any lines I didn’t like.
To begin, I looked at a lot of pictures of marble to see how the veins should look. Photos on Shutterstock ended up being the best option for viewing large slabs of marble.

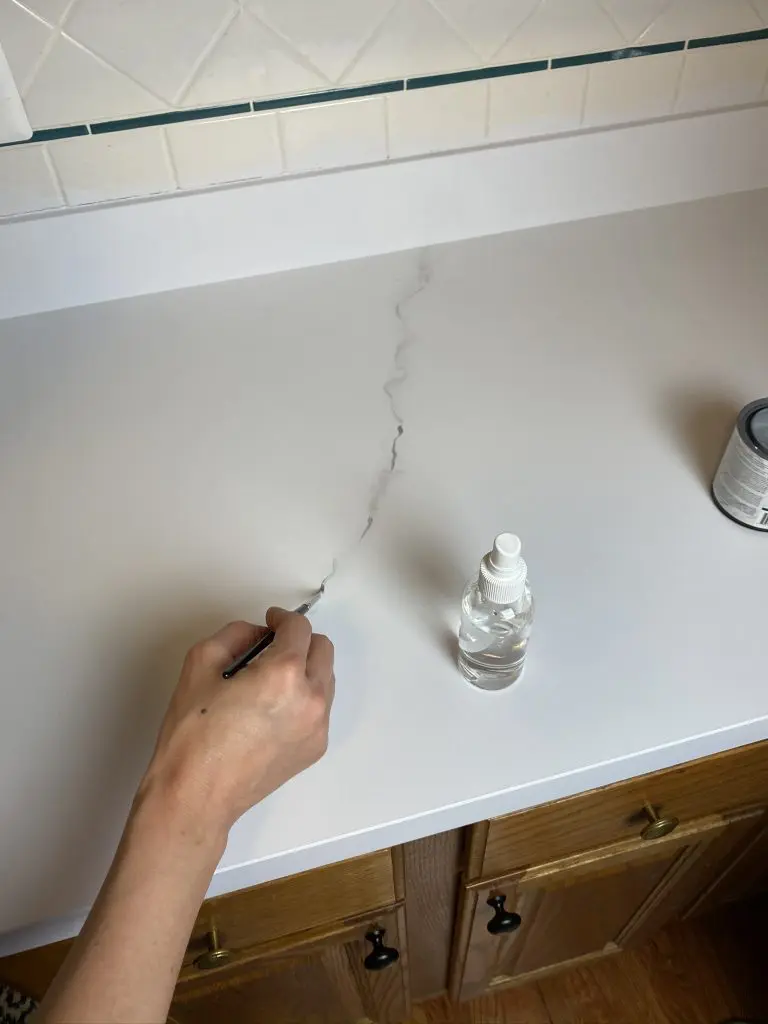
I drew the veins on with a loose hand while twirling the brush. This gave it the squiggly, imperfect look of a marble vein. Then, I spritzed the line with a bit of water and dabbed, pushed and brushed the line with a dry paintbrush.
AND IT LOOKED AMAZING! I couldn’t believe it!
There were a few times I painted a line that was too dark, too straight or just plain old weird looking. Thankfully, I was able to spray them with water and wipe them off before they really dried.
I was relieved at how easy the process was, and amazed at how well it was turning out.
The next step of the directions was to add highlights with a can of white paint that Giani provided in the kit. While it was an optional step, I thought I would try it out to see how it looked. I added some here and there, but didn’t see any difference. Even now, I can’t tell where I applied the white highlights.
Step 3 – Prepping for the Epoxy
This was the scariest step of the whole process to me. The directions started with a big disclaimer to block off 4 hours of time for this step. With a newborn and three other young children, I didn’t have four hours to devote to it.
As it turns out, you don’t actually need four hours in one chunk. You need a long time to tape the countertops and drape the cabinets and floor, but the epoxy part of the process goes pretty quickly.
To prep the countertops for the epoxy, I sanded the countertops with the provided sandpaper. Then I wiped them down with a damp paper towel (twice, for good measure).
After, I taped all along the underside of my countertops, around the sink bowl, and at the edges of the countertops (where they met the stove and the fridge cabinet). Then, I draped all of the cabinets with the provided drop cloths.
Step 4 – Giani Marble Epoxy Topcoat
With a timer in hand, I poured the epoxy activator can into the epoxy resin can and mixed them together for exactly 3 minutes and 15 seconds.
I poured the epoxy on my first stretch of countertop in three lines, reserving some of the can for the backsplash and front lip. Then I painted the epoxy on the backsplash, and rolled the top of the countertop.
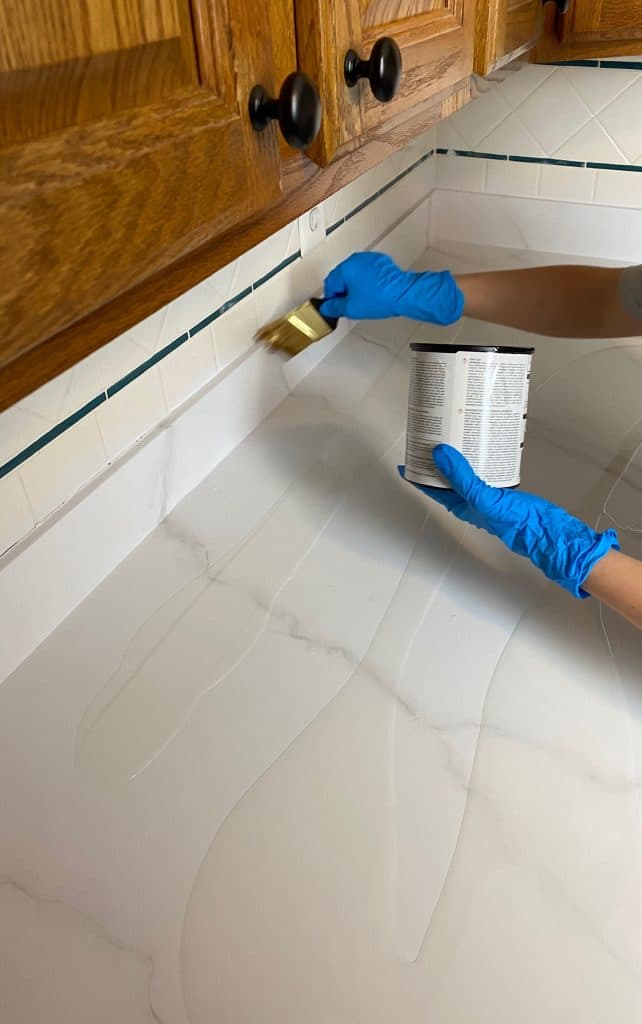

The epoxy goes on thick, and it seemed like there is way too much at first. As the directions suggest, I had mapped out where each can of epoxy would go so it covered the recommended 6 feet of countertop. Even with doing that, it still felt like maybe I had too much for the first section. But with rolling it out to cover the whole 6 feet evenly, I figured that Giani knew best, and allowed it to sit thick on the countertop.
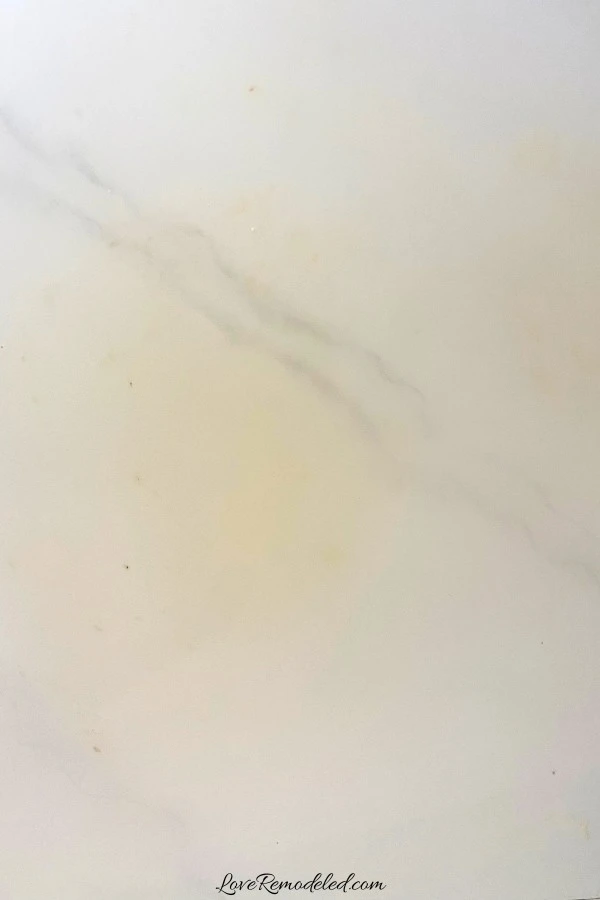
As advertised, the epoxy self-leveled to a nice smooth layer. When it came time to pull the epoxy over the edge of the countertop, I did so with hesitation, but it turned out fine. Not too much falls to the plastic sheeting, and the plastic catches it just like it is supposed to.
My kitchen has about 15 feet of countertop, so I used 2 and a half sets of the resin and activator.
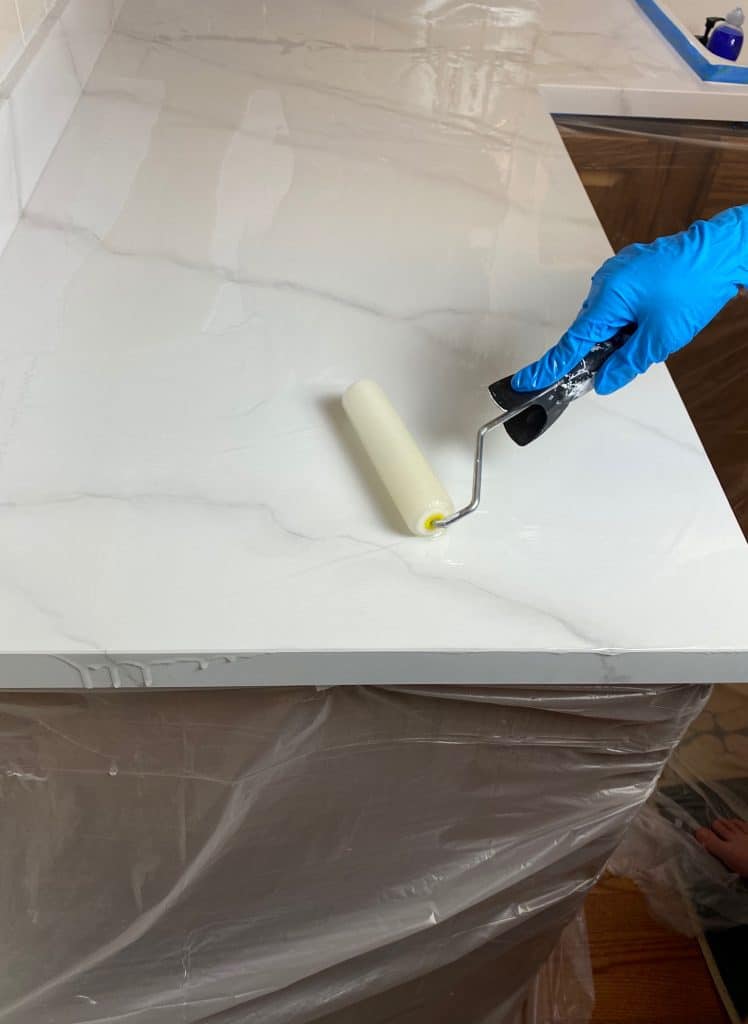

While I was really nervous about applying the epoxy, it went on quickly and was very easy to do. When I found little specks in the finish, I was able to dab a gloved finger on the debris and it came right out. You can see this in the video.
After an hour or so, we removed the tape from underneath the countertops so the epoxy didn’t harden on them, and then left them to dry. By the next morning, they were dry to the touch. While the instructions say that most things (toasters, dishes, etc.) can be put on the countertops after 2 days, we waited the full 7 so as to not damage the finish.
So, Can You Paint a Countertop to Look Like Marble?
Yes, you can! And Giani’s marble countertop paint kit makes it easy.
I am truly amazed at how good these painted marble countertops look.

I love the shiny, glass like finish that makes it look like real marble, and how easy it is to draw the veins on.
Will These Painted Countertops Last?
Because the epoxy goes on thick and dries to a very hard finish, these painted countertops seem as though they will be very durable. They feel as hard as a rock (or as marble, we could say).
Problems and Solutions
Epoxy Drips – Drape Carefully
I did have two places where the epoxy got onto my cabinets underneath the sheeting, but both places were where I was running out of plastic draping and covered the area poorly (or in one case, with a garbage bag). I saw the one spot prior to the epoxy drying and was able to wipe it off, but missed the other and ended up with epoxy on the top of a drawer. Once the epoxy dried, I was able to peel it off easily.
Extra Epoxy Along Tape Line – Tape Carefully
There were some places where the tape on the underside of the countertop stuck out over the edge a little bit. In those places, the epoxy pooled and it doesn’t have quite the crisp line that it should. No one else would ever notice this, but it is something to be aware of so you don’t make the same mistake.
Bubbles in the Epoxy Finish – Pour a Thick Layer
Last, the epoxy dried with bubbles in some places. They are as tiny as a pin head, but noticeable if you catch them in the right light. I reached out to Giani about why this happened, and they said that it can occur when the epoxy is spread too thin. It can be fixed by sanding and polishing the bubbles out. But, so you don’t have to to do this, make sure to stick to the 6 foot sections, and maybe make your sections just a bit smaller so that the epoxy goes on nice and thick.
Summary of My Review of Giani Marble Countertop Paint
There were a lot of things I loved about this project.
First, it was easy. Each step was detailed in the written instructions, leaving little room for error.
Second, the veining process is very forgiving. If you don’t like how a vein turns out, you can push or pull the vein using your paintbrush, blend it out to a very light vein, or erase it altogether.
Third, the epoxy is no VOC and low odor. I didn’t really even smell it. This was super important to me, since I had children in other rooms, and I was not disappointed.
Fourth, the epoxy self-levels, without any brush or roller marks. It is really an amazing topcoat – perfectly hard, shiny and smooth.
Last, I love that I was able to transform the look of my kitchen in a few hours (over the span of two days). Each step of the process was much easier than I anticipated, and it looks gorgeous. Every time I go into my kitchen, I am struck by how good the countertops look. Countertop paint was all I needed to give my kitchen a polished, finished look.
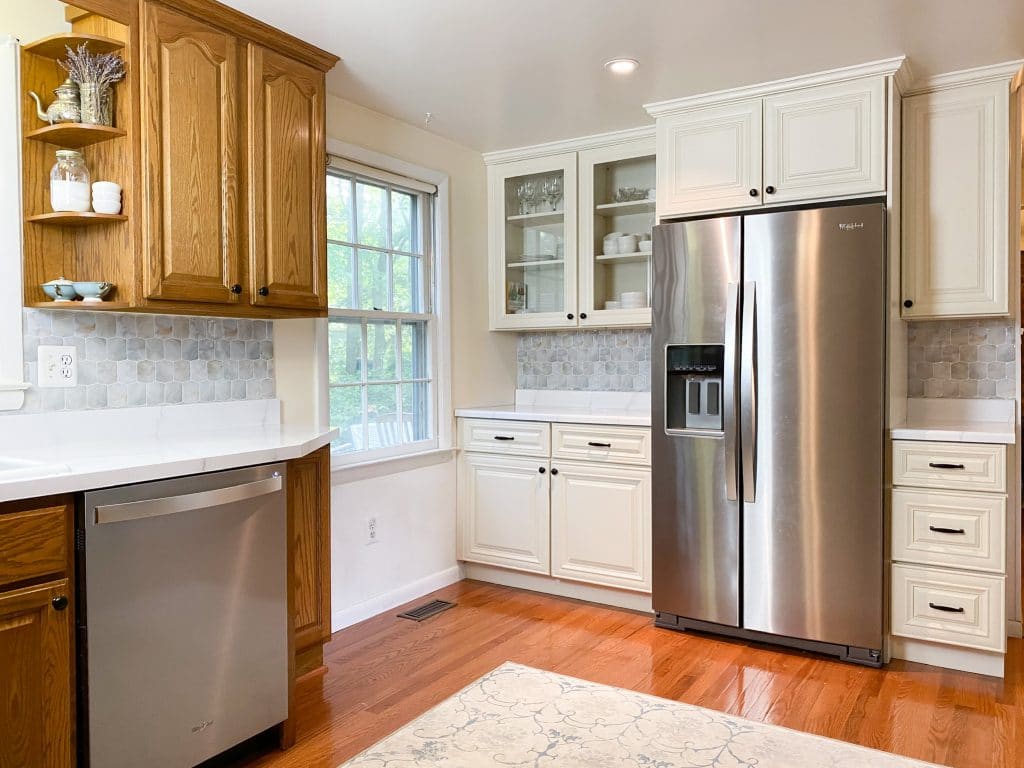

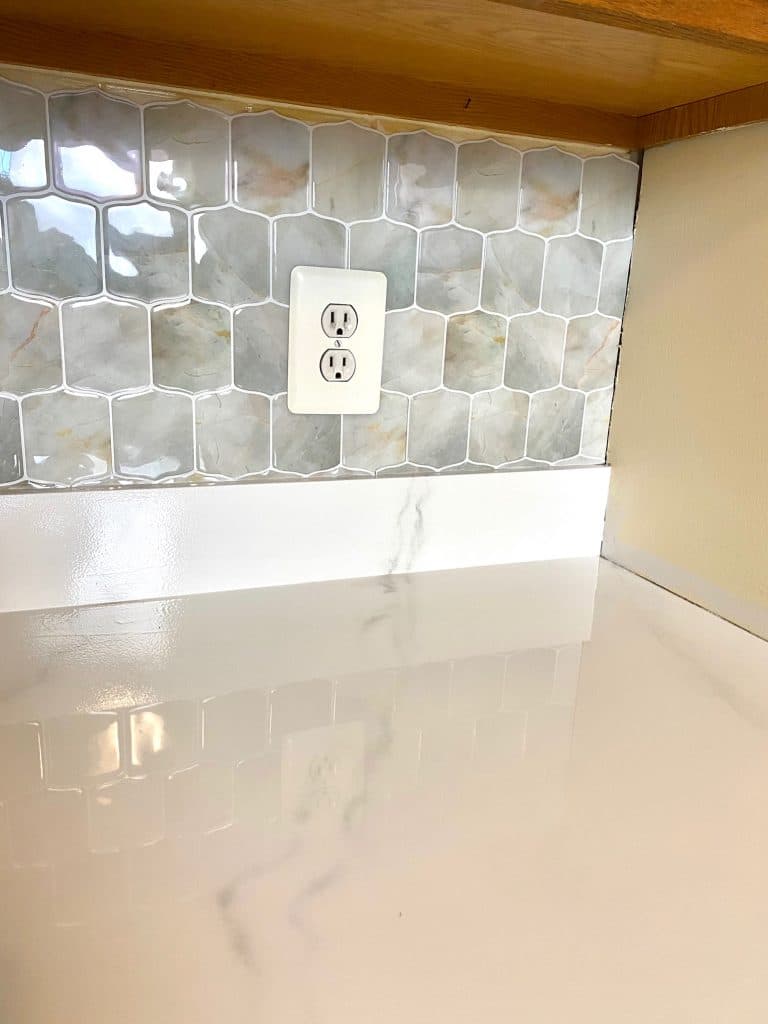
I finished off the kitchen by adding new knobs and pulls, and putting up a peel and stick backsplash. Altogether, the kitchen looks brand new.
Post Update – How Did It Last?
One of the questions I get asked the most about this project is whether the finished stood the test of time.
Overall, it did way better than I thought it would.

First, the finish stayed hard and shiny. Small surface scratches began to appear in the finish over time though, likely from dragging this or that across the countertop.
The scratches never went through to the original surface, and were only ever in the clear coat. You couldn’t see them at first glance, but if the light caught the countertop just right, you could see them. I tried pretty hard to get a picture that showed the scratches, but they were so minor that I couldn’t get the camera to capture them.
Second, the edges wore really well on the curved countertop I tried it on. The edges never chipped. But, on the squared countertop I applied the product to, I did end up with chips. Sometimes, I would be going to put a pot on the counter and would accidentally hit the front edge. That resulted in a few chips over time.
I don’t know if there is a fix for this in the application, but I did find that it stayed much better on a rounded or bullnose edge than on a squared edge.
Last, I found that if someone put something REALLY hot on the countertop, the white would yellow a bit. I don’t mean a mug of coffee… I mean a hot pot from the stove top. So, this is really easily avoided.

Final Thoughts
Using Giani Countertop Paint is a cheap way to refinish or resurface your countertops and transform the look of your kitchen or bathroom. It is easy to do, and everything you need is included in the kit!
Pick up your own paint kit here!

Laur
Tuesday 12th of September 2023
Hi! This is amazing! I have rounded edges on ends of my counter, do you think that is a problem with the epoxy?
Lauren
Tuesday 12th of September 2023
Hi Laur! I actually found that rounded edges do better than the squared off ones. The squared off ones are prone to chip because of the edge, but the rounded ones never chipped on me.
Jamie
Sunday 20th of August 2023
Do you think this is safe to do with littles in the house also while pregnant? Did you happen to air out the kitchen as you were doing it or wear a mask?
Lauren
Sunday 20th of August 2023
Hey Jamie! Good questions. I actually did it right before we left the house for a trip so that it had a good long time to air out. I kept the kids out of the house while I did it (because I had a baby at the time) to be safe. I didn't wear a mask, but I'm pretty sure I had the windows open. I don't actually remember the smell, and the manual it says that the epoxy has zero VOCs and no smell, but those are the precautions that I took. I can't say either way whether it is safe for sure though. I'm sorry that I can't be more helpful!
Vicki
Sunday 9th of January 2022
Hi, the only thing I didn’t catch was how you did the back edge of the counter tops. With the self leveling epoxy how did you keep it from pooling at the bottom? My countertop has rounded edges and is all one piece. Any advice?
Lauren
Wednesday 12th of January 2022
Hi Vicki! I didn't do anything special to the back edge. I rolled the flat part with the foam roller and brushed the vertical edges with the brush. I didn't find that it pooled at the bottom. I actually did two different countertops in my kitchen, one of which had a rounded edge and was all one piece. It worked great on that kind of countertop, and didn't chip at all since the edges were rounded and not squared! Good luck!!!
Emily
Tuesday 23rd of November 2021
I'm thinking of doing this for my new home. How how it held up since doing it last year? Any discoloration? Yours looks so pretty! I'm also worried I cant get the veins to look good haha. Thanks for the tutorial!
Lauren
Wednesday 24th of November 2021
Hey Emily! I am not artistic at all, so if I can make the veins look good, you can too!! And you can erase them if you don't like how it looks and try again, so don't worry. The paint held up really well except for a few places. I am going to add pictures of them in the post above, but I had a few chips along the edges of my countertop that wasn't rounded. It was places where someone was putting something on the counter and hit the sharp edge of the countertop, causing the paint to chip off. If your countertop has squared edges, you may want to really sand that edge first to see if you can get better adhesion. The second problem was one place of discoloration from having the crock pot on top. My crock pot apparently gets really hot underneath, and it caused the paint to yellow in that one spot. I should've had a pot holder under it, but I didn't realize it got so hot. Those were my only two places where it didn't hold up well, and both were our own errors. It is a great option if you have really ugly countertops and want them to look nice. Good luck!!
Agnes
Saturday 29th of May 2021
Can this be used on wood? My kitchen island has a wooden top and I’d like to refinish and update it.
Debbie
Tuesday 14th of February 2023
@Agnes, I would seriously consider getting a piece of formica to cover your butcher block first. Then paint that. I. Case you ever want your butcher block back. I would not ruin that. If you want a change, you could sand that down and look at different things gs to stain it that is food safe. Just food for thought. The butcher block would bring value to your home. This product is for those who cannot afford to do something high-end like butcher clock, marble, granite, quartz etc. . Check out some ideas of what you can do with the butcher block first. You could also sell the butcher block and get real marble. Lauren you did a beautiful job. I have laminate countops as well and some of the tile pieces on the edge have fallen off and broke. My problem is choosing a color for them.
Lauren
Saturday 29th of May 2021
Hi Agnes! Yes, the website lists that it can be used on butcher block!