
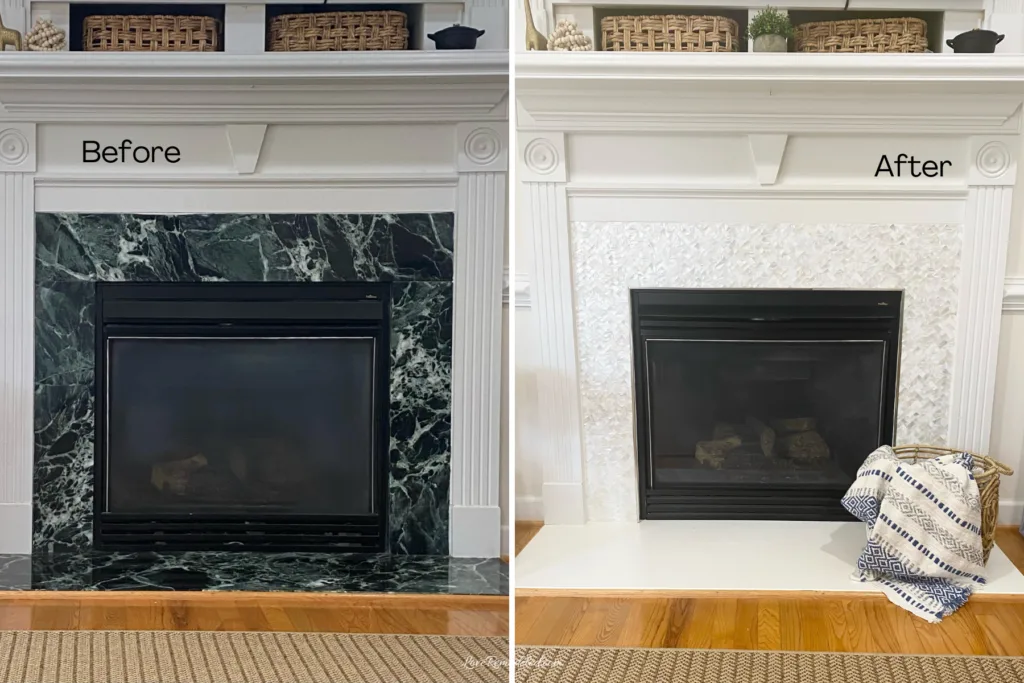
Putting new tile over an existing tile fireplace surround is a great way to refresh the look of your home.
And tiling over tile is a project is something that you can do on your own, in a day or less!
The key to this being a quick and easy tile project is using peel and stick tiles. While this may sound cheap and chintsy, it can actually be really beautiful.
They make peel and stick tiles that are made out of real stone, so they look and feel just like normal tile.
If you’re looking for a way to elevate your fireplace, keep reading for all the details on how to tile over a fireplace surround.

This post may contain affiliate links. If you have any questions, please see my disclaimer page.
Best Tiles for Tiling Over Tile
The first thing you need to do is select the right tiles.
I searched for a long time before finding a tile that was easy to work with, gorgeous, and didn’t require mortar.
The result was finding a few different brands of tile that are real stone fronts with peel and stick backs.
I’ve used vinyl peel and stick backspash tile in the past, and it looked great, but it didn’t have the same feel that real stone does.
So, for my fireplace, I wanted something that was going to be real stone, both so it felt right and held up to the heat that the fireplace produces.
The product that I used on my fireplace surround was called Simplinstall. It is a product sold at Floor and Decor.
If you don’t have a Floor and Decor where you live though, or are wanting something that you can order, Amazon sells a couple different products that are the same thing – real tile with a peel and stick backing.


How To Use Real Stone Peel and Stick Tiles
Real stone peel and stick tiles are great because they don’t require mortar or grout. This means you can cut out two time-consuming, messy parts of the tiling job.
The stone tiles come on roughly 12×12 sheets, with the stone tiles attached to the front of the sheet, and a peel and stick adhesive backing on the back.
The tiles sheets fit together like a puzzle.
You cut the tile sheets to the size you want, peel off the backing and stick them on the existing fireplace surround. It’s really that easy!
But there are a few things you should know.
Cutting Stone Peel and Stick Tile
Cutting real stone peel and stick tile sheets isn’t quite as easy as some say though. While doing my research, I had read that you could cut the tile sheets with a miter saw.
I tried it, and found that the miter saw threw pieces of the tile into the skin on my arms, and didn’t do a great job of cutting.
Trying to make this job as simple as possible, I also tried using tile snips (didn’t work) and a tile snap cutter (also didn’t work).
So, save yourself some time, and just get a cheap wet saw to cut your tiles.
The water from the tile saw didn’t damage the adhesive at all, and it was really simple to cut the super thin tiles.
Steps to Tile Over an Existing Fireplace Surround
Here are the steps that I used to put peel and stick tile over my existing fireplace surround.
The project took me a few hours to complete.

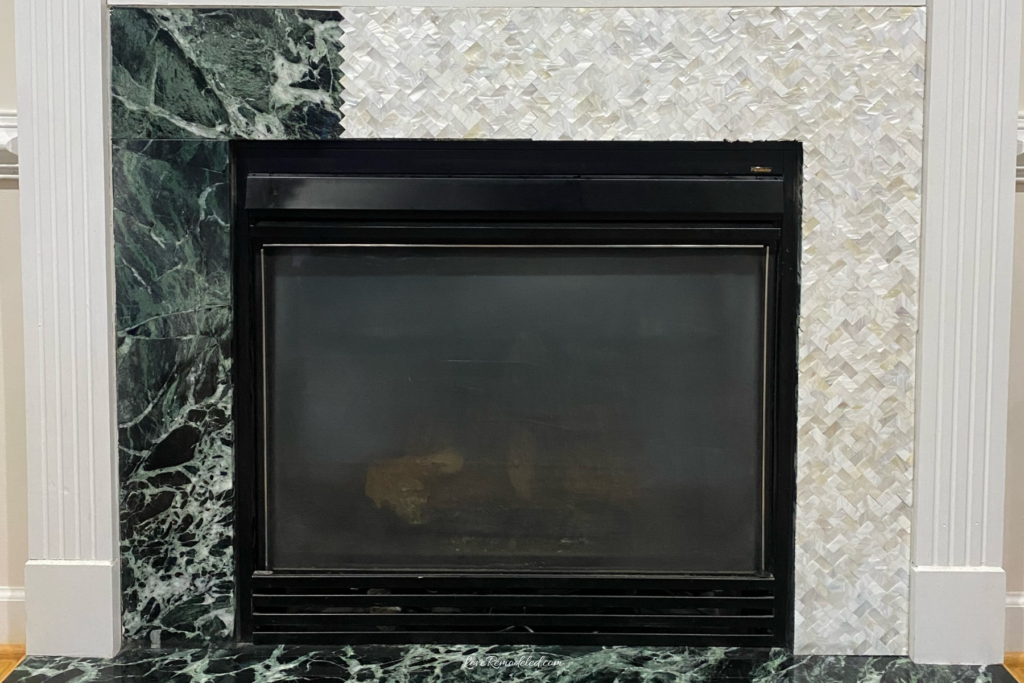
- Measure and cut the tile. I started at the bottom of my fireplace surround and worked my way up. So I cut the bottom of the tile sheet so it would be flat against the floor, as well as the two sides.
- Using your first cut tile as a guide, use a pencil to mark lines on your next tile sheet. You’ll want to align the tiles together they will be once on the fireplace surround, and then use a straight edge to draw your lines. This will ensure that all the pieces fit together well.
- Peel off the backing of your first tile and put it on the fireplace surround. The peel and stick adhesive attaches instantly, and doesn’t allow for much (if any) readjusting. So do the best you can!
- If everything looks good, use your second tile sheet (which should be cut at this point) and mark your lines for your third cut. Again, lay the tile sheets together so that everything will line up once it is on the fireplace.
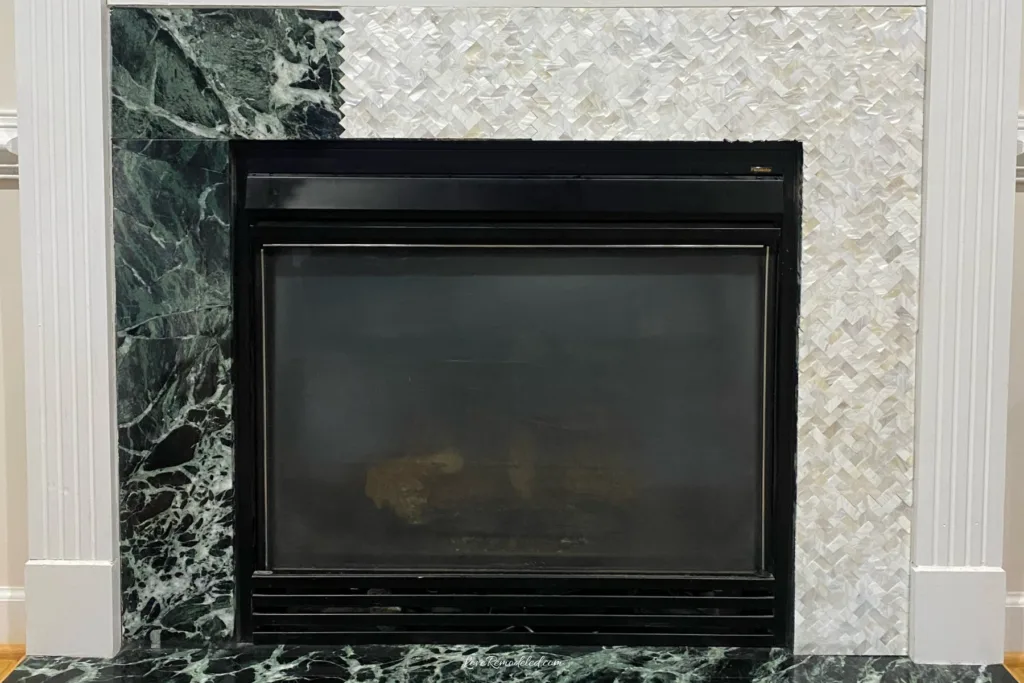
- Continue laying tile sheets, making cuts as needed.
- When you get to the top, you’ll need to make several cuts on the same tile sheet. Just take good measurements. Or, if it is easier, make a cardboard template – but be sure that the tile match up to the ones already on the fireplace.
- After all your tiles are cut and affixed, caulk the edges of the tile to the woodwork around your fireplace. I ran caulk on the top edge, the side edges, and the bottom edge.
- I also caulked in between any lines where the tiles didn’t line up exactly. You can’t see the caulk, and any mistakes are completely invisible now.
- Last, use metal edge strips to cover the inside edge of the tile. These provide a nice, clean edge that looks professional.
Here is a video of how I added tile to my tile fireplace.
At the end of the clip, you’ll see that I made a mistake. I forgot to cut the bottom of the tile sheet where the opening was. So, once it was affixed, I used tile snips to make the additional cuts I needed. Oops!
Finishing Touches on Tiling Over an Existing Fireplace Surround
One important thing to remember.
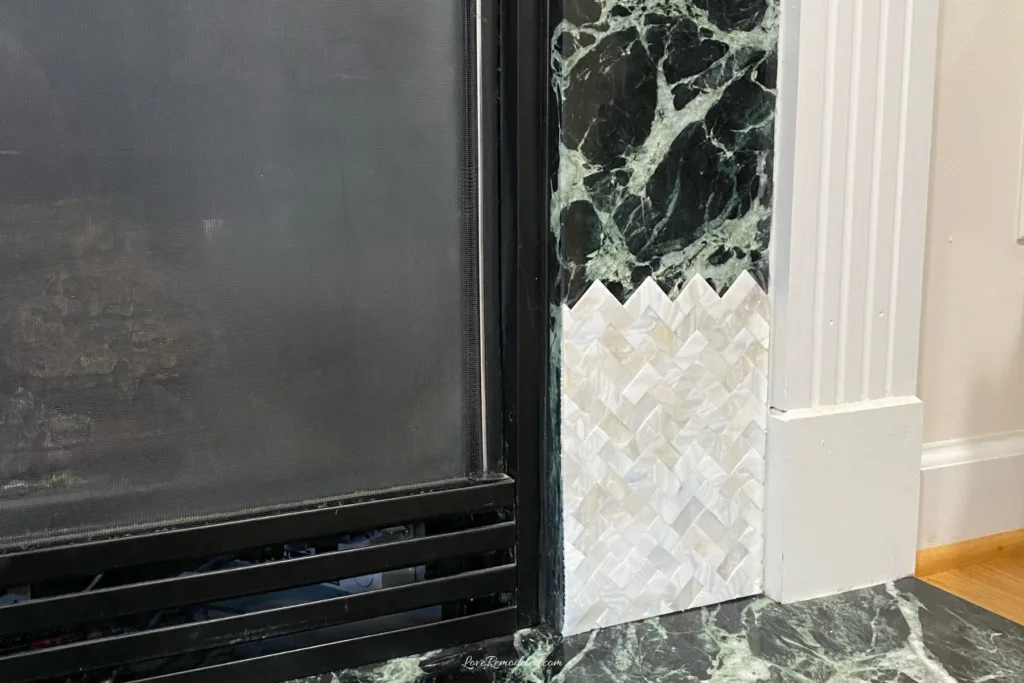
Your cuts don’t have to be absolutely perfect if you’re going to caulk the edges and add metal edge strips. They need to be pretty good, but don’t stress over minor inconsistencies in your measurements, as they’ll be covered by the caulk and edge strips.
Here is my fireplace before the metal strips were added. As you can see, the edges aren’t perfect. But, since the metal strips cover the edges of the tile, you can’t tell after they’re on!

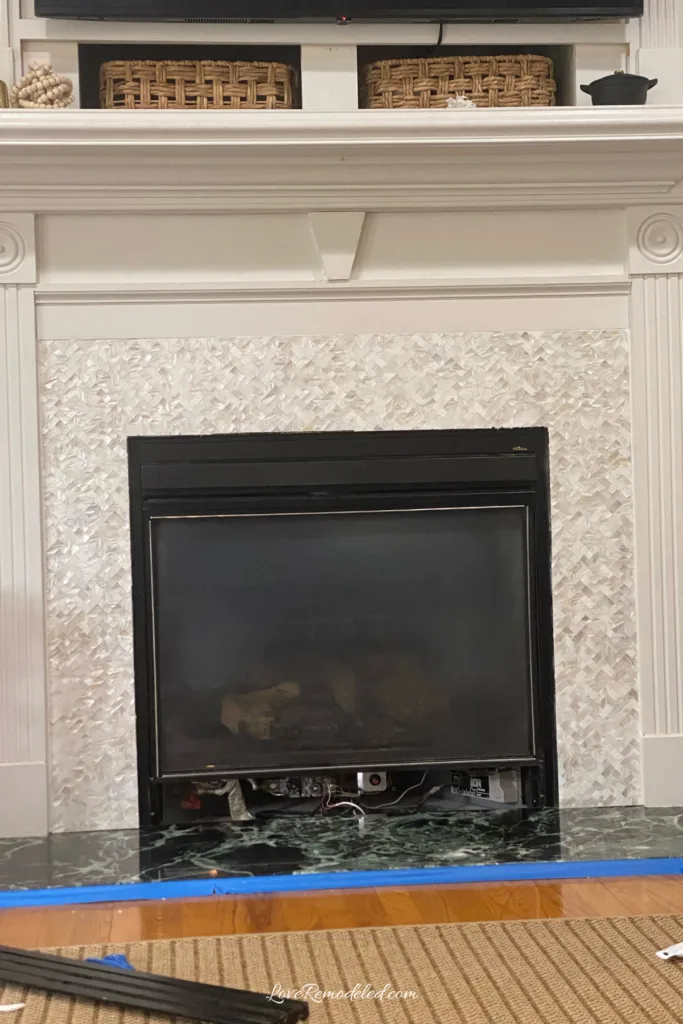
I used blue painters’ tape to make sure my caulk lines were perfect.
For the hearth of the fireplace, I decided against tiling over the existing marble hearth.
I was worried that the mother of pearl tile I had chosen for the surround would break if my children jumped on it. I also didn’t want to introduce a second tile to the project.
I wanted a very clean look, so I ended up just painting it. You can read the tutorial on how to paint marble here.
Final Thoughts on Tiling Over a Fireplace Surround
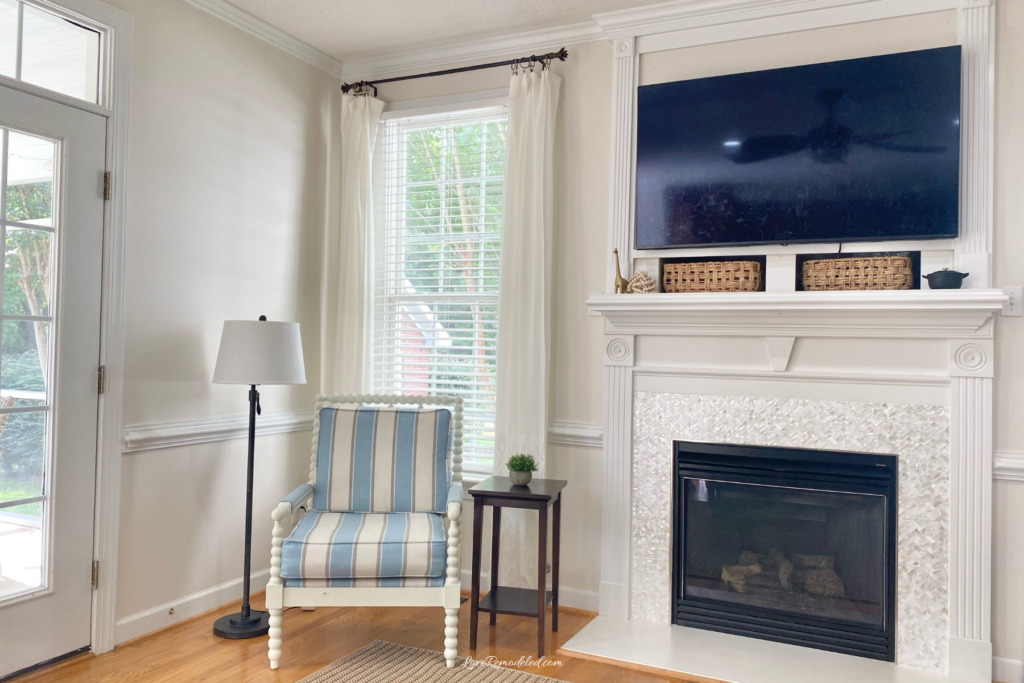
Adding peel and stick tile to the surround of your existing fireplace is a great way to completely transform the look of your fireplace.
This is a pretty easy and fairly inexpensive DIY that takes a few hours of active work.
If you are looking to give your fireplace a makeover, adding peel and stick tile to your fireplace is the fastest and easiest way to get a custom tile fireplace.
Buy your peel and stick real stone tile here!
Kris Dunn
Sunday 24th of August 2025
Beautiful work! You are very talented. I’m motivated and excited to do my fireplace and floor area.
Lauren
Thursday 8th of January 2026
Thank you, Kris!
preet
Friday 26th of January 2024
question: how much did this cost overall for the peel and stick and materials ? Just wondering how cost effective this would be vs painting the marble completely?
Lauren
Saturday 27th of January 2024
Hi Preet! The sheets of tile cost $16 a piece, and I used about 13 of them (I can't remember exactly). Plus I used caulk, and for these tiles, I needed a wet saw. So, for materials it cost right around $200, and a cheap wet saw is around $65-$75. I owned the wet saw already so it only cost me $200, but painting would definitely be cheaper. For under $300 though, I figured I didn't spend too much to make my fireplace look (what I consider to be) really nice. Good luck on whatever you decide to do with your fireplace!
Alison
Sunday 2nd of July 2023
Hello, awesome post! I’ve been researching tile over tile on a fireplace and this seems like a really great option. Do you think there will be any issue with the adhesive when the fire is on? Or does the old tile underneath act like a heat barrier? Thank you!
Lauren
Monday 10th of July 2023
Hi Alison! Thanks so much! I was worried about that too... would it get too hot and the adhesive would peel away, or worse, catch fire!? I haven't had any problems with mine. I did choose a tile that said it was safe for a fireplace. Also, I have a gas fireplace, so it really doesn't have a ton of flames. I'm not sure if a wood burning one would put out more heat? But, I haven't had any issues. My kids ran my gas fireplace all day all winter with no issues with the tile. Good luck! I hope this turns out to be an easy solution for your fireplace!
Lizzy
Friday 23rd of June 2023
Good post. I would use the peel & stick method with real tile, but not vinyl. It may look ok from afar, but not up close. It would be fine for a rental apartment, though.
Denese
Sunday 3rd of August 2025
@Lauren, Would you be able to removed at a later date without causing damage to the underlying marble?
Lauren
Tuesday 27th of June 2023
Hey Lizzy! Thanks! I agree. I have used the vinyl tile in a kitchen before, and it looked great from afar. Close up, everyone always said they couldn't tell, but I could. I really wanted the real stone look and feel for the fireplace. There is a big difference. No one would ever know that my fireplace stone is peel and stick. It feels just as hard and cool as real stone. But yes, for a rental, peel and stick vinyl is a great way to personalize the space (though it can be difficult to remove after some time!).