
Painting a room is one of the fastest and easiest ways to update your home. New paint makes a room feel instantly brighter and cleaner. Plus, it is a cheap way to give your house your own personal style.
Many people choose to hire professional painters to paint the walls in their home. However, painting a room is such a quick and easy DIY!
How I Learned To Paint a Room
The first time I painted a room was when I was in college. I moved back to my parent’s home during the summer and decided to give the bathroom a little refresh. This was before the days when you Google everything, so I asked my dad what to do. He instructed me to wash the walls with soapy water, tape everything off, put drop clothes over all the surfaces, and then to begin painting the walls. The prep alone took hours. When I finished painting that bathroom, I thought, “Never again.”
Fast forward a few years. I made a friend who was a big DIYer. Shortly after, I moved into a home that had some really interesting paint choices. I’m talking, camo looking sponge paint in the bedroom, dark orange walls, and more. During her first visit to my new home, she said, “You’ve gotta paint these walls.”
I told her how much work it was and that it just wasn’t worth it (it was a rental home, after all!). She insisted that it would be easy, and after sleeping in a sponge painted room for a week, I relented.
And it was EASY! We painted almost every room in that house by the time we were done, all with two babies under a year in tow.
So I’ll let you in on all of the secrets I learned then and have perfected over the dozens of rooms I have painted since.
This post may contain affiliate links. If you have any questions, please see my disclaimer page.
Here is how to paint a room – all the best tips for painting interior walls!
Step 1: How To Prep A Room Before Painting
Now, the best practice of prepping a room before painting is probably to wash the walls, put down dropclothes, and tape everything off, like my father instructed (father knows best, right?).
But that is definitely not the fast and easy way to paint a room.
Here is what you actually need to do to prep a room before painting.
- Remove any pictures from the wall.
- Remove the outlet covers and light switch covers from the walls. Sure, you could cut in around the outlet covers and light switches if you really don’t want to remove them, but the paint around them will likely show brush lines. Since outlets and switches are looked at frequently, these lines will be noticed, and give an unprofessional look. Take the few extra minutes to unscrew the covers and your wall will look so much better when you’re done. Plus, you won’t have to scratch any stray paint off of the covers.
- If you are not replacing the pictures you removed, or if you have small holes or dents in the walls, get a putty knife and fill in the holes with spackle. If they’re small, the spackle dries really quickly.
- Put down a drop cloth in the area where you plan to start painting. I’ve tried painting without a drop cloth several times. It is not worth it, and here’s why. When you use a paint roller, teeny tiny paint splatters fly off it as you roll it on the wall. Those paint splatters take forever to remove from the floor when you’re done painting because they don’t pick up easily. Save yourself a headache and put a drop cloth down. Plastic drop cloths are fine, but I really like a fabric drop cloth. The paint dries on them faster than a plastic drop cloth, so it makes less of a mess when you move the drop cloth.
- If you plan on painting the trim in the room, do that now. It is much easier to cut in on the wall than it is on the trim. Here is a DIY trim painting guide, if you need some ideas.
- If necessary, tape the trim and ceiling with painter’s tape. When I prep a room to paint, I don’t tape anything off. I’ve found that, with a little practice, cutting in is actually really easy. But if you’ve never painted before and you’re not confident in your ability to keep the paint exactly where you want it, pick up some tape. It really does make the job easier, though it takes a little extra time on the prep side of things.
Step 2: How To Paint A Room With A Roller
Now that you’ve prepped your room, you’re ready to start painting the room with a roller.
Using a roller is the fastest way to get paint on the walls. It gives the walls a nice even coat, and doesn’t show brush lines, like painting with a brush does.
Steps To Painting A Room With A Roller
- Grab your roller frame and put the roller cover on to it. Before you start to paint the walls, make sure you get any excess lint or fibers off of the roller cover. You can do this by either running your hand up and down it quickly, or by taking a vacuum hose and rubbing it all over the cover.
- Take your big paint can (shaken by the store, and stirred by you once you open it) and pour a generous amount into your paint tray.
- Dip your roller into the paint and roll it up the tray ramp. Roll it up and down several times, though do not continue to get more paint on it. This will allow the paint to coat the roller cover evenly, and will remove any excess.
- Begin to roll the paint roller on the wall. Use long, even, up and down motions, overlapping the paint rolls slightly. When the paint stops coming off the roller and onto the wall, it is time to get more paint on it.
- Repeat steps 3 and 4 until the entire wall is covered in paint. Go as far up on the wall as you can without touching the ceiling. And come as far down on the wall as you can without touching the trim. And roll right beside those outlet and light switch openings. And last, roll as far into the corners as you can.
Remember that this is a first coat. Almost all walls and all paint types require two coats. If you’re covering a dark color, you could need as many as three or four coats. So, don’t panic if you’re still seeing some of the old wall color coming through. You’ll take care of that with the next coat.

Now that you’re done rolling the wall, it is time to start painting with a brush.
Step 3: How To Cut In When Painting A Room
Since you have rolled as far up, down and to the corners on the wall as you can, you shouldn’t have too much to paint with your brush. There should be a strip around 4 inches at the top and bottom of the wall, and a small strip by the corners of the walls.
Grab your brush and begin by painting the corners. This Purdy brush is my favorite!
If you have never cut in on a wall before, you can practice making a straight line without going onto the other wall on the corners. It won’t matter if you get some on the other wall, because you’re going to paint that wall too.
Once the corners are done, it is time to start cutting in with the paint on either the top or bottom of the wall. You can choose whichever you like, but I actually find trimming the top of the wall easier than the bottom.
There are two methods of cutting in when painting a wall with a brush.
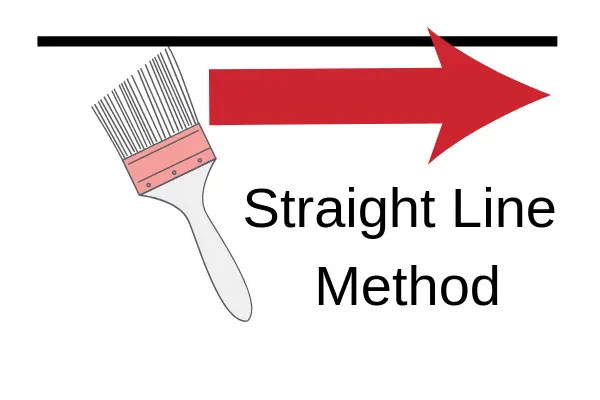
First, you can use a steady line method. Take an angled paint brush, dip the end of it in a small container of paint, and then wipe the excess off on the side of the container. Then, put the tip of the paint brush just a smidge above the trim line or below the ceiling line, and begin to make a line with the paint. Once you see how the paint will brush onto the wall, try again by putting the angled tip right up to the edge of the trim or ceiling, and make a straight line. Then fill in the area under the line you just made and above where you rolled the wall with your roller with paint. Continue to get a small amount of paint on your brush and move down the wall until you’re finished.

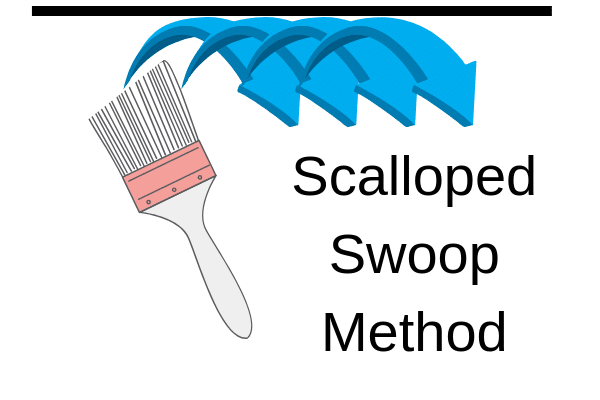
Second, you can use a scalloped swoop method. This is not a technical term, but it is the easiest way I can describe the motion that you’ll use. Dip your paintbrush into the container of paint, scrape off the excess, and swoop up towards the edge line so just the top of the swoop you made hits the edge line. Continue painting up to the edge line in overlapping swoops until the entire area is edged.
Reverse the motion to cut in along the trim on the floor.

You’ll find that one of these methods is much easier for you than the other. So try them both out, remembering to practice on the corners. Once you find your rhythm with it, try it out on the ceiling or trim line.
Now, if you’ve practiced these methods and its still going terribly, or you just don’t even want to mess with figuring out how to cut in, AND you don’t want to bother with taping everything, get yourself one of these edging tools. I’ve found them to work really well, and they make it so anyone can edge a room!
That’s everything you need to know on how to paint a room!
Now that you’ve prepped your room for painting, painted the walls with a roller, and painted the edges with a brush, you’re done! Clean your brush with dish soap and water (or just water if you prefer), and let it dry before using it again. You can also clean your roller that way, but it takes a LONG time to get all the paint out, so you may want to just pitch it.
And that is it!
Painting interior walls is really that simple.
Of course you’ll need to do at least two coats, and frequently I have to do three or four coats on the areas that I brush painted because the paint doesn’t go on as thick. But all in all, painting a room is a really simple DIY that changes the entire look and feel of a space.
If you need some inspiration on colors, check out this whole house color scheme. These amazing neutrals go in any house!
And while you’re doing your research on how to paint walls, find out how to paint really tall walls, or the walls of your stairwell with this tutorial.
Let me know how it goes for you!
How To Paint A Room – A Simple DIY